Photography is an art form that hinges on light. The way light falls on a subject can completely transform the mood, texture, and feeling of an image. Whether you are capturing a portrait, a landscape, or an action shot, the lighting you use has the power to make or break the final outcome. But with so many types of lighting techniques to explore, how do you decide which one is best for your shot?
In this article, we’ll explore the different types of lighting in photography, providing you with practical tips, real-world examples, and a deeper understanding of how to harness the power of light in your work. Whether you’re a beginner or a seasoned professional, mastering lighting is crucial to creating compelling and visually stunning images.
Understanding the Importance of Lighting in Photography
Before diving into the specifics, it’s essential to understand why lighting is so vital in photography. Essentially, light determines the exposure, mood, and texture of your photos. The direction, quality, and color of light can influence how shadows fall, how colors appear, and how the subject is highlighted.
If you think of light as a tool, it becomes clear that it’s just as important as the camera and lens. Without the right light, even the most high-tech equipment can’t help you achieve the desired results. It’s the lighting that creates the magic, and understanding its role is the first step toward becoming a better photographer.
Natural Lighting: The Gift of the Outdoors
When most people think of photography lighting, they often think of natural light. This is the light provided by the sun, which is both free and abundant. But as simple as it sounds, natural lighting can be incredibly versatile, offering photographers the ability to capture a wide range of effects, from soft and flattering to dramatic and moody.
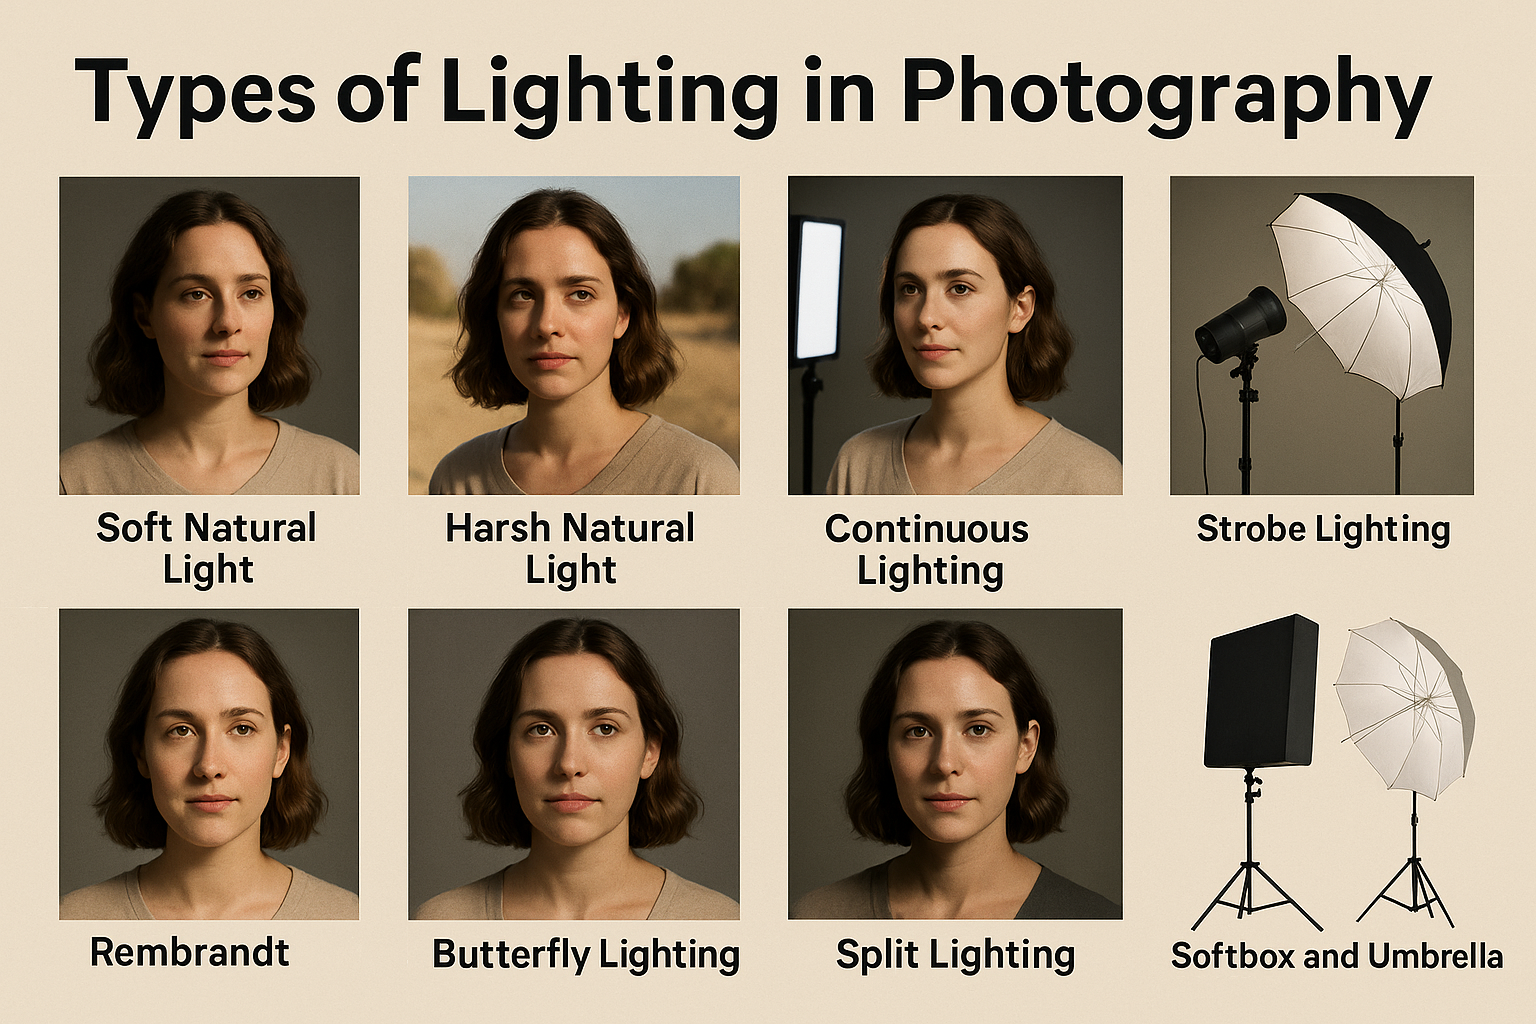
1. Soft Natural Light
Soft natural light typically occurs during the golden hours of the day—early morning and late afternoon—when the sun is low in the sky. During these times, the light is diffused, often due to the presence of clouds or the time of day, which creates even illumination and soft shadows. This kind of light is perfect for portraiture, as it tends to wrap around the subject’s face, providing a flattering effect.
- Practical Tip: If you’re shooting portraits, position your subject so they are facing the light source. Avoid harsh direct sunlight, as it can create strong shadows and unflattering lines on the face.
2. Harsh Natural Light
In contrast, midday sunlight is much harsher. The light is often direct and strong, creating stark shadows and high contrast. While this might seem challenging to work with, it can be used creatively to add drama or intensity to an image. Harsh natural light is often ideal for capturing architectural photography, street photography, or dramatic landscapes.
- Practical Tip: To balance the harsh light, use reflectors or diffusers to soften the light on your subject. Alternatively, embrace the contrast and shadow play to create a high-impact, edgy look.
Artificial Lighting: Control and Flexibility
While natural light is beautiful and free, artificial lighting provides photographers with complete control over their shooting environment. There are various types of artificial lighting that photographers use to achieve specific effects, and understanding how to manipulate them is key to mastering lighting in photography.
1. Continuous Lighting
Continuous lighting sources, such as LED panels, tungsten lights, and fluorescent lights, provide a constant stream of light. These types of lights are ideal for beginners or videographers since they allow you to see the effects of the light in real-time.
- Practical Tip: Continuous lights can be used for both photography and video. Experiment with positioning them to create different moods: placing the light close to the subject creates more intense shadows, while moving it further away softens the effect.
2. Strobe Lighting
Strobe lights, also known as flash lighting, are powerful bursts of light that can be synchronized with your camera’s shutter speed. They are often used in studio photography, particularly for portraits, because they provide a brief, intense light that freezes motion and highlights details with clarity.
- Practical Tip: Strobes are ideal for high-speed photography or when you want to overpower ambient light, such as during a bright sunny day or in a dark studio environment. Play with different light modifiers, like softboxes or umbrellas, to soften or spread the light.
Key Types of Lighting Setups
There are several fundamental lighting setups that are commonly used in photography. Each one can evoke a different mood or style, depending on how the light is positioned in relation to the subject.
1. Rembrandt Lighting
Rembrandt lighting is a classic portrait lighting setup that creates a triangle of light on the subject’s cheek. This lighting technique is named after the Dutch painter Rembrandt, who often used it in his paintings to create depth and dimension. To achieve this look, position your light source at about a 45-degree angle from the subject, slightly above their eye level, and off to one side. This will create soft, flattering shadows and highlight the features of the face.
- Practical Tip: Use a reflector or a fill light on the opposite side of the subject to soften the shadows and reduce harshness.
2. Butterfly Lighting
Butterfly lighting, also known as Paramount lighting, is often used in beauty and fashion photography. This technique places the light directly above and in front of the subject, creating a soft, flattering shadow under the nose that resembles a butterfly. This setup is particularly popular for its ability to accentuate the cheekbones and jawline, creating a glamorous, smooth look.
- Practical Tip: Adjust the light’s distance to control the intensity of the shadows. The closer the light is, the softer the effect will be.
3. Loop Lighting
Loop lighting is a variation of Rembrandt lighting, where the light is positioned at a slightly more front-facing angle to the subject. It creates a small, loop-shaped shadow under the subject’s nose. This technique is flattering for most face shapes and is one of the most commonly used lighting setups in portrait photography.
- Practical Tip: If the shadow under the nose is too harsh, use a reflector below the subject to bounce some light back into the shadow areas.
4. Split Lighting
Split lighting is a dramatic and high-contrast lighting technique where the light is placed directly to the side of the subject. Half of the face is illuminated, while the other half remains in shadow, creating a bold, sculptural look. This lighting style is often used in more artistic, editorial, or cinematic photography.
- Practical Tip: Use split lighting for a more dramatic effect, especially in black and white photography, where the stark contrast between light and shadow adds impact.
Light Modifiers: Shaping the Light
To achieve the perfect lighting for your shots, you often need to shape or modify the light. There are several types of modifiers you can use to soften, diffuse, or direct the light.
1. Softboxes and Umbrellas
Softboxes and umbrellas are the most common light modifiers used in studio photography. They help to diffuse the light, making it softer and more even. Softboxes are ideal for portrait photography, as they create flattering, soft shadows that wrap around the subject’s face.
- Practical Tip: If you want to achieve soft, even lighting, use a large softbox close to your subject. The larger the modifier, the softer the light will be.
2. Reflectors
Reflectors are used to bounce light back onto the subject, filling in shadows and reducing contrast. They come in different colors—white, silver, and gold—each offering a different quality of reflection. Silver reflectors create a harsher, cooler light, while gold reflectors add warmth to the image.
- Practical Tip: If you’re shooting outdoors in natural light, use a reflector to bounce sunlight back onto your subject, eliminating harsh shadows and creating a more balanced exposure.
3. Grids and Barn Doors
Grids and barn doors are used to control the direction and spread of the light. A grid is a honeycomb-like structure that narrows the light beam, creating a spotlight effect, while barn doors are adjustable flaps that can be positioned to limit the spread of light. These modifiers are often used in more controlled, dramatic lighting setups.
- Practical Tip: Use grids to highlight specific parts of your subject or to add emphasis to certain areas of the image. Barn doors are great for creating a focused beam of light in a particular area.
Color Temperature: The Warmth of Light
The color temperature of light refers to the warmth or coolness of the light source, measured in Kelvins (K). Different lighting sources have different color temperatures, and understanding how to manipulate these can significantly affect the mood of your photograph.
- Daylight: Around 5,500K to 6,500K, producing a neutral white light.
- Tungsten: About 3,200K, giving a warm, yellowish light.
- Fluorescent: Typically around 4,000K, often with a greenish hue.
- LED: LED lights can have a wide range of color temperatures, making them highly versatile.
- Practical Tip: Adjust your white balance settings in-camera to match the color temperature of your light source. If you want to add warmth to your portraits, use a tungsten or warm LED light.
Conclusion: The Power of Light in Photography
Lighting is the backbone of every great photograph. Whether you’re working with natural light, artificial lighting, or a combination of both, understanding the different types of lighting and how to control them is essential for producing stunning images. By experimenting with lighting setups, using modifiers, and paying attention to color temperature, you can elevate your photography and transform your creative vision into reality.
With the knowledge of various lighting techniques, you can create portraits with flattering shadows, capture high-contrast moments, and add a dramatic flair to your photos. Always remember that light is your ultimate tool—learn to control it, and you’ll be able to capture breathtaking images, no matter the situation. Happy shooting!


