Good product photography doesn’t just make things look nice — it sells. In a digital world where people can’t touch, hold, or test a product before buying, the photo becomes the product. It’s the first impression, the silent salesperson, and often the deciding factor between a scroll and a click.
And the best part? You don’t need a studio or expensive equipment to get started. With basic tools, a creative eye, and a few essential techniques, you can start producing professional-looking product photos — right from your home.
Let’s break it down step-by-step, in a way that’s clear, practical, and made for beginners who want results.
Understand What Makes a Great Product Photo
Before jumping into gear or setup, let’s define what actually makes a product photo effective. It’s not just about being “pretty” — it’s about clarity, purpose, and persuasion.
A great product photo should:
- Clearly show the product (shape, color, size, material)
- Highlight key features (textures, packaging, usability)
- Create desire (show it in use or in a styled context)
- Build trust (professionalism = credibility)
Different products require different styles. For example:
- Jewelry needs attention to shine and reflection.
- Skincare often benefits from a clean, minimal look.
- Food looks best with warmth and texture.
- Tech prefers sharpness and symmetry.
Start by thinking: What feeling should this product create in the viewer?
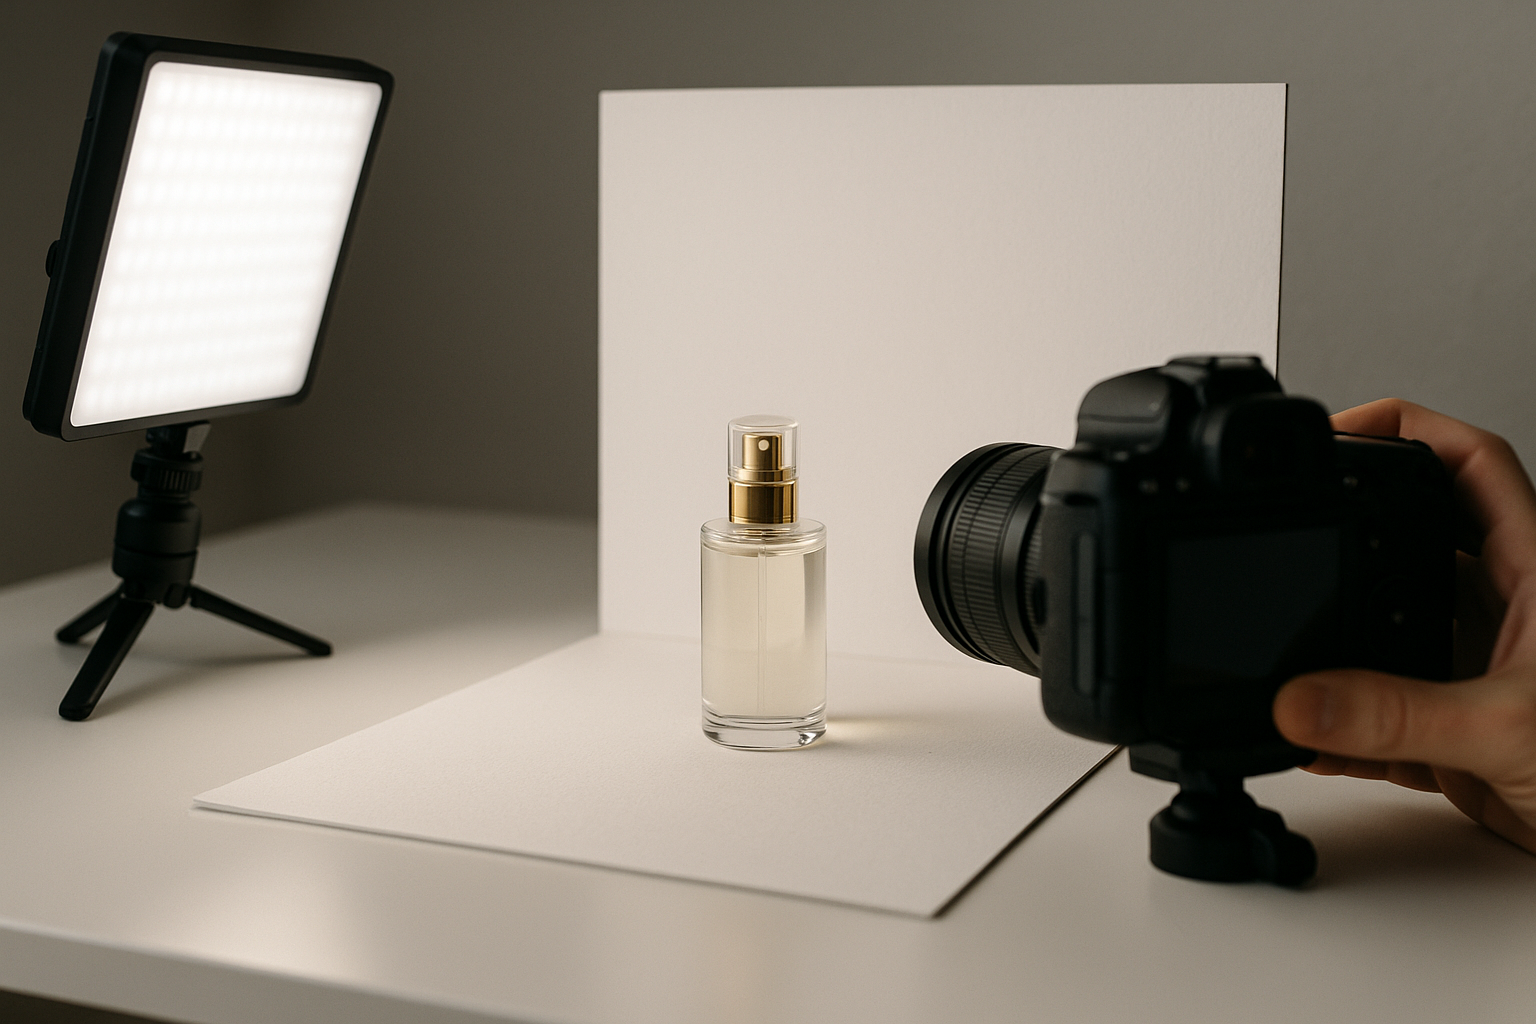
Start With What You Have
You don’t need a DSLR to shoot great product photos. If you have a smartphone with a good camera, that’s enough to start.
What matters more:
- Good light
- Good framing
- Clean composition
- Careful editing
That said, here’s a basic equipment checklist (using affordable or DIY options):
- Camera: Smartphone or DSLR/Mirrorless if available
- Tripod: Even a small, flexible one helps with stability
- Lighting: Natural light or softbox/LED panel
- Backdrop: Poster board, fabric, wood table, or vinyl sheet
- Reflector: A piece of white foam board or even aluminum foil
- Surface: Choose textures based on your product (wood, marble, minimal white)
No fancy studio needed — just good thinking.
Lighting: Your Best Friend (or Worst Enemy)
Lighting can make or break your photo. The good news? You can do a lot with daylight — if you know how to use it.
Natural light setup:
- Choose a spot next to a large window with soft, indirect light.
- Avoid direct sunlight (causes harsh shadows and blown highlights).
- Use a white foam board opposite the window to reflect light and reduce shadows.
- If needed, diffuse the light with a sheer white curtain or paper.
Artificial light setup:
- Use one or two soft light sources (LED panels, softboxes, or ring lights).
- Avoid mixing color temperatures (e.g., warm lamp + cool LED).
- Bounce light off a wall or ceiling to soften it if needed.
Quick tip: Always look at your shadows. Soft, controlled shadows make your product look dimensional and elegant.
Backgrounds Matter (But Don’t Overdo It)
The background should support the product — not distract from it. The cleaner and simpler, the more attention goes to the product itself.
Beginner-friendly backgrounds:
- White or light gray for a clean, e-commerce-ready look
- Black for luxury or drama
- Wooden table for handmade or rustic products
- Colored paper for a modern or playful vibe
Use seamless paper rolls, foam boards, or even tile samples from hardware stores. Tape them to the wall or curve them to create a smooth backdrop.
Avoid: busy patterns, clutter, strong textures that compete with the product.
Composition: Keep It Balanced and Intentional
A strong composition guides the viewer’s eye, tells a story, and makes the product stand out.
Basic composition tips:
- Use the rule of thirds: Don’t always center the product. Try placing it off to one-third of the frame.
- Leave breathing room: Don’t crop too tightly.
- Keep lines straight: Use grid lines in your camera to align horizons or surfaces.
- Highlight details: Zoom in on textures, edges, buttons, or labels.
- Include negative space: Especially useful for text overlays if it’s for social media or ads.
Important: Clean the product before shooting! Dust, fingerprints, or smudges will ruin even the best lighting.
Angle and Perspective: Show the Product Honestly
Different angles tell different stories. The key is to show what matters.
Try these:
- Eye-level: Straight-on view, great for food or packaged goods.
- 45-degree: Slight angle adds depth and realism.
- Top-down (flat lay): Ideal for groups, kits, and styled shots.
- Close-up/macro: For texture, ingredients, stitching, or product detail.
Pro tip: Don’t rely on just one angle. Take 4–6 shots from different perspectives — this increases professional appeal and gives your client or customer options.
Add Context (Lifestyle or Use Shots)
While white-background images are essential for stores and catalogs, contextual images help customers imagine using the product in real life.
Ideas:
- A hand holding the product (for scale)
- The product on a desk, table, or shelf
- Someone applying it, wearing it, or interacting with it
- Paired with complementary objects (e.g., coffee mug with a planner)
This is where creativity kicks in. You’re not just showing a product — you’re showing a feeling.
Control Reflections and Glare
Glossy surfaces like glass, metal, or plastic are tricky. They reflect everything — including you and your camera.
Solutions:
- Use diffused lighting — not direct bulbs or harsh LEDs
- Adjust your shooting angle slightly to eliminate glare
- Use a polarizing filter (if using a camera with filters)
- Surround the product with white foam boards to reflect light evenly
For bottles or products with clear surfaces, fill them with liquid or colored water to make them photograph better and avoid looking empty.
Editing: Clean, Consistent, and Natural
Editing is where everything comes together — but it’s easy to go overboard.
Editing goals:
- Correct white balance and exposure
- Remove minor distractions (dust, smudges)
- Straighten lines
- Crop consistently
- Maintain true product colors
Recommended tools:
- Snapseed or Lightroom Mobile (free and powerful on phones)
- Lightroom, Capture One, or Photoshop for desktop editing
Always compare the edited image with the real product. If the color is off or the image looks fake, you’ve gone too far.
Show Before-and-After Shots (When Relevant)
If you’re working with products that benefit from transformation — like cleaning products, makeup, skincare, or organization tools — consider photographing before-and-after comparisons.
This approach works because:
- It adds credibility (you’re proving a result)
- It provides context (what problem does the product solve?)
- It increases engagement, especially on social media
Important: Make sure lighting and angle are identical between shots. That way, the viewer focuses only on the difference created by the product — not differences in setup.
Create a Visual Style Guide (Even as a Beginner)
If you’re photographing products regularly — for your brand, for clients, or for content — it’s worth creating a simple visual guide to keep everything cohesive.
This includes:
- Preferred background colors
- Lighting setup (natural or artificial, warm or cool)
- Angles to repeat (flat lay, 45º, front-facing, etc.)
- Editing style (warm, neutral, desaturated, etc.)
- Typography or branding overlays (for banners or social posts)
Why does this matter? Because visual consistency builds recognition. Whether you’re shooting five products or fifty, your work should feel like it belongs to the same universe.
Even a one-page style board can keep your shoots sharp and your edits focused.
Work With Limited Space? No Problem
Many beginners think they need a big studio to shoot well. But some of the best product photos are made in tight corners with smart lighting and clean backgrounds.
If you’re working in a small room, here’s how to make it work:
- Use vertical setups: Stack boards behind and beneath the product
- Move furniture and shoot next to a window for better light
- Use clip-on lights or compact LED panels instead of large softboxes
- Keep backgrounds simple and lightweight (foam, fabric, vinyl)
- Rotate the product instead of moving your tripod for different angles
Remember: control matters more than space. A calm, minimal environment will always outperform a cluttered setup.
Don’t Forget to Shoot for Different Platforms
One often overlooked detail — especially for beginners — is that product photography isn’t used in just one format. The same product might need to appear on:
- An e-commerce site (white background, square or vertical)
- Social media (story format, carousels, banners)
- Printed flyers or catalogs (high resolution, layered compositions)
- Marketplaces like Etsy, Amazon, or Mercado Livre (each with different technical standards)
That means you should plan multiple versions of each shot:
- Landscape and portrait orientation
- Cropped and uncropped versions
- Clean studio version and a lifestyle version
Thinking ahead saves time and makes your content more versatile. Even with a small setup, you can deliver a gallery that works across platforms — and that adds huge value to your work.
Practice with Household Items
If you’re just getting started and don’t have clients yet, you don’t have to wait. Practice with what’s around you.
Great starter ideas:
- Bottles, jars, or candles
- Shoes or accessories
- Coffee mugs, kitchen tools
- Books, pens, notebooks
- Food packaging or cosmetics
The goal isn’t perfection — it’s building your eye. Challenge yourself to make something simple look desirable. That’s the real power of good product photography.
Once you get confident, you can start offering your work to local businesses or craft sellers — and begin growing a portfolio.
Final Thoughts: It’s About Clarity, Care, and Consistency
You don’t need to be a professional photographer to take professional product photos. What matters most is:
- That your image communicates the product clearly
- That the viewer feels confidence and curiosity
- That your visual style matches the brand personality
Take your time. Notice details. Don’t rush. Let light, texture, and context work together.
You’re not just clicking a button — you’re building trust with the viewer.
And whether you’re shooting your own handmade goods or helping a small business grow, great product photography has the power to make people stop, feel, and take action.
So grab your light, clear a table, and start clicking — one intentional frame at a time.


