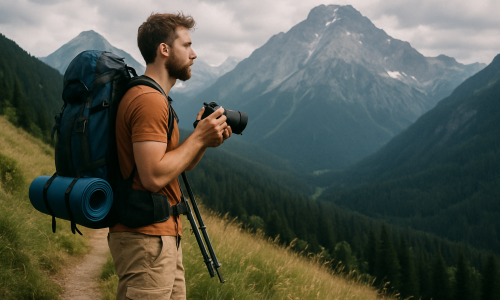
Backpacking is a journey of freedom, discovery, and self-knowledge. For photography lovers, each destination reveals landscapes, people, and moments worth capturing. But unlike conventional travel, backpacking demands lightness, mobility, and strategic choices — including when it comes to photography gear. Learning to balance weight, versatility, and quality is the key to creating impactful images without compromising your adventure. Why Backpacking Photography Is Unique Unlike more structured itineraries, backpacking puts you in direct contact with the unexpected. You might leave a tropical beach and, the next day, be hiking in icy mountain trails. This variety makes each shot special — and challenging. Scenes are more authentic, encounters more spontaneous, and stories more vivid. Shooting in these conditions requires a sharp eye and quick reflexes, since there’s not always time to set up gear. On the other hand, every image tends to be more emotional and true to the moment. Choose the Ideal Gear Choosing your camera and accessories must take into account your backpack weight, equipment durability, and practicality. Here’s what to consider: Advanced Compact Cameras Models like mirrorless or premium compacts (such as the Sony RX100 series) offer high image quality with less weight. They’re perfect for those who want performance without the bulk. Versatile Lenses Take only one lens, two at most. A zoom lens like 18-135mm or 24-70mm works well for landscapes, portraits, and details. For maximum portability, a fixed 35mm or 50mm lens is ideal. Lightweight, Foldable Tripod Choose mini tripods or carbon fiber models. These help with night shots, self-portraits, and creative compositions without adding much weight. Smart Accessories Plan Without Losing Your Freedom Even in a free-flowing trip, it’s useful to scout a few places you’d love to photograph. Use tools like Google Maps, Pinterest, or Instagram to get visual inspiration for the places on your route. Still, leave room for spontaneity. The best photos often come from unexpected moments — a local market, a child’s laughter on the street, or a host inviting you in for coffee. Always be ready. Composition Tips That Work Anywhere Rule of Thirds Divide the frame into nine parts and place your subject at one of the intersections. This adds balance and dynamism. Natural Framing Use doors, windows, arches, foliage, or rocks to frame your subject. It adds depth and guides the viewer’s gaze. Leading Lines Paths, roads, fences, rivers, or shadows can lead the eye to the main subject. Use People for Scale Include a traveler (yourself or others) in landscape shots to show the grand scale of the scenery. How to Shoot Light Yet Expressive Maximize Natural Light Avoid carrying artificial lighting. Aim to shoot during sunrise or sunset. Golden hour enhances faces and landscapes with a warm, professional look. Use Your Phone Strategically If gear weight is an issue, invest in a phone with a great camera. High-end models offer manual control, HDR, RAW, and even long exposure. The key is mastering the settings and sharpening your eye. Be Quick on the Trigger On streets, markets, stations, or local festivities, you often have only seconds to catch real, moving moments. Keep your camera accessible with pre-set configurations. Step-by-Step Guide for a Backpacking Photo Journey Photography as a Bridge to the World Beyond documentation, photography during backpacking is a form of connection. When you pause to observe, listen, and wait for the right moment, you absorb more of the place, its culture, and its people. More than that — the camera often acts as a bridge. It sparks conversations, opens doors, and evokes curiosity. Showing someone a photo you just took can trigger smiles and create bonds with people you’ll remember forever. Edit Lightly, Share Authentically You don’t need to spend hours editing on the road. Use fast apps like Snapseed or Lightroom Mobile. Tweak exposure, contrast, warmth, and sharpness. Maintain the natural look of the scene. When posting, write captions that complement the image. Talk about how you felt, what you learned, who you met. It brings the photo to life and builds a connection with your audience. The Emotional Baggage Photos Carry At the end of your backpacking journey, the photos will be much more than memories. They’ll be reflections of your growth, courage, and the landscapes that marked your soul. Light in weight, heavy in meaning. Carry your camera as an extension of your vision. Learn to say more with less. And keep moving, capturing the world as it unfolds — leaving trails, but also eternal footprints in the memory of those who see your work.

How to Photograph Sunrises and Sunsets During Your Adventures
Capturing sunrises and sunsets is one of the greatest rewards for photographers passionate about landscapes. These fleeting moments bring a unique combination of light, color, and emotion, turning ordinary scenes into memorable images. However, getting the best results requires more than just pointing the camera at the horizon. Great photography demands technique, planning, and sensitivity. Understanding Golden Hour Light The so-called “golden hour” refers to the time shortly after sunrise and just before sunset, when sunlight is softer and warmer. This kind of lighting is extremely favorable for photography because it creates long shadows, warm tones, and softer contrasts. During this period, the sun sits low in the sky, creating a magical atmosphere. Observing how light strikes landscape elements—like trees, mountains, or bodies of water—is essential to finding the best framing and highlighting the right details. Choose Your Location in Advance One of the key factors in photographing sunrises or sunsets is preparation. Choosing the right spot beforehand makes all the difference. Use apps like Google Earth, PhotoPills, or The Photographer’s Ephemeris to plan your position in relation to the sun. Look for elevated, open areas with few horizon obstacles. Beaches, mountains, open fields, or desert regions are excellent options. Avoid urban areas with visual clutter that may distract from the natural beauty of the scene. Essential Gear to Bring To be well-prepared for this type of photography, make sure you bring the following items: Explore Different Compositions While it may be tempting to center the sun in your photo, more creative compositions can yield more impactful results. Use the rule of thirds to position the sun at one of the intersecting points and take advantage of natural lines—like paths, rivers, or mountain silhouettes—to guide the viewer’s eye through the image. Add foreground elements—such as rocks, trees, or people—to create depth and interest. Morning mist or evening clouds can also add dramatic layers to the scene. Ideal Manual Settings Shooting in manual mode allows you to control all aspects of your image. Here are suggested settings: Use your camera’s histogram to assess exposure. Avoid peaks on the far left or right—signs of under or overexposure, respectively. Always Shoot in RAW Always shoot in RAW format, as it allows you to recover detail from shadows and highlights. It also offers greater flexibility in editing without sacrificing image quality. Step-by-Step Guide for Perfect Shots Keep It Steady During sunrise and sunset, light is low and shutter speeds are slower. A tripod is crucial for avoiding camera shake and ensuring sharp images. If possible, use a timer or remote shutter release to avoid vibrations when pressing the shutter button. Get Creative with Filters Filters can transform your image: Thoughtful Editing After capturing the shot, post-processing is key. Use software like Adobe Lightroom or Capture One to adjust exposure, contrast, saturation, and highlights. Avoid going overboard—the goal is to enhance natural beauty, not create artificial effects. Patience Pays Off Not every day will have the perfect sunrise or sunset. Weather, clouds, or atmospheric pollution can interfere. Landscape photography requires patience and returning to the same location at different times. With practice and observation, you’ll develop a more refined eye and produce increasingly striking images. Tell a Visual Story A photo doesn’t just have to be beautiful—it should tell a story. A hiker watching the sun, a shadow cast on the mountains, a calm lake reflecting golden clouds… all of this adds emotion and context. When publishing your images, consider complementing them with short stories or reflections. This creates an emotional connection with your audience and expands the impact of your work. A Light Touch and a Sharp Eye Photographing sunrises and sunsets is more than capturing light. It’s about translating the fleeting beauty of time into images that evoke feelings and memories. With preparation, technique, and passion, you’ll be able to eternalize nature’s daily show in photographs that speak for themselves. Clear skies, calm winds, and may your clicks always be intense and authentic. In those moments when the sun touches the horizon, the world seems to pause. And in that second, with camera in hand, you can freeze time’s poetry.

How to Take Amazing Photos in Mountains and Viewpoints Without Professional Equipment
Photographing mountain landscapes and viewpoints is an experience that combines adventure, contemplation, and creativity. Mountains are majestic, full of texture, light, and shadow, offering perfect scenery for those looking to capture impactful images. But contrary to popular belief, you don’t need professional gear to achieve great results. With a keen eye, some simple techniques, and accessible resources, it’s totally possible to take impressive photos using just a smartphone or a compact camera. This guide will show you how to make the most of the potential already in your hands and record the grandeur of the mountains with creative compositions, striking lighting, and sharp framing. Prepare Before the Climb Before taking any shots, planning is essential. Climbing a mountain or reaching a viewpoint requires physical and mental preparation, but also a photographic strategy. Also, dress appropriately. Take waterproof clothing if there’s a chance of rain, sunscreen for open trails, and always carry water to stay hydrated. Choose the Best Viewpoints The top is not always the best place to shoot. Often, the most expressive scenes are found along the way. Areas with elevation changes or sparse vegetation often provide clearer views and balanced lighting, offering unique angles to capture the immensity of the landscape. Compose with Intelligence Even without a professional lens, good composition enhances any photo. Follow classic principles and unleash your creativity. Another powerful technique is using “leading lines” to draw the viewer’s eye to the focal point. Trails, fences, shadows, and waterways work great for this purpose. Work the Light to Your Advantage Light is the raw material of photography. Knowing how to handle it makes all the difference. When shooting early in the morning, you might find fog in the valleys. Take advantage of this to give your photos a dreamy feel with well-defined layers. Adjust Framing on Your Phone Even without interchangeable lenses, you can simulate effects with framing and focus. Also, use your phone’s built-in editing tools right after the shot. Simple contrast and brightness tweaks already make a big difference. Take Advantage of Natural Conditions Mountains offer a variety of climates and atmospheres that enrich photography. Create a Visual Story Mountain photography is not just about showcasing the highest point. It’s about telling a story of achievement, journey, and experience. Extra Tips to Make Even Simple Photos Incredible Safety Comes First When chasing the best shot, don’t compromise your safety. Your safety should always be more important than the perfect image. The best shot is the one captured in peace and well-being. The Power of a Great Mountain Photo A well-composed mountain photo conveys more than just beauty. It inspires, moves, and challenges. It shows the majesty of nature and the human drive to reach new heights. With simple tools and a trained eye, you can turn your travel records into something truly memorable. Each visited viewpoint and conquered peak is a unique opportunity to see the world from a new perspective — and to share that view through photos that don’t need professional gear but are filled with emotion and intention. Finally, remember: it’s not the gear that makes the photographer, but the ability to observe, compose, and connect with the environment. With practice and dedication, your mountain and viewpoint images will have professional quality — even without professional equipment.

Photographing in Humid Environments: Essential Precautions at Waterfalls and Rivers
Nature photography is one of the most enriching ways to explore the world, especially when it involves humid environments such as waterfalls, rivers, and rapids. These scenes are visually stunning, offering an abundance of colors, movements, and textures. However, shooting in these locations requires extra attention to equipment, the environment, and proper techniques. To ensure impactful shots while protecting your gear, it’s essential to follow best practices before, during, and after your sessions. This guide is designed to help both beginners and professionals enhance their skills in this photography niche. Understand the Risks of Humid Environments Waterfalls and rivers present specific challenges. Beyond the water itself, it’s common to deal with splashes, constant mist, airborne humidity, slippery surfaces, and rapidly changing light conditions. Constant exposure to moisture can cause internal damage to gear, affecting lenses, sensors, and camera electronics. Moreover, safety conditions are critical. Many of these locations require hiking on trails, navigating slippery rocks, or crossing small streams, which demand planning and caution. Planning Before You Head Out to Shoot Before any photography expedition in a humid environment, follow this checklist: Recommended Equipment for Humid Environments Choosing the right gear can save your shoot and preserve your photography equipment. Weather-sealed cameras Many advanced DSLR and mirrorless cameras offer splash and dust resistance. Still, this doesn’t mean they are waterproof. Avoid direct exposure to water and always use additional protection. Sealed lenses and protective filters Choose moisture-resistant lenses and use UV or ND filters to protect the front element. ND filters are especially useful for creating a “silky water” effect. Polarizers also help eliminate unwanted reflections from water surfaces. Sturdy tripod with good grip Avoid overly lightweight tripods. Prefer aluminum or carbon fiber models with rubber feet or retractable spikes for rocks and uneven surfaces. Quick-release legs save time and boost safety. Rain covers for cameras and bags Use adjustable rain covers designed for cameras that allow normal use even during drizzle. Heavy-duty plastic bags with rubber bands can also work in emergencies. Techniques for Photographing Waterfalls and Rivers Environments with constant water movement demand unique techniques to achieve captivating results. Long exposure effect To turn flowing water into a silky visual effect: Freezing motion To capture the details of water splashes: Composition with natural elements Use natural frames such as branches, trunks, or rocks. Add foreground elements for depth. Try layered compositions to create richer, more interesting visuals. Embrace diffused light Mist and tree cover provide soft light that reduces harsh shadows—ideal for highlighting natural colors and textures. Manually adjust white balance to maintain color fidelity. On-Site Safety and Care The safety of both the photographer and the gear should always come first. Post-Session: Cleaning and Care After your shoot: Exploring Details: Textures and Micro Elements Waterfalls and rivers are full of hidden details: Use macro lenses to capture these often-overlooked beauties. Adjust aperture to highlight your subject with selective focus. Interaction with Nature: Respect and Responsibility Photographing natural environments is also an act of respect: Every photo taken in a natural location carries the responsibility of protecting that space. Capturing Emotion in Cold and Wet Environments Although they may seem unwelcoming, humid environments are highly expressive. Capture: Including people in your shots can make them more powerful and evoke genuine emotion. A Living Universe to Be Photographed Photographing waterfalls and rivers is more than mastering technique. It’s about immersing yourself in the raw energy of these places. It’s waiting for that perfect moment when light pierces through the curtain of water revealing hidden hues. It’s leaving drenched but with memories captured forever in pixels. Whether building a professional portfolio or simply recording your adventures, following best practices and caring for your gear makes all the difference. After all, nature rewards every image made with respect and passion.

How to Capture Nature’s Colors and Textures During Your Travels
Traveling is an experience that goes far beyond destinations. It is an immersion in landscapes, cultures, and sensations that deserve to be captured in the best possible way. When we talk about nature, we are dealing with a universe of colors and textures that can turn a simple photo into a true work of art. Capturing this richness, however, requires much more than pointing a camera and pressing the shutter. In this article, we’ll explore how to faithfully and impactfully capture the colors and textures of nature during your travels. From preparation before the shot to the final tweaks in editing, you will discover essential techniques and tips to take your photography to the next level. Understand the Importance of Natural Light Light is one of the most important elements in photography, especially when we talk about colors and textures. The light of sunrise and sunset, known as the “golden hour,” provides warm tones and soft shadows that highlight every detail of the natural environment. Avoid shooting at noon when the light is harsher and flattens textures. Prefer the early hours of the morning or late afternoon when the light is more diffused and colors gain depth. Choose the Right Equipment You don’t need the most expensive gear on the market to take great photos, but understanding what each tool offers is essential. Work on Composition Composing an image intelligently is essential for highlighting colors and textures. Know How to Choose Colors Nature is rich in colors and contrasts. Knowing how to highlight these elements can transform your photos. Use Aperture and Depth of Field to Your Advantage A wide aperture (f/1.8, f/2.8) blurs the background and highlights the texture of a focused element. It’s ideal for photos of flowers, insects, or leaves. A smaller aperture (f/8, f/11) increases depth of field and is excellent for landscapes, allowing all elements to remain sharp. Textures: How to Capture Them Accurately Textures add a sense of reality to the image. The viewer can almost feel the surface depicted. Always Shoot in RAW When Possible The RAW format preserves much more information than JPEG, which is essential for working with colors and textures in editing. In post-production, you can adjust white balance, contrast, highlights, and shadows without losing quality. Be Patient and Observant The best shot doesn’t always happen right away. Nature photography requires observation, waiting, and connection with the environment. Wait for the right light, the wind’s movement through the leaves, the ideal reflection in the water. Sit down, observe, and understand nature’s rhythm. Practical Tips While Traveling Create a Visual Narrative Instead of isolated photos, think of a series of images that tell a story. This makes your photography more engaging and meaningful. Show the path to the waterfall, the trail details, footprints on the ground, leaves on the floor. Every detail contributes to a richer narrative. Go Beyond the Obvious: Explore Unusual Angles Change your perspective: shoot from below, from above, crouch, climb rocks. Nature seen from different angles reveals patterns and textures invisible to the naked eye. This kind of creative approach catches attention and makes your images unique, even in locations frequently photographed by other travelers. Use Weather Conditions to Your Advantage Many people avoid photographing on cloudy or drizzly days. But these conditions create a special atmosphere in your shots. Fog can add a mysterious touch. Rain intensifies colors, especially the greens of vegetation. After rain, droplets on leaves and puddles on the ground are details that create fascinating compositions. Capture Nature’s Movement Flowing water, swaying leaves, birds in flight. Use varying shutter speeds to freeze or soften movement. These techniques help convey life and dynamism in your images. When Nature and Emotion Meet Capturing nature’s colors and textures is also capturing emotion. The most impactful photos are those that make the viewer feel something. So, more than just technique, pour your passion and personal vision into every click. Let your images speak for you and show the world what your eyes uniquely saw. Nature is an inexhaustible source of inspiration. And you, with sensitivity and knowledge, can turn it into unforgettable photographic art.

30-Day Project: One Photo a Day Using Natural Light at Home
Creating daily is one of the most powerful ways to develop your photographic eye, build creative discipline, and heighten sensitivity to light. When this process is done using only natural light and the comfort of your own home, the experience becomes even more intimate and revealing. A 30-day challenge, with one photo per day, is more than just a routine — it’s a deep perception exercise that can completely transform the way you see the everyday. It’s a mistake to think that shooting at home limits creativity. In truth, the home is filled with narrative potential. The light coming through the window, a reflection on the wall, the steam from your coffee, the shadow of a plant… all of it can become a powerful image when viewed with care. A project like this invites you to observe more, experiment freely, and discover beauty in simplicity. Why Start a 30-Day Photography Project? There are many benefits to committing to a continuous creative challenge, especially one limited to using natural light and your domestic environment. 1. Builds a creative habit Daily practice encourages consistency and helps overcome creative blocks. Photography becomes part of your daily rhythm. 2. Sharpens your eye for light Natural light changes constantly with the time of day and seasons. Observing it daily teaches you how to use it more expressively. 3. Helps you see beauty in the ordinary The challenge of photographing your home for 30 days forces you to see familiar things with new eyes. What once seemed invisible now becomes a focal point. 4. Creates a cohesive body of work By the end, you’ll have a complete visual narrative — a series with its own identity, voice, and photographic language. Getting Ready for the Challenge Before you begin, it helps to prepare both technically and creatively so you can stay consistent throughout the month. Choose your camera Use a DSLR, mirrorless, or even a smartphone — the key is to feel comfortable with your gear and be able to control exposure. Ideal lenses Editing Decide in advance if you’ll edit your photos or keep them raw. If editing, use a consistent style or preset to give the series visual unity. Project Structure: One Photo Per Day To support your creative flow and avoid burnout, here’s a suggested thematic structure for the 30 days. You can follow it exactly or adapt it to your own rhythm and intuition. Week 1 – Observing Light This week focuses on training your eye to notice light. Don’t worry about complex compositions yet — just feel how light behaves in your space. Week 2 – Exploring Texture and Form Here, you’ll start refining composition by noticing how light reveals surfaces, shapes, and depth. Week 3 – Narrative and Emotion This week challenges you to go beyond aesthetics and focus on storytelling and emotional connection. Week 4 – Synthesis and Personal Style The final week is a creative synthesis. By now, you’ll have a better sense of what you enjoy, how you see, and your personal visual identity. Tips for Staying Consistent When Home Becomes the Best Studio After 30 days, what you’ve created won’t just be a gallery of images — it will be a new way of seeing. By observing the light that enters your home day after day, you also open yourself to its presence. Photography becomes less about technique and more about lived experience. This project doesn’t require travel, models, or fancy locations. It invites you to take a personal journey through your own lens. Natural light becomes your creative partner. The daily repetition doesn’t lead to boredom — it reveals nuance. Each corner of your home begins to feel new again. And you realize that photography is everywhere — you just have to learn to see it.

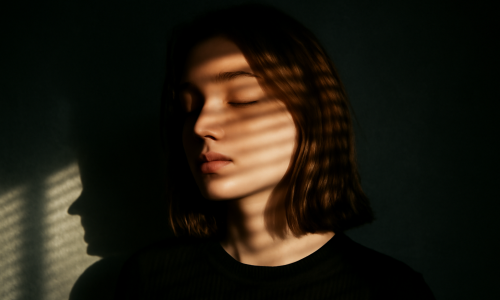
Using Natural Reflections to Create Stunning Photographs
Reflections are one of the most accessible and fascinating tools for enriching a photograph with visual layers, texture, and meaning. When explored with intention and sensitivity, natural reflections become a powerful resource for creating surprising, often poetic and unexpected compositions. They can appear in puddles, windows, mirrors, cups, screens, or even metal surfaces — anything that interacts with light can become the foundation for a unique visual creation. Using natural reflections with purpose is an excellent way to train your photographic eye. It teaches you to look beyond the foreground, to include what is invisible at first glance, to play with perspective and symmetry. In this article, we’ll explore how to use natural reflections to turn everyday scenes into expressive works of art. The Power of Reflections in Photography Reflections are not just visual duplications. They serve as: Reflections don’t just mirror the world — they reveal feelings, atmospheres, and often dualities present in a moment. Where to Find Natural Reflections You don’t need elaborate settings to work with reflections. They’re everywhere in daily life. All it takes is a shift in angle, a pause to observe, and a willingness to let the light lead the way. Common sources of natural reflections: The secret is to notice how natural light interacts with these surfaces and what kind of image is revealed — often more interesting than the object itself. Creative Photography Projects Using Natural Reflections Below are practical, artistic ideas for using natural reflections to create engaging and expressive images. 1. Parallel Worlds in Puddles Rain puddles, especially right after a downpour, create visual portals. They reflect skies, buildings, people, and trees in poetic, distorted ways. How to explore: This kind of photography is ideal for creating surreal, layered narratives that feel almost magical. 2. Reflections in Windows: Inside and Out Windows act as transparent screens, blending the inside and outside worlds. When photographing reflections in windows, you can overlap realities and create images full of meaning. Step-by-step: This project is perfect for creating urban, nostalgic, or cinematic imagery. 3. Fragmented Self-Portraits with Reflections Capturing your own image in uneven or imperfect surfaces is a powerful way to take self-portraits beyond the literal. The goal isn’t to show your face clearly, but to play with fragmentation, distortion, and visual identity. Tips: This project is great for artistic self-exploration through abstract and creative framing. 4. Reflections in Transparent Surfaces Glasses, dishes, and other transparent objects offer unique opportunities for capturing subtle, often abstract reflections. How to do it: These photos work well in minimalist or moody photography series with a sensory, tactile quality. 5. Compositions with Double Meaning One of the most compelling aspects of reflections is the ability to tell two stories in a single image. By overlapping the reflected and real subject, you can create compositions full of symbolic or poetic meaning. Suggestions: This kind of project requires patience and pre-visualization, but the result is often powerful, layered, and emotionally evocative. Technical Tips for Working with Reflections Photographing natural reflections demands control over light, angle, and focus. Here are some recommendations: What Reflections Reveal About the Photographer’s Eye Photographing reflections is a practice of expanded vision. You’re not just photographing what’s in front of you — you’re capturing what whispers around it. You’re showing that reality isn’t singular, and that a photo can hold more than one viewpoint. As you train yourself to see reflections, you begin to notice the world with greater depth. What once seemed invisible becomes impossible to ignore. A dusty mirror, a rain-soaked street, a shop window — they all become creative opportunities. These projects also help you develop a photographic signature. After all, to reflect is also to interpret. And every photographer will see something different in the same surface. To create with reflections is to accept the light’s invitation to play, distort, overlay, and surprise. And once you start accepting that invitation, it becomes hard to see the world the same way again.

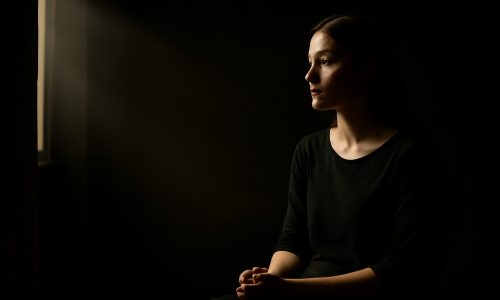
Turn Lack of Light into Art: Projects to Train Your Eye
When we think of photography, we often associate the act of capturing images with abundant light. It’s understandable — the very word “photography” comes from Greek and means “drawing with light.” However, it is precisely in low-light situations that our vision becomes sharper. Photographing with minimal light is not a limitation — it’s a creative lab. A space where perception, sensitivity, and composition take center stage. Developing photography projects in low-light conditions is one of the most effective ways to train your eye. Instead of relying on bright sources or expensive gear, you’re challenged to see beyond the obvious — to create using what’s available. And when that limitation meets natural light, the result can be surprisingly expressive. The Beauty in What’s Missing Contrary to what many believe, total darkness is not necessary for these kinds of projects. The key lies in scarcity: that soft beam of sunlight cutting through a gap, the subtle glow on a wall, or the gentle reflection of street light creeping into a room. These nuances are powerful invitations to create. A lack of light unveils hidden textures, enhances contours, and creates moods that wouldn’t be possible in fully lit environments. It invites you to slow down, to observe more carefully, and to compose with intention. Why Train Your Eye in Low-Light Environments? 1. Enhances Contrast Perception In darker scenes, the difference between lit and shadowed areas becomes more apparent. This teaches you how to highlight key elements in a composition and balance the visual weight in your frame. 2. Improves Scene Observation Low-light conditions require more patience. You must watch how light behaves — where it hits, how it spreads. This builds awareness and improves creative decision-making. 3. Creates Powerful Atmosphere Minimal light carries emotional weight. It can suggest solitude, stillness, intimacy. Learning how to work with such light is a great way to craft images with strong mood and storytelling. Creative Projects to Explore Natural Light Scarcity Below are several hands-on photography project ideas that will help you turn a lack of light into artistic expression — while developing a more refined and sensitive photographic eye. 1. Light Hunt: A Daily Micro Project Set aside 10 to 15 minutes each day to observe areas in your home (or another accessible space) where subtle natural light appears. It could be light peeking through a door crack, a curtain’s shadow on the wall, or a faint reflection. The exercise is to capture only one detail per day. How to do it: Over time, this project reveals hidden light patterns in your space and teaches you to see beauty where most would overlook it. 2. Self-Portraits in Low Light Nothing improves your eye more than becoming the subject yourself. Creating self-portraits in low-light settings allows you to experiment with limited natural light while learning about composition, expression, and light control. Step by step: This project builds emotional depth and aesthetic control. The results are often intimate, poetic, and visually striking. 3. Dramatic Still Life Scenes Use ordinary objects to build still life compositions in dark spaces. The key is to take advantage of side or overhead natural light to create dramatic shadows with simple items like fruit, flowers, or a teacup. Steps: This exercise trains your sense of balance, light direction, and negative space — and it’s an excellent entry point for learning about visual composition. 4. Shadows as Main Subject What if, instead of avoiding shadows, you made them the star? In dark settings, the shadows cast by natural light can become almost painterly. How to explore this: This project pushes your creative limits and teaches you to look at what’s “not there” — the invisible becoming visible through the light it blocks. 5. Low-Light Everyday Narratives Create a visual story about ordinary daily actions in low light: making coffee, journaling, making the bed, putting on shoes. Use only the available natural light and compose with intentional storytelling. Tips: This approach is excellent for developing timing and narrative through photography, while learning to find beauty in life’s small, quiet moments. Technical Notes to Support the Process Even without artificial lighting, you can optimize your images with thoughtful technical choices: When Light Speaks Louder in Silence Low-light projects aren’t just technical challenges — they’re sensory experiences. Photographing in these conditions is like whispering with your images, where each shaft of light carries meaning. Instead of illuminating everything, you choose what to reveal. The rest remains in mystery. And that’s often where true beauty lives. When you embrace this method of creation, you begin to trust your intuition. You learn to look slower. To notice what moves quietly. To understand that not everything needs to be fully seen to be deeply felt. You become more than just a photographer — you become a more sensitive observer of the world. Turning a lack of light into art is not a trick. It’s a mindset. It’s choosing to create even when the scene seems empty or uninspiring. And when you do that, you not only improve your technical skills — you shape a photographic identity that’s uniquely yours.

How to Create a Photo Series in Dark Environments Using Only Natural Light
Creating under limitations can be one of the most powerful ways to push creativity forward. In photography, dark environments are often viewed as obstacles—especially for those who want to work exclusively with natural light. But it’s precisely in these challenging settings that magic can happen. Low light doesn’t mean a lack of beauty; on the contrary, it opens doors to mysterious compositions, emotionally charged atmospheres, and results that evoke deep, intimate sensations. In this article, you’ll learn how to turn low-light spaces into the perfect setting for developing a consistent, engaging, and expressive photo series—using nothing but the natural light available. Why Photograph in Dark Environments? Low-light environments sharpen the photographer’s eye. With less visual information available, compositions become more minimalist, contrasts stand out more clearly, and light becomes a true storytelling tool. This kind of photography favors drama, emotion, and sensitivity. Moreover, developing a series in low-light conditions is an opportunity to explore the technical capabilities of your camera, observe subtle details more attentively, and above all, exercise intentional creativity. What Is a Photo Series? Before we dive into technique, it’s essential to understand what a photo series is. A series is a group of images that share a visual, thematic, or narrative unity. In other words, they’re not isolated photos—but photographs that speak to one another, forming a cohesive body of work. By choosing to build a series in dark environments, you’re diving into a specific visual world and establishing a unique photographic language—whether through lighting, color palette, composition, or subject matter. Choosing the Right Environment Not all dark environments are the same. Some offer small streams of natural light from windows, door gaps, or skylights. Others rely on reflections, light-colored surfaces, or ambient light from adjoining rooms. Your choice of space will directly affect the tone and direction of your series. What to Look for: Spaces like dimly lit hallways, bedrooms with thick curtains, bathrooms with small windows, or rustic kitchens can become deeply expressive scenes when observed with the right intention. Training the Eye: What to Observe Before Shooting Light in dark spaces is precious. Before you start shooting, take time to simply observe how it behaves in the room: A useful practice is to spend a few minutes in stillness, just observing. That moment of silence often reveals details that would otherwise go unnoticed in the rush to shoot. Recommended Gear and Settings Although we’re working exclusively with natural light, making a few smart technical choices can drastically improve your results. Ideal Equipment: Suggested Settings: Developing a Visual Narrative A series is more than just a collection of aesthetically pleasing photos. It should communicate something. Think about what emotion or atmosphere you want to evoke—quietness, introspection, solitude, warmth, mystery? Then begin to build your visual story around that intention. Tips for Visual Cohesion: Step-by-Step: Building Your Series 1. Planning Choose a theme and define how many images you want to create (ideally between 5 and 15). Think about how each image will complement the others to form a narrative. 2. Choosing Your Locations Explore your home or nearby spaces. Study how natural light behaves at different times of day. Take notes on which locations have the most potential. 3. Staging and Adjustments Organize the space subtly—without removing its essence. Rearrange furniture, open or close curtains, add or remove decorative elements that support your concept. 4. Shooting Session Set up your tripod, fine-tune your camera settings, and shoot calmly. Take multiple angles of the same scene, experiment with depth of field, and watch how shadows evolve. 5. Selection and Editing Curate the photos that best complement one another. Edit with a light touch—enhance shadows, adjust color temperature, but preserve the natural quality of the light. Creative Techniques to Enrich the Series Turning Darkness Into Visual Poetry Photographing in dark spaces with only natural light invites you to become a visual poet. You’re no longer fighting the darkness—you’re embracing it as part of your language. Darkness becomes a character, a storyteller, an atmosphere builder. Through this lens, images become quiet, emotional, and layered with meaning. Your focus sharpens toward the essential—the small light, the subtle form, the barely-there texture. This is where your unique photographic voice begins to emerge. Whatever your theme, remember: the power of a series lies in its intention. Each image should echo the previous one and prepare the way for the next. It’s through this visual dialogue that you go beyond technique—you build expression, authorship, identity.

5 Creative Project Ideas Using Only Window Light
Natural light streaming through a window has an almost magical quality. It transforms spaces, reveals textures, and creates moods that artificial lighting rarely matches. For photographers who love a soft, realistic, and emotionally resonant aesthetic, exploring window light offers a rich creative opportunity. In this article, you’ll discover five creative photography project ideas that rely solely on window light — all approached with depth, technique, and artistic sensitivity. Why Use Window Light? Window light is one of the most accessible and versatile sources of illumination for photographers seeking atmosphere and authenticity. It shifts throughout the day, changing with the weather and seasons, offering an array of expressive possibilities. A soft light filtered by curtains or blinds often provides a more aesthetically pleasing alternative to flashes or continuous lighting. Working with natural window light encourages you to develop a keener eye for space, composition, and light direction. Each ray that enters through a gap holds artistic potential. Let’s explore how to make the most of this light source through five inspiring projects. 1. Intimate Portraits with Side Lighting Few things enhance a face more beautifully than diffused side lighting. Place your subject near a window, preferably during the soft light hours of early morning or late afternoon. This setup produces natural shadows and contrast that gracefully highlight facial features. How to do it: This setup also works well for self-portraits. With a tripod and a timer, you can create deeply personal images that communicate emotion through body language and the dance between light and shadow. 2. Shadow and Silhouette Studies Direct sunlight pouring through a window creates striking shadows — perfect for abstract or minimalist compositions. Studying these shapes is a powerful creative exercise that can yield surprisingly expressive results. Execution tips: To take it a step further, use human elements like hands or profiles to play with silhouettes. This technique adds a poetic, emotional dimension to your visual storytelling. 3. Poetic Still Life Compositions Creating still life scenes under window light is a great way to study composition, light, and color harmony. These projects help refine your eye and give you the opportunity to produce image series that are emotionally and visually compelling. Steps to try: Photograph the same setup at different times of day to see how the light transforms the scene. This is a powerful way to train your sensitivity to subtle shifts in natural lighting. 4. Detailed Macro Textures with Natural Light Soft window light is ideal for macro photography, especially when highlighting textures and fine details. Whether you’re photographing the surface of a leaf, the texture of skin, or the interior of a flower, this light helps those tiny elements come alive. How to shoot: This project is also great for capturing everyday objects — feathers, fabric, food, even soap bubbles. The key is to observe closely and let the light do the storytelling. 5. Everyday Life with Visual Narratives One of the greatest strengths of natural window light is its ability to tell authentic stories. Capturing daily moments — a child playing on the floor, someone reading by the window, coffee being poured — can produce emotionally resonant images with strong narrative power. How to approach it: This project encourages the photographer to slow down, observe, and connect with their surroundings. The result is not just beautiful imagery, but a reflection of real life through a poetic lens. Let Light Lead the Way Using window light invites you to deepen your photographic vision. As you begin to see how it shapes faces, spaces, and everyday objects, photography takes on new meaning. The five projects shared here don’t require complex gear or elaborate setups — they ask only for attention, curiosity, and a willingness to create with what you already have. The beauty of natural light lies in its simplicity and unpredictability. A single sunbeam shifting position, a passing cloud, a gently moving curtain — each moment can change a photo entirely. Embrace these changes. Observe, experiment, and shoot. That’s where the magic happens. Each of these projects can be repeated and reinterpreted endlessly. The more you practice, the more refined your eye becomes. Window light becomes your creative partner — your tool, your muse, and your everyday source of inspiration. So now that you have these ideas, why not pick up your camera and begin experimenting with the light that’s pouring into your own space? Photography happens wherever the light lands — and it might be glowing right now through your window.