Taking photos with your phone has become an essential part of digital culture. Whether for social media lifestyle content, everyday moments, or even work, the phone camera is no longer a secondary tool — it’s a key element in how we create visual experiences. And while today’s smartphones are incredibly powerful, many people still don’t unlock their full camera potential due to a lack of understanding about the settings that truly enhance image quality. This guide goes beyond the basics. Its purpose is to clearly and accessibly reveal the best settings to get truly impressive photos from your phone camera, turning ordinary shots into standout visuals. Know Your Camera’s Full Potential Before changing any settings, the first step is to understand what your phone camera can actually do. The evolution of smartphone lenses and sensors is impressive, with some models offering multiple cameras (wide, ultra-wide, macro, telephoto), sensors up to 200MP, and AI-powered post-processing. Look into: The megapixel count of the main lens; Whether it has optical image stabilization (OIS); The lens aperture (e.g., f/1.8, f/2.2); RAW shooting capability; Real night mode functionality; Optical and digital zoom capabilities. These specifications help define your technical range and inform which settings you should prioritize. Activate RAW Format for Advanced Editing Many smartphones now allow you to shoot in RAW — an uncompressed image file that keeps all the data captured by the sensor. Unlike JPEG, RAW doesn’t lose quality during editing, making it perfect for enhancing light, shadows, and color without sacrificing detail. How to enable it: Switch to the “Pro” or “Manual” mode; Find the image format settings; Choose RAW (sometimes labeled DNG). How to enable it: Keep in mind: RAW files take up more storage, so use them when you plan to edit. Lighting Is Everything Light is the foundation of good photography. Even with the right phone camera settings, poor lighting can ruin a shot. Ideally, use natural light — it’s free and flattering — or position yourself near a soft, even artificial light source. Quick tips: Stand near windows with sheer curtains; Shoot during the “golden hour” for warm, soft tones; At night, use reflected or diffused light for smoother results. If artificial lighting is your only option, opt for LED lights with a neutral temperature (5,000K–5,500K) for natural skin tones. Use a Tripod or Stable Surface Shaky hands are a major enemy of photo clarity. Especially in low light or when using manual mode, even small movements can blur your shots. A simple tripod for smartphones can make a significant difference. Also: Activate Portrait Mode Carefully Portrait mode is great for highlighting your subject by blurring the background (bokeh effect). But some models may struggle to accurately separate the subject from the background, especially with hair or uneven edges. For better results: If your phone camera has a telephoto lens, it usually activates automatically in portrait mode, improving depth detection. Disable Beauty Filters (If You Prefer Realism) Many phones apply automatic filters, like beauty mode or skin smoothing. While some users enjoy this, these filters can make your photos look overly edited and unnatural. Recommendation: Turn off auto-enhancement and beauty filters in your camera settings for a more authentic, professional look. Master White Balance Control White balance adjusts your photo’s color temperature. This is key for keeping tones realistic, especially in artificial lighting. Typical values: Manual white balance allows you to correct unwanted yellow or blue color casts and maintain color accuracy. Manually Adjust Focus and Exposure Even in automatic mode, tapping your screen lets you manually set focus and exposure. This is a quick way to avoid overexposed areas or soft focus. Try this: Avoid Digital Zoom Whenever Possible Digital zoom only enlarges the image digitally, which reduces quality. Whenever possible, physically move closer to the subject or use your phone’s telephoto lens if available. Another solution: shoot at maximum resolution and crop later during editing — this preserves better detail than zooming in live. Turn On Gridlines (Rule of Thirds) Composition is key in photography. By enabling gridlines, you can apply the rule of thirds — aligning your subject with intersecting lines to create more balanced, visually appealing images. To activate: This simple visual guide helps you avoid centering everything and improves framing naturally. Use Burst Mode for Action Shots Burst mode captures several images in quick succession when you hold the shutter button. It’s perfect for sports, candid shots, or any scene with movement. After capturing, choose the best image and delete the rest to save space. Don’t Rely on the Front Camera Alone While convenient for selfies, the front camera is typically lower in quality. It usually has fewer megapixels, weaker sensors, and fewer focus options. For higher-quality selfies: Adjust Aspect Ratio Based on Purpose Aspect ratio determines your image’s frame shape and size. Choose the one that matches your final destination. Always preview your frame to avoid unexpected cuts. Use Third-Party Camera Apps for More Control If your default camera app lacks manual settings, try alternatives like: These apps offer RAW support, full manual control, histograms, and more. Edit with Purpose, Not Excess Editing enhances your photo — it shouldn’t replace good photography. Avoid over-processing your images. Best practices: Creating your own preset or editing style can help you build a consistent visual identity. Tell Visual Stories with Style Great photography isn’t just about individual shots. It’s also about curating a collection that communicates your story. Organize your photos by themes, colors, moods, or places. Try creative photo challenges: With intention, your phone camera becomes a storytelling tool — not just a quick snapshot device. The True Difference Is in Your Perspective Knowing the ideal phone camera settings is just the first step. What truly transforms your photos is the way you see the world. Practice, experiment, and refine your eye. Understand light. Observe shapes. Compose with emotion. Technical skills matter, but your unique perspective is what brings meaning to the image. The camera in your hand holds immense power. Now

Visual trends for Instagram in 2026
In 2026, Instagram is faster, more competitive, and at the same time, more sensitive to details. The feed is no longer just a place to “post something pretty”: it’s a storefront for attention, identity, and trust. And when attention becomes scarce, visuals become language. That’s why understanding visual trends isn’t about chasing fads. It’s about learning how people’s taste is shifting, how aesthetics behave at social speed, and how you can use that to your advantage without losing authenticity. In this guide, you’ll find the visual trends that show up most often in strong profiles, modern brands, and creators who look current without looking identical. You’ll also get a practical step-by-step to apply these choices with consistency and a “brand” feel — even if you create everything on your phone. What’s shaping Instagram’s look in 2026 Before we list visual trends, it helps to understand the forces behind them. Three movements explain almost everything: 1) Aesthetics became more strategic People recognize patterns. When your profile is coherent, it looks professional, trustworthy, and “well cared for.” That changes perceived value in seconds. 2) Content must be readable in motion People consume content on the bus, in line, between tasks. The visuals that win are the ones the brain understands fast: contrast, hierarchy, rhythm, and simplicity. 3) Visual identity became a competitive advantage Creators with a recognizable signature don’t need a new trend every week. The secret is using visual trends as seasoning, not the main dish. 12 visual trends for Instagram in 2026 (the ones you actually see in strong profiles) Below are visual trends that share one thing: they work on mobile, improve retention, and make your content look current. 1) Warm minimalism (fewer elements, more feeling) Not the cold, distant minimalism. This is clean but warm: sand, cream, brown, olive, terracotta, natural light, and soft shadows. How to apply: a light background + one main element + generous spacing + controlled contrast. It’s one of the easiest visual trends to sustain for months. 2) Editorial typography in carousels (magazine-like hierarchy) Carousels that feel like editorial pages: strong headlines, light subheads, short blocks, precise alignment. The goal is fast, elegant reading. A working formula: big headline + smaller supporting line + one highlight per slide. Among visual trends, this one boosts saves when your content is useful. 3) Analog textures and intentional imperfections Subtle grain, scanned paper, light scratches, film feel, organic borders. It humanizes digital content and creates a “made by hand” mood without looking amateur. Tip: keep textures subtle. If the texture gets more attention than the message, you went too far. 4) Subtle motion (movement that doesn’t shout) In 2026, motion is discreet: a soft light sweep, gentle zoom, a shadow shifting, elements floating slowly. It’s a type of visual trend that increases retention without feeling “effect-heavy.” Where to use: Reel covers, Stories, and carousel-as-video exports with micro-animations. 5) Sorbet colors with contrast points (sweet palette + strong anchor) Dusty pink, sky blue, mint green, buttery yellow — plus a darker anchor (graphite, navy, coffee). This feels modern and stays readable. It’s one of the most popular visual trends for lifestyle, wellness, beauty, and digital culture because it communicates lightness with authority. 6) Frames inspired by interface design (UI aesthetic) Posts that look like a “screen”: thin bars, cards, window-like elements, rounded corners — UI-inspired structure without copying platform branding. It organizes information and feels “digital product.” Use carefully: the goal is structure, not clutter. Among visual trends, the line between clean and confusing is thin. 7) Documentary photos with soft flash (realism that holds attention) Photos that feel like real moments: moderate flash, honest shadows, natural skin, less “perfect” composition. People got tired of plastic perfection. Realness returned — with style. For creators, it’s one of the most powerful visual trends because it builds closeness and trust, especially in behind-the-scenes content. 8) Soft 3D and “inflatable” objects (without looking like a game) Gentle 3D elements with matte, milky glass, or satin-plastic materials. It’s calm 3D used as detail, not the star. Where it shines: carousel covers, category icons, checklist posts. Among visual trends, it signals modernity quickly. 9) Elegant digital collage (cutouts + realistic shadows) Collage doesn’t mean chaos. It means art direction. Clean cutouts, coherent shadows, subtle layering, controlled palette. A safe rule: max 3 layers (background + cutout + small detail). This keeps the visual trend stylish, not messy. 10) Quiet luxury — translated to digital Sophisticated minimalism, refined typography, neutrals, few elements, premium-feeling imagery. It’s “silent luxury” adapted for the feed. Works especially well for services, consultancies, aesthetics, personal brands, and higher-ticket offers. It’s one of the visual trends that increases perceived value fast. 11) Visual series and modular grids (instant recognition) Instead of isolated posts, strong profiles build series: same structure, consistent colors, variations by theme. People recognize you immediately. This is one of the most important visual trends because it solves a real problem: consistency without needing inspiration every day. 12) “Preview-first” design (covers and first frames matter more than ever) Carousel covers, the first Reel frame, and the first Story second became your “poster.” Cover design is part of the content, not decoration. Practical translation: your content must explain “what comes next” at first glance. Among visual trends, this most directly impacts clicks and retention. How to choose visual trends without losing your identity If you try to apply every visual trend at once, your profile becomes a lab without a signature. The smart move is combining a strong base with small updates. Define your base (what stays consistent) Pick 2 visual trends to “season” each month Example: minimal base + analog texture + editorial typography. That way you stay current without becoming algorithm-dependent — using visual trends as evolution, not identity. Step-by-step to apply visual trends on Instagram in 2026 (without getting stuck) This workflow is designed to be fast, repeatable, and phone-friendly. Step 1) Do a 5-minute profile check Open your grid and ask: If you answered

How to create posts that grab attention on Instagram
Have you noticed how some posts seem to “hold” your eyes for longer? That’s not luck. In a feed that changes every second, attention became currency — and the people who learn to build it with intention get more than likes: they earn memory, recognition, and consistency. The good news is: this doesn’t depend on expensive gear, being “creative all the time,” or chasing trends nonstop. It depends on a method. And that’s exactly what you’ll find here: a practical, in-depth, repeatable guide on How to create posts that grab attention on Instagram, with a Culture Digital + Visual Lifestyle mindset — from planning to execution, with clear steps you can reuse every week. What truly makes a post stop the scroll (and why most posts don’t) Before you think about layout, filters, or captions, it helps to understand how Instagram works today: people don’t open the app “to see you.” They open it to feel something fast — curiosity, identification, desire, relief, surprise, belonging. A post grabs attention when it answers at least one of these questions in under 2 seconds: Most posts fail because they’re born without intention. They’re “just another post,” not a piece designed to provoke a reaction. And attention is reaction. The “2-second rule”: what your post must communicate at first glance No text, text on the image, single photo, carousel… the format doesn’t matter: your post needs an immediate visual hook. You need to design what people will notice first. Think of your post like a storefront. If the storefront doesn’t attract, nobody walks in. Your visual hook can come from: Start with the goal: what action do you want people to take? Here’s a decisive point in How to create posts that grab attention: a post isn’t just “pretty.” It must have one main action. Pick only one: When you choose one action, your aesthetic and copy get simpler, sharper, and more effective. The 5 formats that pull attention fastest (and when to use each) 1) Educational carousel (the “save” magnet) It works because it becomes a mini-lesson. Best for: Important: if the cover isn’t strong, the carousel dies. 2) Single photo with strong aesthetics (classic lifestyle) It works when the image speaks and reinforces your visual identity. Great for: Important: the caption is what turns the photo into connection. 3) Minimal “quote” post (to drive shares and comments) It works when it’s short, true, and visually clean. Best for: Important: less text on the image, more impact. 4) Before-and-after (the proof format) It works because it’s instant: the eye understands transformation. Best for: Important: don’t fake the transformation — credibility is what sustains long-term growth. 5) Behind-the-scenes (the connection builder) It works because it humanizes. Best for: Important: behind-the-scenes isn’t mess. It’s story. Palette, typography, and consistency: how to build a feed that feels like a brand Your aesthetic doesn’t have to be rigid — but it should be recognizable. A strong feed has a signature. Three simple ways to create a visual signature: You don’t need all three. One already changes the game. Step-by-step: How to create posts that grab attention on Instagram (from zero to published) Here is the full, repeatable process you can use every week. Step 1) Pick a topic with intent and real interest Ask: Examples: Step 2) Define the post “promise” in one sentence The promise is what people gain. Examples: If you can’t write the promise, the post is still too vague. Step 3) Choose the right format for that promise Step 4) Outline the content before opening the design app This prevents you from getting stuck in Canva and wasting time. For a carousel, draft: Step 5) Design the cover like a thumbnail Your cover must work at small size. Quick checklist: Step 6) Simplify the design to win clarity The design that grabs attention isn’t the busiest. It’s the one the brain understands fast. Practical rules: Step 7) Adjust image and color so it looks professional This is gold for visual lifestyle: If you edit on your phone: start in Snapseed/Lightroom and finish in Canva if you need layout. Step 8) Write a caption with rhythm (without unnecessary essays) A strong caption has: Hook examples: Step 9) Publish with retention in mind When you post: You don’t need to “go viral.” You need to signal consistency. What to post when you run out of ideas (without relying on trends) If you want to always know How to create posts even on low-energy days, use these templates: Template 1: “Mistake + fix” Template 2: “Checklist” Template 3: “Before/after + process” Show the result and explain the path. Template 4: “Opinion with reasons” Template 5: “Honest behind-the-scenes” These templates work in any niche: travel, lifestyle, design, marketing, food. Quick wins that boost attention without adding extra work A checklist you can save and use every time Before you publish, ask: If you answered “yes” to at least four, you’re on the right track. The shift that changes everything: attention is built, not “deserved” Posting on Instagram is like talking in a crowded room: if you speak beautifully but without direction, you disappear in the noise. If you learn to focus on the other person, organize your message, and build rhythm, you become a reference. You don’t need to be a genius. You need to be intentional. Now pick a simple topic, apply the step-by-step, and publish with a testing mindset: every post is a step. When you master How to create posts that grab attention on Instagram, you stop depending on luck — and you start building real presence, in a way your audience can recognize from far away.
 4")
Best apps to edit photos on your phone (2026)
Creating impactful images has never been so accessible. The camera is in the palm of your hand and, with it, a universe of apps that can turn any shot into content worthy of a professional feed. The world of photo editing apps has evolved: it used to be mostly about ready-made filters, and today it’s a blend of technology, style, and visual identity. For people who create content for social media, mastering these apps is part of the creative routine — and it’s also what separates an ordinary post from an image that stops the scroll and sparks engagement. Below, you’ll find the best photo editing apps in 2026, both free and paid, with practical notes, key features, and real usage tips to level up your photos right from your phone. 1. Lightroom Mobile (Adobe) Lightroom Mobile remains a top reference for creators and digital photographers. Available for Android and iOS, it offers professional control over color, light, and texture, powered by the same engine used in the desktop version — ideal if you want consistent edits. Key features: Why it’s worth it:It’s a favorite for anyone building a consistent visual identity, with photos that look professionally graded. Plan: Free (with limitations) and Premium via subscription. 2. Snapseed (Google) Snapseed is a favorite among creators who want precise editing for free. Its biggest advantage is the quality of manual tools — you can fine-tune contrast, saturation, and perspective with precision, without losing quality. Highlights: Quick step-by-step: Cost: 100% free. 3. VSCO VSCO is almost a synonym for aesthetics. It combines cinematic filters with solid light and color controls, perfect for the lifestyle and minimalist look common on social platforms. What makes it special: Creator tip:Blend two presets at low intensity (for example, A6 + HB2 around 50%), then adjust contrast manually to keep it natural. Plan: Free with paid features (annual subscription). 4. PicsArt PicsArt is ideal if you want to create visual art, not only classic photo edits. It combines filters, collages, frames, and creative manipulation tools that feel like Photoshop — but with a simple mobile workflow. Standout features: Who it’s for:Influencers, Reels creators, and anyone who makes quick post designs directly on the phone. Plan: Free with a Gold (premium) option. 5. Canva Canva is no longer just a design editor — it’s a full creation platform. In the context of photo editing apps, it offers filters, color adjustments, cropping, background removal, and templates sized for social media. Why it’s essential: Basic step-by-step: Plan: Free + Canva Pro (monthly subscription). 6. CapCut Although it’s best known for video, CapCut has gained space for photo editing too. It’s great for creating images with motion-style effects, dynamic captions, and visual storytelling, widely used for Reels and animated carousels. What’s new in 2026: Creator tip:Use CapCut to build animated thumbnails and video covers with a cinematic feel — it can boost CTR on social platforms. Plan: Free (with optional premium features). 7. Remini Remini is a lifesaver for older photos or images that are slightly out of focus. With AI, it enhances sharpness, reduces noise, and restores image quality in just a few taps. Best uses: How to use: Plan: Free with daily credits and a Pro unlimited version. 8. Polarr Polarr is a refined option, popular with creators who love custom presets and a distinct feed style. You can build your own filters, share them with other creators, and apply consistent edits quickly. Advantages: Why use it:Excellent for building a personal brand identity so every photo follows the same palette and mood. Plan: Free with a Pro version. 9. Prequel Prequel is the app for the “aesthetic” vibe. If you want golden glow, vintage grain, or pastel tones that trend on Reels, it’s all there — with strong visual curation. Popular features: Plan: Free with Premium subscription for exclusive filters. 10. Afterlight Afterlight is for people who love subtlety. With a clean interface and precise tools, it offers fine control over light, saturation, and texture — perfect for photos that look natural but technically polished. Differentials: Ideal for: minimalist creators who want harmony across the feed. Plan: Free with a paid full version. 11. Fotor Fotor balances ease and power. It offers AI tools that automatically adjust brightness, saturation, and background, plus collage and facial enhancement features. Highlights: Plan: Free and Pro with more features. 12. Lensa Lensa, by Prisma Labs, became famous for AI avatars, but its editor is also excellent. It delivers automatic color and focus tuning, plus exclusive cinematic filters. Extra tip:Great for profile selfies, covers, and personal branding shots — the kind that need to look professional but still natural. Plan: Free with a Pro version. 13. AirBrush AirBrush is one of the most popular apps among fashion and beauty influencers. It offers retouch tools that can keep the face natural, without looking artificial. Notable tools: Plan: Free with Premium subscription. 14. Toolwiz Photos Less well-known, but powerful. Toolwiz Photos includes 200+ tools that combine classic editing, digital art, and creative manipulation. What you get: Ideal for: creators who want artistic styles and standout feed visuals. 15. Pixlr To close the list, Pixlr is lightweight, simple, and versatile. Perfect for fast results: collages, filters, auto adjustments, and layer-style overlays in seconds. Advantages: Plan: Free with ads and a Pro version without limitations. How to choose the right app for your style With so many options, the best choice depends on your creative goal. Pro tip: define a color palette and visual style and keep it consistent across posts. That helps people recognize your identity instantly — a key step for organic growth. Step-by-step to make your photos look professional The power of good editing Editing photos is more than boosting colors — it’s translating feelings, telling stories, and building a visual style that speaks before the caption does. Photo editing apps are now tools of visual expression, capable of turning simple moments into visual narratives that connect. Pick the apps that match your style,
 5")
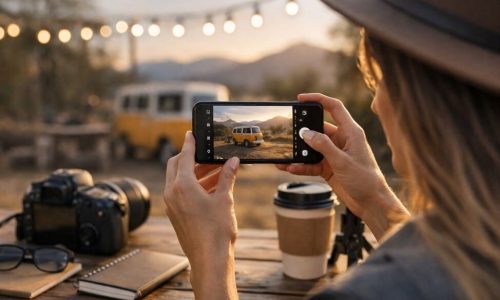
How to Take Professional Photos with Your Phone (Complete Guide)
Photography has evolved. What once required bulky cameras and complex techniques now fits in your pocket. Mobile photography has become an accessible, powerful, and essential art for anyone living a connected life and seeking to express themselves through images. More than just capturing moments, mastering this skill opens doors to the visual universe of digital lifestyle — whether to fuel a creative profile, boost a personal brand, or simply record the world with a unique perspective. This guide is for those who want to go beyond casual snapshots and turn their phone into a professional tool for visual creation. We’ll explore techniques, practical tips, composition tricks, and even editing guidance — all in depth, yet without complication. The Importance of Mobile Photography in Today’s Digital World We live in an era where the image is king. Whether on social media, blogs, or portfolios, a good photo speaks for you before any caption does. Mobile photography has gained prestige not only for its convenience but also for the technological advances that have put smartphones on par with professional cameras in many aspects. Influencers, content creators, designers, and digital entrepreneurs rely on their phones as their primary creative tool. That’s because it’s fast, lightweight, and powerful — capable of capturing and editing with surprising quality and speed. Moreover, accessibility has transformed the phone into an extension of anyone’s creativity. There’s no longer a need to invest thousands in heavy equipment to achieve visually impressive results. Mobile photography has democratized the art of visual storytelling. Understanding Your Phone Camera’s Features Before snapping away, it’s essential to understand what your phone’s camera can do. Each smartphone has its own features. Here are some elements to explore: Resolution and Megapixels More megapixels don’t always mean better quality. What truly matters is the combination of sensor, lens, and image processing software. Still, understanding resolution helps you know how much you can crop or edit without losing quality. Photography Modes Most modern smartphones offer various modes like portrait, night, panorama, and pro. The manual (or Pro) mode lets you adjust ISO, white balance, shutter speed, and focus — perfect for those wanting more creative control. Wide-Angle Lens and Optical Zoom Phones with multiple lenses offer more versatility. The wide-angle lens is ideal for landscapes and indoor shots, while optical zoom helps you get closer without losing sharpness. Optical Image Stabilization Often underrated, this feature makes a huge difference in low-light photos or when filming on the move. If your phone has it, make the most of it to avoid blurry or shaky shots. Lighting: The Element That Transforms the Image Light is everything in photography. Learning to see and control light completely changes your photo outcomes. Here are some fundamental tips: Make the Most of Natural Light Shoot during the day, especially in the “golden hour” (right after sunrise and just before sunset), for soft tones and beautiful shadows. Avoid midday light, which creates harsh shadows and excessive contrast. Be Careful with Artificial Light Indoor lights can cast yellow or green hues. Whenever possible, place the subject near a window or use white, diffused lights to balance the environment. Get to Know HDR HDR (High Dynamic Range) combines multiple exposures into one photo, capturing details in both bright and dark areas. It’s great for scenes with a wide range of lighting. Use DIY Reflectors White objects like paper, cardboard, or even mirrors can reflect light and soften shadows in portraits. This simple trick is easy to apply and very effective. Composition: How to Create Standout Photos Composing an image is more than centering a subject — it’s about telling a story visually. Here are some powerful techniques: Rule of Thirds Turn on the grid on your phone. Imagine the image divided into nine equal parts. Positioning the main subject at one of the intersection points creates a more balanced and pleasing photo. Lines and Symmetry Lines guide the viewer’s eye. Use roads, fences, walls, or shadows to lead attention. Symmetry also works well — especially in architecture or reflection shots. Negative Space Give your subject room to breathe by including empty areas (like sky, walls, or ground). It helps highlight your theme and gives a modern aesthetic feel. Colors and Contrast Play with color palettes. Complementary colors create impact, while similar tones create softness. Colors can also guide emotions or focus the viewer’s attention. Depth of Field Even on phones, depth can be simulated. Use foreground or background elements to create layers and visual interest. Step-by-Step: How to Take Professional Photos with Your Phone Editing: The Final Touch for Impactful Photos Editing isn’t cheating — it’s enhancing. Post-production refines what the camera captured. With the right apps, your phone can handle it masterfully. Recommended Apps What to Edit? Mobile Photography in Practice: Where and How to Train You don’t need to travel to take great photos. Daily practice makes the difference. How to Build Your Visual Identity with a Phone Professional photography is also about style. Over time, you’ll develop a visual signature — that “something” that makes your photos recognizable. A New Perspective Through Your Phone’s Lens Turning your phone into a professional camera is more than just technique — it’s about awakening a new way of seeing the world. Every corner, ray of light, shadow, or detail can become the next powerful image in your portfolio. The most important thing is to practice with intention, learn with each shot, and embrace experimentation. Mobile photography is not a lesser version of photography — it’s a unique, authentic, and ever-evolving language. By applying these tips and consistently training your eye, you don’t just improve your photos — you expand how you see and document life.

Light, Texture, and Creativity: Visual Projects Without Professional Equipment
Photography is born from light, but it’s with the sensitivity of the eye that it becomes art. In a world filled with advanced technology, many people believe that impactful images can only be created with high-end cameras, expensive lenses, and complete studios. However, the truth is that you can develop expressive and artistic visual projects with very few resources — often without any professional equipment at all. The key is to use what you already have: natural light, the texture of everyday objects, and your own creativity. When you begin to observe your surroundings more closely, you realize that art lives in the shadows cast on a wall at sunset, in the soft light filtered through a curtain, in the reflection on a metallic surface, or in the texture of an old book. This article will show you how to create artistic and personal photography projects using only natural light and accessible tools — no need to invest in professional gear. With technique, sensitivity, and practice, it’s possible to achieve impressive results and develop a portfolio full of identity. Why Leave Professional Equipment Behind? The goal here isn’t to undervalue gear, but to prove that it’s not required to create creative and expressive images. Many of the greatest photographers began with simple cameras — and even today, countless impactful artistic projects are produced with smartphones or compact cameras. Choosing to work without professional equipment brings several advantages: Natural Light as a Creative Resource Natural light is constantly changing — and that’s a gift to those who want to explore different visual atmospheres. Understanding how light behaves is essential to unlocking its full artistic potential. Types of Natural Light and Their Effects Texture: The Secret to Visual Impact Without Special Lenses Texture is one of the richest elements in visual storytelling. When used well, it adds depth, realism, and emotion — even in smartphone photos. Where to Find Beautiful Textures How to Enhance Texture Using Natural Light Composition: Organizing Chaos with Creativity Even with limited tools, strong composition transforms a photo. Think about visual impact, element balance, and guiding the viewer’s gaze. Simple Composition Principles That Work Step-by-Step: How to Create a Visual Project Without Professional Gear 1. Choose a Theme Don’t just shoot randomly. Think about something you want to express: solitude, daily life, calm, memories, contrast… 2. Select a Location and Observe the Light It could be your home, a specific room, a window, or a yard. Spend time watching how the light behaves throughout the day. 3. Choose Your Elements Think of objects that connect to your theme. Avoid visual clutter — minimalism helps focus attention. 4. Plan for Texture Group materials that contrast or harmonize: fabric + wood, metal + paper, fruit + old books… 5. Build a Simple Composition Carefully arrange the scene. Use books to lift objects, plates to reflect light, or cloth as background. 6. Shape the Light Naturally Use curtains, doors, mirrors, or even paper to direct or soften the light. Move objects around to find the perfect exposure. 7. Shoot with Intention Use your phone camera or a basic manual camera. Focus on framing, capturing the light, and observing the small details. 8. Make Subtle Edits Use apps like Snapseed, Lightroom Mobile, or even your phone’s default editor. Adjust brightness, contrast, sharpness, and warmth gently. Creative Ideas for Projects with Light, Texture, and Creativity Simple Tools That Replace Expensive Gear When Simplicity Reveals More Than Technique Many photographers spend years chasing the perfect camera, the ideal lens, or the dream studio. But often, it’s in the simplest projects — done with what’s at hand — that the most honest and memorable images emerge. Working with natural light, texture, and creativity — without relying on expensive gear — is an exercise in presence. You begin to see possibilities where you once saw routine. And in doing so, you discover that beauty lives in the in-between, in details not illuminated by spotlights, but softly touched by the sun. The art of photography doesn’t reside in megapixels. It lives in the eye of those who choose to see with attention.

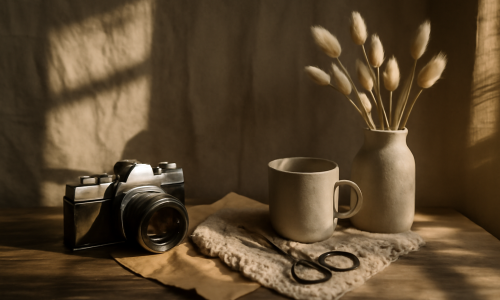
How to Photograph Objects and Details with Natural Light in an Artistic Way
The beauty of object photography lies in the details. When we observe closely, we realize that a simple cup, a flower, a piece of fabric, or an everyday utensil can turn into visual poetry — especially when natural light becomes part of the scene. Photographing objects artistically goes far beyond capturing their shape. It’s about discovering soul in the small elements of daily life. Natural light, being soft, organic, and ever-changing, is the ideal partner for this kind of approach. Rather than setting up elaborate scenes or using complex lighting setups, the artistic photographer looks for meaning in what already exists — a beam of sunlight across a table, the shadow of a plant on the wall, or the glow of a metallic surface. In this article, you’ll learn how to turn simple objects into true works of visual art using only natural light. With a trained eye and some practical techniques, you’ll be able to create expressive, intimate, and deeply personal images. Why Photograph Objects Using Natural Light? Sunlight has a unique quality: it changes color and intensity throughout the day, revealing different aspects of an object. Unlike artificial lighting, which tends to be more constant and predictable, natural light surprises — and that’s a gift for anyone exploring artistic aesthetics. Moreover, natural light: Photographing with natural light also sharpens your powers of observation and patience. You need to understand how light behaves throughout the day and learn to use it intentionally. What Makes an Object Photo Artistic? The difference between a casual photo and an artistic one lies in intention. Artistic photography requires sensitivity, but also decisiveness. Every choice matters — framing, light, background, focus, distance. Here are some key elements that turn object photography into artistic expression: Visual Narrative Even a basic object can tell a story. An open book, a coffee-stained mug, a worn-out spoon — all of these can carry symbolism. Intentional Composition Lines, shapes, negative space, and visual balance. A good composition arranges elements with meaning and purpose. Exploration of Detail Get close to textures, highlight the edge of a shadow, or focus on a small part of the object. These perspectives reveal unexpected beauty. Creative Use of Light and Shadow Shadows aren’t the enemy — they can suggest, hide, or dramatize. Light directs the viewer’s eye and gives life to the object. Background and Context The setting matters. A neutral background highlights the object; a contextual one (like a messy desk or old shelf) adds contrast and storytelling. Best Times of Day for Natural Light Object Photography Morning Light (7–9 AM) Soft tones and diffused light. Perfect for delicate photos and pastel tones. Great for fabrics, flowers, and paper textures. Midday Light (11 AM – 1 PM) Harsher and more direct light. Ideal for exploring sharp shadows and high contrast. Works well with bold shapes and defined forms. Afternoon Light (3–5 PM) Golden, warm, emotional light. Excellent for nostalgic, cozy scenes. Enhances warm tones and metallic highlights. Indirect Light (indoors, near windows) When sunlight doesn’t hit directly, the filtered light is perfect for soft and even exposure — great for subtle, minimalist compositions. Step-by-Step: How to Photograph Objects with Natural Light Artistically 1. Choose Your Object with Intention Select something meaningful, symbolic, or aesthetically interesting. Focus on just one main object to start — less is more. 2. Observe the Light in the Space Watch how light interacts with the object. Where does it fall? What type of shadow does it create? Move the object around to experiment. 3. Select the Background Carefully Use materials like fabric, paper, wood, concrete, or plain walls. Avoid busy or colorful backgrounds that steal focus. 4. Compose with Thoughtfulness Try centering, offsetting, using the rule of thirds, or embracing negative space. Balance simplicity with visual interest. 5. Explore Different Angles From above, from the side, diagonally — each angle reveals something new. 6. Use Depth of Field If possible, shoot with a wide aperture (f/1.8 to f/4) to blur the background and isolate the object. This adds softness and draws attention. 7. Shoot in RAW (if your camera allows it) RAW format offers greater control during editing, especially for high-contrast scenes or subtle lighting. 8. Create a Photo Series Capture several variations of the same object — change the angle, distance, lighting, and composition slightly. Then curate your best images with a critical eye. Creative Ideas to Practice Subtle and Artistic Editing Tips Artistic References to Inspire You When the Ordinary Becomes Extraordinary Finding beauty in the mundane is one of the greatest gifts of sensitive photography. In a world saturated with flashy, overstimulated images, capturing poetry in a quiet detail, a soft light, or an everyday item is an act of artistic rebellion. Art lives in the eye of the one who observes with care. By choosing natural light as your main tool, you connect with a slower, more authentic rhythm. Sunlight cannot be controlled — it invites patience, awareness, and presence. When you photograph objects with calm, respect, and intention, you’re not just taking pictures — you’re revealing stories, emotions, and fragments of reality in a deeply personal way. And that’s what makes your photography truly artistic.

Create Dramatic Atmospheres with Natural Light in Dark Interiors
Photographing in dark environments is often surrounded by misconceptions. Many believe that without high-end artificial lighting, good images are impossible. Yet natural light — even when scarce — can be a powerful tool to craft images full of drama, emotion, and visual depth. Mastering the use of natural light in low-light spaces is a valuable skill. It allows you to explore bold contrasts, highlight specific details, and evoke powerful feelings. The key lies in recognizing that darkness is not a barrier — it’s a fundamental part of your visual language. In this guide, you’ll learn how to turn limited natural light into a creative ally, crafting expressive, dramatic moods even in challenging lighting conditions. The Power of Drama in Photography Dramatic atmosphere isn’t about theatrical poses or exaggerated expressions. It’s about how light and shadow interact to tell intense visual stories — with contrast, emotion, and mystery. This aesthetic has long been explored in cinema, classic painting, and fine art photography. Working in this style invites experimentation and sharpens your artistic vision. Total darkness, for instance, forces the viewer to focus on what little is illuminated. Shadows, in turn, become narrative tools — they hide, reveal, and provoke. Understanding Natural Light in Dark Spaces Even in low-light rooms, you can work effectively if you understand the characteristics of the available light: Light Quality Natural light in dark spaces is usually softer and more diffuse, especially when entering through small windows or filtered by curtains. This softness creates gentle transitions between light and shadow. Directionality With less light, any source becomes highly directional. You can mold the light more clearly, guiding the viewer’s eye with precision. Timing In dark rooms, natural light changes subtly throughout the day. Recognizing peak light moments, even if brief, is essential for planning your shots. Natural Light Sources That Add Drama Side Window with Filtered Light Ideal for dramatic portraits. Light from the side enhances texture — on skin, fabric, or surfaces — and adds a cinematic sense of depth. Partially Open Doors Narrow beams of light entering through small openings act like natural spotlights, creating focused areas of illumination. Reflections on Mirrors or Tiles Light bouncing off reflective or white surfaces creates unpredictable patterns, adding a surreal touch to the image. Late Afternoon Light The golden hour light — warm, low, and diffused — is perfect for creating nostalgic, dramatic environments with emotional weight. Visual Composition to Emphasize Drama Use Contrast Intentionally Work with chiaroscuro, a technique made famous in classical painting. Light just enough of the subject and let the rest fall into darkness. Position the Subject Precisely In dark settings, subject placement is everything. A small shift can drastically change how light hits the subject. Mark key positions if needed. Play with Shadow Symmetry Use blinds, lace, or grills to project geometric shadows onto your subject or background. These patterns add complexity and narrative. Choose Simple, Dark Backgrounds Plain, dark walls help accentuate natural light and make your subject stand out without visual distractions. Step-by-Step: Creating Dramatic Photos with Natural Light 1. Choose a Space Where Light Can Be Controlled Pick a room with a single window or limited light entry. The key is to control and direct the natural light effectively. 2. Turn Off All Artificial Lights To preserve the integrity of natural light, avoid mixing it with bulbs. Artificial light can interfere with color tones and visual mood. 3. Define the Mood You Want to Convey Do you want to express loneliness? Introspection? Tension? Your chosen emotion will dictate the light direction, framing, and scene elements. 4. Position the Model or Object Carefully The light should fall exactly where you want focus. In portraits, for example, illuminating only half the face can create intense impact. 5. Use a High ISO with Caution Low-light shooting often requires raising your ISO. Keep it as high as your gear allows without introducing too much noise. 6. Work with Longer Exposure If the subject remains still, use a longer shutter speed with a tripod to let in more light while maintaining sharpness. 7. Use Mirrors or DIY Reflectors A white cardboard, piece of aluminum foil, or handheld mirror can bounce light to fill shadows or illuminate secondary areas. 8. Shoot in RAW Format RAW files give you greater flexibility during editing, especially for adjusting shadows, highlights, and overall contrast. Creative Project Ideas with Dramatic Lighting Editing Tips: Enhancing Drama Without Overdoing It Post-processing should enhance your atmosphere — not overpower it. Here’s how to stay subtle but impactful: Artistic References to Inspire You When Less Light Reveals More Instead of fighting the darkness, embrace it. The absence of light can communicate things that full exposure never could. It invites curiosity, encourages reflection, and shifts focus to what truly matters in the frame. Working with natural light in dark spaces is a test of patience, technical control, and artistic sensibility. By accepting the limits of your environment, you unlock new creative perspectives. It’s in the interplay between light and shadow that unforgettable images are born — images that whisper instead of shout, and because of that, linger longer in memory.

DIY: Creative Indoor Photography Projects with Natural Light
Creating personal photography projects at home might seem challenging, especially when space, gear, or lighting is limited. But natural light — free, accessible, and full of personality — can become a powerful ally, transforming simple indoor spaces into rich, artistic, and expressive visual stories. Photographing with natural light indoors doesn’t require a professional studio. All it takes is close observation, creative planning, and a willingness to explore. In this article, you’ll learn how to develop original photography projects from the comfort of your home, using only daylight to its full potential — from the softest glow to the boldest shadow. Whether you’re building a personal portfolio, developing your own style, or simply reconnecting with the joy of creating, the techniques and ideas shared here will help you work with more freedom and authenticity. Why Create Personal Projects with Natural Light? Personal projects are powerful opportunities to experiment, study composition, express emotions, and shape a unique photographic voice. Natural light, on the other hand, brings an organic touch to your images — it’s unpredictable, dynamic, and creates textures that are hard to replicate artificially. Shooting with natural light also sharpens your creativity. You learn to observe, to wait for the right moment, and to appreciate the subtle changes in brightness. Working within your own space, with familiar objects and environments, builds intimacy with your process and reduces dependency on external resources. Strategic Spots in Your Home to Shoot Every home is full of visual potential — you just need to know where to look. Here are some key areas that offer great lighting and storytelling opportunities: Near windows Windows are natural light sources that provide soft, diffuse light, especially in the morning and late afternoon. White curtains can filter sunlight into an ethereal glow, ideal for delicate portraits or still life compositions. Partially open doors Light entering through narrow gaps can create dramatic beams and strong shadows — great for conceptual, artistic images. Kitchen This space offers textures, props, and ingredients that interact beautifully with light. Ideal for food photography or capturing everyday moments. Bathroom Tiled walls and mirrors provide interesting reflections and symmetry. Minimalist setups work great here, especially for portraits or self-portraits. Bedroom Curtains, fabrics, books, and personal objects make the bedroom an intimate and expressive environment, ideal for narrative scenes. Types of Projects You Can Create with Natural Light 1. Self-Portrait Series Working with your own image is a powerful exercise in perception and self-expression. Set up a tripod or find a steady surface, choose a time when light is interesting, and experiment with poses, angles, and shadows. Tip: Use a mirror to play with reflections and dual compositions. 2. Still Life with Meaningful Objects Select objects that hold emotional or symbolic value and photograph them in different lighting conditions. Explore the symbolism of shadows, depth of field, and minimalist backgrounds. 3. Light Study Over Time Pick one room and photograph it at different times of day. Watch how light shifts, how shadows move across surfaces, and how color temperature changes the mood. 4. Botanical or Nature Elements Plants and flowers react beautifully to natural light. A plant lit from the side through a window can make for a soft, poetic composition. 5. Shadow Projection Experiments Use blinds, lace fabrics, or patterned objects to cast shadows across your subject or background. These shapes can give your project a strong visual identity. 6. Portraits with Lateral Light and Dark Backgrounds With the light coming in from one side and the background placed far from the light source, you can create dramatic portraits inspired by classical painting. Everyday Materials You Can Use There’s no need to invest in expensive gear. Here are some common household items that can dramatically enhance your photos: How to Plan Your Indoor Photography Project A well-organized project helps you stay focused and achieve meaningful results. Here’s a step-by-step guide: 1. Define your theme Choose a theme that resonates with you — emotional, aesthetic, symbolic, or documentary. The more personal it is, the more powerful it will be. Example themes: 2. Choose the best location Identify a space in your home that offers good light for your concept. Observe how light behaves in that spot throughout the day. 3. Study daylight Follow the natural light’s movement. Take test shots. Note the times when light is softest, harshest, or most expressive. 4. Build your scene Arrange objects or props with care. Remove distractions and focus on essential elements that support your visual message. 5. Use manual settings if possible Set your camera or smartphone to manual mode when available. Adjust exposure, focus, and white balance to achieve the look you want. 6. Shoot with intention Avoid random snapping. Each click should be a purposeful attempt to communicate something. Try different compositions and lighting angles. 7. Curate your images Select your strongest photos. Reflect on what worked and what surprised you. Curating is a vital part of the creative process. 8. Edit thoughtfully Enhance the beauty of natural light, maintain softness, and avoid over-editing. The goal is to complement the photo, not overpower it. Developing Visual Narrative in Your Project Every personal project tells a story — even in silence. As you build your photo series, think about how the images relate to each other, the feelings you want to evoke, and the balance between light and shadow. A cohesive visual narrative has flow, poetry, and purpose. Consider writing short captions or reflections to accompany your work. Or even create a small digital zine to share with others — it’s a powerful way to connect with your audience and elevate your storytelling. How to Share Your Work with the World When Simplicity Becomes Art Personal photography projects with natural light don’t demand technical perfection — just a sensitive eye and attention to the everyday. The light spilling through a curtain, a fleeting reflection in the mirror, the shadow cast by a houseplant — all of it can become art. By photographing within your own space, using what

How to Play with Shadows in Dark Spaces and Create Stunning Images
Light is the essence of photography, but shadows are its soul. In dark environments, where lighting is limited, many beginner photographers feel intimidated—as if they’re working against the darkness. However, once you learn to play with shadows, those same spaces transform into dramatic, intimate, and deeply expressive stages. In this article, we’ll dive deep into how to turn the absence of light into a powerful creative tool. From identifying natural light sources to hands-on techniques for shadow composition, you’ll find a complete guide here to create captivating images even in the darkest scenarios. Understanding the Role of Shadows in Photography Shadows are more than just dark areas in an image. They are shapes, textures, contrast, and atmosphere. When used intentionally, they create a rich visual language capable of conveying emotion, mystery, and depth. Mastering shadows requires sensitivity to observe how light behaves—and the courage to embrace imperfection. That might mean using a beam of light filtered through a curtain, a reflection from a distant window, or even the glow of a candle. Natural Light Sources in Dark Environments Before diving into techniques, it’s crucial to learn how to identify and harness even the faintest light sources. Here are some common sources of natural light in dim spaces: Light from Windows Even small windows can create striking light beams. During golden hours—early morning or late afternoon—light enters at dramatic angles, ideal for long, well-defined shadows. Reflections on Light Surfaces White walls or mirrors can reflect light softly and creatively, offering a second layer to shape more subtle shadows. Curtains and Blinds Light filtered through these elements creates unique shadow patterns that add texture and artistic flair to your shots. Partially Open Doors Narrow openings can channel light into narrow, directional rays—perfect for highlighting a subject or part of the face. Composing with Light and Shadow Now that you’ve identified your light sources, the next step is learning to compose the scene with a keen eye on the shapes shadows create. Embrace Contrast Dark settings are perfect for high contrast photography. This means highlighting a well-lit area while keeping the rest in shadow. It immediately draws the viewer’s eye to your subject. Integrate the Environment into the Story Use furniture, plants, doors, or grates as elements that cast creative shadows. These details add context and depth to your composition. Try Unusual Angles Change the camera height, tilt your lens, or shoot from above. Shadows behave differently depending on the angle—some of the most surprising effects come from experimentation. Step-by-Step: How to Create Amazing Shadow Photography 1. Choose the Right Environment Look for a space with at least one source of natural light. Rooms with a single window or a small opening are ideal to give you control over the scene. 2. Turn Off All Artificial Lights Avoid interference from lamps or mixed lighting. Keep full control of the natural light and its shadows. 3. Position Your Subject Place your subject where they can interact directly with the light source. A hand extended into the light, a partially lit face, or an object placed on a textured surface all work beautifully. 4. Observe and Adjust Before shooting, take a moment to study how the light hits the subject and where the shadows fall. Small adjustments can make a big difference. 5. Set Your Camera Manually Use a wide aperture (f/1.8 to f/2.8) to let in more light, an ISO between 400 and 800 depending on the light available, and a slightly longer exposure if needed—using a tripod whenever possible. 6. Experiment with Shadow Intensity Try different levels of shadow by playing with partially open curtains, placing objects between the subject and the light, or even blocking parts of the scene with your own body. 7. Post-Process with Care In editing, enhance the contrast slightly, gently adjust the shadows if needed, and maintain the natural feel. Preserving the mood of the original lighting is key in this type of work. Types of Shadows That Create Impact Full Silhouettes When the background is bright and the subject is completely dark, you create a strong, mysterious silhouette. Partial Face Shadows Covering part of a face with shadow can evoke introspection, sadness, or sensuality—depending on the pose and light intensity. Geometric Patterns Grids, blinds, leaves, or lace can cast fascinating patterns onto skin or objects, adding interest and texture. Double Shadows When there are multiple light reflections, you can capture shadows from different directions, creating a surreal and layered visual effect. Black and White Photography with Shadows An excellent way to highlight the impact of shadows is through black and white photography. Without the distraction of color, light and shadow become the main focus. Textures, expressions, and lines take center stage, and contrast plays an even more dramatic role. Inspiration from Classical Art Great painters like Caravaggio and Rembrandt used chiaroscuro (light-dark contrast) to create depth and emotion in their work. This same principle can be applied to modern photography. Studying paintings rich in shadows can expand your understanding of lighting and atmospheric storytelling. Bonus Tips to Improve Your Shadow Photography Turning Simplicity into Art Playing with shadows in dark spaces doesn’t require fancy gear or exotic locations. All you need is attention, sensitivity, and imagination. A beam of light through blinds can become an emotional frame. A half-lit face can say more than a thousand words. The beauty of shadow photography lies in imperfection, mystery, and stillness. When you stop trying to illuminate everything and start embracing what remains hidden, you begin to shoot with greater authenticity. Shadow, often overlooked, is where the magic lives. So next time you find yourself in a dark room—know this: it might just be where your creativity shines the brightest.