In the digital age, where millions of images are shared every day, standing out as a photographer can feel daunting—especially if you’re just starting. But here’s the truth: every great photographer was once a beginner. What sets the memorable ones apart isn’t just technical mastery—it’s identity. Your photographic identity is the unique way you see the world and express it visually. It’s what makes someone look at an image and think, “That’s definitely theirs.” Developing this voice early on gives your work purpose, cohesion, and meaning. So, how do you begin to shape that identity? Let’s explore. Understand That Style Is Discovered, Not Declared Many new photographers worry about “finding their style” as if it’s a destination. But style isn’t something you choose from a menu—it’s something you grow into by doing the work. Your style evolves naturally as you shoot, reflect, and refine your approach. It’s a byproduct of your choices: Don’t rush it. Let your curiosity lead the way. Shoot often, experiment freely, and patterns will emerge. Think of your early years as a sandbox—play, explore, and let your instincts guide you. Give yourself permission to make “bad” photos. They’re part of the journey. Get Comfortable With Your Gear Your camera is your instrument. Knowing how it works empowers you to translate your vision with confidence. The more fluent you are with your gear, the more naturally you can create without interruption. Whether you’re using a DSLR, mirrorless, or smartphone, mastery begins with consistency. Remember: great photos are made by photographers, not by cameras. Spend time with your camera every week—even if it’s just five minutes experimenting with settings indoors. Shoot What Moves You Your identity begins with what you care about. Ask yourself: Maybe it’s street moments, natural light, travel scenes, faces, or quiet landscapes. Follow that pull. It will become a compass for your vision. Don’t chase trends—chase what stirs you. Photographing what matters to you adds authenticity and emotional depth to your images. Your subject matter doesn’t have to be exotic—sometimes the everyday holds the most powerful stories. Even mundane locations can come alive through your perspective. That’s where identity forms—in the details. Study Photography—But With Intention There’s immense value in studying others’ work. Look at the greats, both past and present: Ask: What draws you to their photos? Is it their use of light, subject matter, or mood? But don’t just copy—understand. Learn why their choices work, then apply those insights to your own context. Also explore different genres: architecture, portraiture, documentary, travel, abstract. Each teaches a different visual language. Build a folder of your favorite images and revisit it monthly to see what patterns emerge. Analyze what resonates emotionally. That connection is often the key to developing your voice. Create Consistently You can’t develop a voice if you only shoot occasionally. Make photography part of your routine: Consistency builds both skill and self-awareness. Over time, you’ll start to notice what feels most “you.” Think of every image as a sentence. The more you write, the clearer your language becomes. Even if you don’t share daily, aim to shoot regularly. Repetition creates fluency. The more you photograph, the more intuitive your decisions become. Embrace Editing as Creative Expression Post-processing isn’t just about fixing—it’s about finishing. It’s where your creative fingerprint comes alive. Explore tools like Lightroom, Capture One, or mobile apps like VSCO. Develop presets that match your style. Use editing to emphasize mood and emotion, not just accuracy. Over time, your editing voice will become a signature. Re-edit older images with new skills to track how your taste has evolved. Editing can be where the emotional message becomes most clear. Share With Purpose Posting online can be powerful—but do it with intention. Don’t just post for likes. Instead: Instagram, blogs, and online galleries are platforms to express—not just impress. As you share more of your authentic self, your audience will connect more deeply. Feedback is helpful, but don’t let it shape your vision. Trust your gut. Use platforms like Exposure, Behance, or even print zines to give your projects a home beyond social media. Build a small website or online portfolio early—it helps shape how you see your work. Reflect and Revisit One of the most overlooked tools in identity development is reflection. Keep a journal or notes about your shoots. Record what you liked, what you struggled with, and what you’d do differently. Growth isn’t always linear—but when you look back, you’ll see how far you’ve come. Consider printing your work—it forces a different level of reflection and appreciation. Rewriting captions and reorganizing galleries is a form of reflection, too. Explore Self-Portraits Self-portraiture is a powerful way to explore your visual language and emotional depth. These exercises not only build technical skill, but also deepen your self-awareness as an artist. Photographing yourself helps you develop empathy and creativity—two key ingredients in identity. Set a recurring reminder to create a self-portrait series, evolving with your journey. Your presence in your work, even subtly, can enrich your storytelling. Create Personal Projects A personal project gives your work direction and depth. Choose a theme, subject, or question and explore it over time. Ideas: Personal projects help you practice consistency, storytelling, and reflection. They become the threads of your identity. Publishing or printing your project—even just for yourself—gives it meaning and closure. Pitch personal projects to local galleries, blogs, or community events—they love authentic stories. A series of 10 images can sometimes say more than a single masterpiece. Connect With Community Photography can be solitary, but community nurtures growth. Seeing how others approach similar scenes can open your eyes to new possibilities. You’ll grow faster with others beside you. Community also helps you normalize struggles and celebrate small wins. Mentorship, even informal, can accelerate your identity development. And feedback from peers can shine a light on things you don’t notice in your own work. Let Your Background Influence You Your identity isn’t just about photography—it’s about you. Your culture, history, and worldview can inspire visual

How to Create Personal Photography Projects
In a world of constant content creation, taking time to focus on personal photography projects isn’t just refreshing—it’s essential. These self-driven projects allow photographers to reconnect with their vision, explore meaningful themes, and develop a distinctive style. Whether you’re wandering through unfamiliar cities or documenting your own neighborhood, creating a personal photography project can reignite your passion and push your creativity. Unlike client work or social media content, personal projects are deeply yours. They’re driven by curiosity, emotion, and questions only you can ask. And they can be as big as a documentary series across countries, or as intimate as capturing quiet corners of your apartment. Here’s a comprehensive guide to help you create personal photography projects that are fulfilling, original, and impactful. Start With What Moves You Every strong personal project begins with a spark—something you’re genuinely curious or passionate about. Don’t start with what’s trendy; start with what tugs at your attention. What themes keep showing up in your work? What stories do you feel need to be told? What emotions or places stir something in you? These questions are the foundation. Examples: Your project should feel personal, even if it’s not about you. The deeper the connection, the more authentic the result. Define a Clear Focus or Theme Once you’ve found a spark, give it structure. A good project has boundaries—it’s not just “photos from my trip” but “portraits of strangers who shared their stories in cafés across Europe.” Define your project’s: Having a framework helps you stay consistent and makes it easier to edit and present the work later. Be sure your theme is flexible enough to evolve, but structured enough to guide you forward. Keep It Manageable (At First) It’s tempting to go big, but many great projects start small. A personal project doesn’t need to be grand—it needs to be finished. Begin with something achievable: Completion builds momentum. Once you finish a small project, you’ll have the confidence (and insight) to take on more ambitious ones. Smaller projects also allow for quicker feedback and opportunities to revise your creative direction. Use Limitations to Fuel Creativity Limitations often spark creativity. Constrain your tools, time, or subject matter to force inventive thinking. Try limiting yourself to: These constraints help you focus and find meaning within boundaries. They also train your eye to notice subtleties you might normally miss. Limitations often turn into unique signatures. Embrace them as part of your voice. Let the Story Evolve Organically While structure helps, leave room for discovery. Often, personal projects shift as you go. You might start photographing architecture but realize you’re drawn to how people interact with space. Be open. Follow your curiosity. Let the story tell you what it wants to be. Sometimes, the real heart of your project emerges halfway through. Journal your process. Write about what you’re seeing, feeling, questioning. These reflections can help you refine your direction and deepen the project. Organic growth often leads to more honest, layered narratives—don’t be afraid of evolution. Photograph With Intention When working on a personal project, slow down. Be deliberate. Every frame should have a reason for being. Ask yourself: What am I trying to say with this photo? How does it connect to the rest of the series? What emotion or idea am I trying to evoke? This doesn’t mean every shot has to be perfect. But it should be intentional—taken with thought, not habit. Being mindful of intention reduces visual noise and strengthens the story you’re telling. Build a Consistent Aesthetic A personal project gains power when the images feel like they belong together. This can come from consistent: You don’t need to lock yourself into one style, but aim for cohesion. Think of your project as a visual storybook—each image should feel like a chapter in the same story. Review your photos as a group. Lay them out side by side. Look for what feels out of place or disconnected. Cohesion creates impact. Even when your subjects vary, your visual language can tie everything together. Make Time and Commit Personal projects thrive with consistency. Set aside regular time—daily, weekly, or monthly—to work on it. Treat it like a job, even if it’s just for you. If you’re traveling, plan your project time into your itinerary. If you’re working from home, make it part of your weekly creative routine. Commitment doesn’t mean pressure—it means prioritizing what matters to you. A personal calendar or visual tracker can help you stay motivated and track your progress. Share the Process (or Keep It Private) Some photographers find motivation by sharing their progress—on blogs, Instagram, or newsletters. It builds accountability and invites others into the journey. Others prefer to keep their work private until it’s finished, so it can grow without external noise. Choose what works for you. But remember: the process is part of the story. Even your doubts and pivots are valuable. If you do share, don’t just post results—share insights, behind-the-scenes, and lessons learned. Edit Ruthlessly Once you’ve collected your images, the next step is editing—not just technically, but curating. Don’t include every photo. Choose only those that serve the theme and feel emotionally or visually powerful. Kill your darlings if they don’t belong. Look for rhythm, pacing, variety. A strong project has a beginning, middle, and end. Even if it’s abstract, there should be a flow. You’re not building a gallery—you’re shaping a story. Use test prints, online proofing tools, or even simple slideshows to refine your narrative before finalizing the project. Present It With Purpose How you share your project matters. Will it live as a photo essay on your website? A printed zine? An exhibition? A digital story? Think about your audience. Think about how the format supports the narrative. A quiet, moody series might be best printed. A travel-based story might shine online with captions and maps. Add context if needed. Include a short artist statement or intro paragraph. Share the “why” behind the images—it helps people connect. Consider also pairing your

How to Build a Photography Portfolio from Scratch
When you’re just starting out in photography, one of the biggest questions is: “How do I build a portfolio if I don’t have any clients or experience yet?” The answer is: you create your own opportunities. Your portfolio isn’t just a gallery of nice photos — it’s your voice, your personal brand, your proof of work. And yes, even with zero clients and basic equipment, you can build a powerful portfolio that opens doors. Let’s walk through it — from zero to something that genuinely represents your potential. What Is a Photography Portfolio — Really? Before we dive into how to build one, it’s important to understand what a photography portfolio truly is. It’s not just a folder with your “best photos.” A real portfolio: tells a story about your style and vision, shows consistency, not just quality, demonstrates your technical and creative range, and targets the type of work you want to be hired for. So building a portfolio isn’t just about showing what you’ve done — it’s also about showing what you want to do. Start With What You Have (Even If It’s Just a Phone) Don’t wait to have a “real” camera or a client to start building. Your creativity matters more than your gear. If you only have a smartphone, make that your tool. The key is to shoot intentionally. Use your surroundings: friends, your neighborhood, nature, local markets, small businesses. Think like a pro: how would this look on a real website or magazine? Focus on light, composition, emotion — the basics that make any photo great. Example: One of the best portfolios I saw was from a photographer who shot all her portraits using window light in her living room. No studio, no client — just great vision. Define Your Style (Even If It’s Still Evolving) You don’t need to have a fully-formed photographic identity on day one. But it’s helpful to ask yourself: What subjects do I love to shoot? (People, food, landscapes, products?) Do I prefer natural light or artificial setups? Do I want my images to feel soft, cinematic, bold, raw? Your portfolio should reflect your personality. Even if you explore different areas, keep some visual cohesion — through editing style, color palettes, or composition. Pro tip: Create a moodboard with references you admire. Use it as inspiration, not imitation. Create Personal Projects If you don’t have clients yet, be your own client. One of the most powerful ways to build a strong portfolio from scratch is through self-assigned projects. Ideas you can start today: “Faces of My Street” – portraits of people in your neighborhood. “One Object, Ten Perspectives” – study one thing from multiple angles and lights. “Breakfast Series” – document your meals with editorial-style composition. “City at 6 AM” – explore your town when it’s still waking up. Give your project a name, a goal, and a timeline. That structure helps you stay consistent and creates a story arc — not just random photos. Practice in Real-Life Scenarios (Even If Unpaid) You don’t need to charge people to start shooting real situations. Offer your time to: friends and family (portraits, events, pets), local businesses (cafés, stores, barbershops), community events (fairs, meetups, workshops), aspiring models or makeup artists (they also need portfolio work). These are mutual collaborations. You get real-world practice and usable portfolio content. But always treat these sessions like paid gigs — be punctual, communicate clearly, and deliver quality. Important: Ask for permission to use the photos publicly — especially for portraits or commercial-style images. Show Variety — But Stay Focused Your portfolio should reflect your versatility within the type of photography you want to be known for. If you want to do portrait photography: show headshots, full-body shots, candid moments, environmental portraits. Use different lighting conditions: golden hour, shade, indoor window light. If you’re into product photography: show items in context (lifestyle) and on plain backgrounds (catalog style). Include various textures, materials, colors. Variety shows you’re resourceful. But avoid mixing too many unrelated styles (e.g., weddings + real estate + food + concerts). That waters down your identity. Edit Ruthlessly — Less Is More The biggest beginner mistake? Including too many average photos. Your portfolio should be your absolute strongest work only. Ten great images beat thirty “okay” ones. Here’s how to curate like a pro: choose images that tell a complete story, avoid repetition (same model, pose, or location), make sure every image adds something unique, prioritize emotional impact and technical sharpness. Ask for feedback from honest friends or other photographers. Sometimes you’re too emotionally attached to certain shots to judge clearly. Keep the Presentation Simple It doesn’t matter how great your photos are if your presentation is confusing or messy. Whether you’re building a website, PDF portfolio, or social media grid: keep the layout clean, distraction-free. Use consistent sizing, fonts, and margins. Avoid over-designed elements unless you’re also a designer. Tip: Start with platforms like Adobe Portfolio, Format, Squarespace, or even a high-quality Instagram layout. The goal is: let the work speak. Don’t Forget the Story Behind the Images Photographs carry more weight when the viewer understands the context or intent. In your portfolio (especially online), add brief captions or project descriptions: What was the goal of this shoot? What challenges did you overcome? What story are you telling? It helps the viewer connect not just with your image, but with you as the creator. It turns passive viewers into interested clients. Update Regularly (And Let Go of Old Work) A common trap: building a portfolio once, then forgetting about it. Your skills evolve — your portfolio should too. Review and update your work every 3–6 months. Remove older images that no longer reflect your level. Replace weaker photos with better, recent ones. Permission to delete: Just because something got “likes” on Instagram doesn’t mean it deserves a permanent spot in your portfolio. Be bold. Curate with intention. Include a Clear Call to Action If your portfolio’s goal is to attract clients, make

First Steps to Create Your Own Photography Style
Finding your own photography style is one of the most exciting—and sometimes most challenging—parts of growing as a photographer. When you’re starting out, it’s easy to feel overwhelmed by the amount of inspiration out there. You scroll through Instagram, browse endless Pinterest boards, and study the work of your favorite photographers, wondering: How will I ever develop a style that’s truly mine? The good news is: your unique style is already within you. It’s not about copying others or choosing a trendy preset. It’s about exploring, experimenting, and listening to your creative instincts. In this article, we’ll walk through the key steps to help you discover, develop, and refine your own photography style—without overcomplicating the process. What Does “Photography Style” Really Mean? Before we dive into the steps, let’s get clear on what “style” actually means in photography. Your style is the visual signature that sets your work apart. It’s a combination of your choices—your favorite subjects, the way you frame a shot, the colors you enhance, the emotions you highlight. Over time, this combination becomes recognizable, even when your name isn’t attached to the photo. For example: Your style doesn’t need to fit into a box—but it does need to feel authentic to you. Step 1: Explore All Kinds of Photography In the beginning, don’t worry about being consistent. In fact, give yourself permission to be inconsistent. Try shooting: Each genre teaches you something different. For example, street photography hones your eye for timing and human emotion. Landscape photography teaches you about natural light. Still life helps you master composition and control. Even photographing your breakfast under morning light can reveal a new aesthetic direction. Think of this phase as your photographic playground. The more you explore, the more you’ll understand what excites you and what doesn’t. Don’t limit yourself to what’s “popular” or “commercial.” This phase is about discovery, not perfection. Step 2: Study What You’re Drawn To Create a folder (digital or physical) of images that deeply resonate with you. Don’t analyze them yet—just collect. After a while, go back and look for patterns. Ask yourself: These patterns are clues to your inner creative voice. The more you identify them, the more you can start to consciously apply them to your own work. This applies not only to photos taken by others, but to your own past images. Review your previous shoots with fresh eyes. You might notice recurring decisions you didn’t realize you were making. Step 3: Practice Intentionally Once you’ve noticed the patterns, start shooting with those elements in mind. Let’s say you realized you’re drawn to soft lighting, earthy tones, and intimate moments. Great—now design shoots around those qualities. Intentional practice is where your style begins to take shape. You’re not just clicking the shutter anymore—you’re making decisions based on what speaks to you artistically. Plan small personal projects. For example: These small series not only improve your consistency, but help define your visual identity over time. Step 4: Edit with Purpose Editing is where your photos come to life. It’s also a powerful tool for shaping your visual identity. Choose editing tools that let you experiment—like Adobe Lightroom, Capture One, or even mobile apps like VSCO—and start developing a signature look. You don’t need a full preset pack. Instead, ask: Editing isn’t just technical—it’s emotional. The way you process your images reflects how you interpret a moment. 💡 Pro tip: Save your favorite edits as presets—not to apply blindly, but to build consistency. Over time, your editing preferences will become part of your style DNA. Step 5: Be Honest with Your Inspiration We all get inspired by other photographers. That’s not a problem—it’s part of the process. What matters is how you use that inspiration. When you see a photo you love, ask: There’s a big difference between copying and being influenced. Learning from others is how all creatives grow. The goal is to internalize, not imitate. Create mood boards, but always ask: What am I learning from this reference? Step 6: Embrace Imperfection In the quest for style, perfection is a trap. Some of the most powerful photography feels raw, messy, even accidental. That doesn’t mean you shouldn’t strive for quality—but don’t let technical perfection block emotional connection. Often, your quirks become your signature. Maybe you always shoot slightly underexposed. Maybe you love motion blur. Maybe you frame things a little off-center. Those details matter. They tell the viewer: this is how you see the world. Great style doesn’t come from technical mastery alone. It comes from courage—the courage to be yourself, to take risks, and to show your perspective. Step 7: Share Your Work and Listen (But Not Too Much) Putting your work out there is a vital part of finding your style. It gives you feedback, builds your confidence, and helps you notice which images resonate with others—and with yourself. But beware of chasing likes or compliments. Your photography style is not defined by popularity. It’s defined by what feels meaningful to you. Engage with communities, post on social media, join challenges—but always filter feedback through your own intuition. Sometimes, the images that get the most attention are the ones that feel least like you. Stay grounded. Step 8: Create Personal Projects One of the fastest ways to build style is by working on personal projects. These projects don’t need to be grand or public. They just need to be yours. Some ideas: Personal projects give you structure and direction while still allowing creative freedom. They also create a body of work that reflects your style more clearly than random, isolated photos. Step 9: Study the Masters—Then Break the Rules It’s essential to study the work of iconic photographers. Learn from their composition, lighting, subject choice, and storytelling. Look at: Analyze what made their styles timeless. But remember—they didn’t follow rules. They created their own. Take what inspires you, then break away. That’s how your style emerges—not from imitation, but transformation. Step 10: Stay Curious Style is not a

Best YouTube Channels That Teach Photography to Beginners
When you’re starting out in photography, it’s easy to feel overwhelmed by the amount of information available online. You know YouTube is a goldmine, but with thousands of creators out there, how do you find the ones that truly help? The truth is, some channels are just better at teaching than others — not just because of their knowledge, but because they genuinely care about helping you grow. In this article, you’ll discover a carefully curated list of the best YouTube channels to learn photography as a beginner. But more than that, you’ll understand why these channels matter, what type of photographer they’re best for, and how to actually apply what you learn. Let’s get into it. Why YouTube Works So Well for Photography Learning YouTube is visual, free, and allows you to learn at your own pace. You can pause, rewatch, slow things down, and follow along step-by-step. That’s a huge advantage for photography — a craft that’s visual by nature. Plus, many of the creators on this list started from scratch. They know what it feels like to be confused by camera settings or overwhelmed by editing software. They speak your language. Whether you’re using a smartphone or your first DSLR, the right videos can help you improve faster than you think. 1. Sean Tucker Sean Tucker doesn’t just teach photography — he teaches you how to be a thoughtful creator. His videos explore topics like artistic purpose, creative self-doubt, and storytelling through images. He also shares behind-the-scenes breakdowns, gear opinions, and how he works with light. But what really sets him apart is his philosophical and emotional approach to creativity. Watch Sean if you’re someone who wants more than technical advice — you want to create with meaning. 2. Mango Street Julia and Daniel (the duo behind Mango Street) make short, fast-paced videos that are easy to digest and full of value. Their tutorials cover composition, posing, editing, and creative exercises you can try immediately. They focus on real-world scenarios using minimal gear. If you’re the kind of learner who wants to see how to make great photos without overcomplicating things, Mango Street is a great place to start. Watch them if you want to level up your creative thinking in small, consistent doses. 3. Peter McKinnon Peter brings energy, storytelling, and inspiration to every video. While his channel includes filmmaking and gear reviews, his passion for photography always shines through. What makes Peter special is his ability to make you excited to go shoot. His content is cinematic, but still approachable. And he’s honest about what works and what doesn’t. Perfect for days when you feel stuck or need a creative kick. 4. Jessica Kobeissi Jessica focuses primarily on portrait photography, sharing full photoshoot breakdowns, posing tips, editing workflows, and often collaborates with other photographers to explore different approaches. She’s approachable, fun, and isn’t afraid to show when things go wrong — which makes her content both relatable and educational. If you want to learn how to photograph people and direct them confidently, Jessica’s channel is a must. 5. The Art of Photography (Ted Forbes) This is a channel for the more reflective learner. Ted Forbes explores the artistic side of photography, including historical context, visual design principles, and book reviews of legendary photographers. His voice is calm, and his content feels like a quiet conversation with a mentor. He doesn’t chase trends — he teaches with depth. If you’re someone who loves art and wants to build your visual literacy, this is your place. 6. The Bite Shot (Joanie Simon) If you’re curious about food photography, Joanie makes it incredibly fun and accessible. She teaches lighting, styling, editing, and camera settings in a friendly, no-pressure way. But even if you’re not into photographing food, her lessons on artificial light apply to product, portrait, and still-life photography too. She’s known for breaking down complex concepts in a way that feels like learning with a friend. 7. Nigel Danson Nigel is a landscape photographer who teaches from the field — forests, hillsides, coastlines — and always brings the viewer into his thought process. He talks about composition, light, gear, and most importantly, how to slow down and see. His honest style (he shares mistakes too) makes it feel like you’re learning with someone who’s walking the same path — just a few steps ahead. 8. PiXimperfect (Unmesh Dinda) This is one of the best channels on the internet for learning Photoshop. Unmesh is a fantastic teacher who explains every tool, concept, and technique with clarity. He doesn’t just show what to click — he tells you why it matters. Whether you’re editing portraits, fixing lighting, or doing creative retouching, PiXimperfect will become a long-term resource. 9. Thomas Heaton Thomas combines landscape photography with storytelling. His videos often follow an entire day (or trip) where he scouts a location, waits for the right light, and reflects on the experience. It’s not always about getting the perfect photo — sometimes it’s about the process, and Thomas captures that beautifully. Ideal for those who want to combine photography with travel and mindfulness. 10. Jamie Windsor Jamie explores creativity, originality, and the psychology behind photography. He talks about topics that most channels ignore — like dealing with comparison, finding your style, or working through creative fear. His videos feel like conversations with a thoughtful friend who “gets it.” If you’re struggling with your identity as a photographer, Jamie’s channel can be incredibly reassuring and practical. How to Make the Most of These Channels It’s easy to fall into the trap of watching too much and doing too little. The best way to learn is to take action — even small action — after every video. Here’s a smart approach: You’ll learn faster by doing than by watching a hundred videos in a row. Suggested Weekly Plan for Self-Taught Beginners Here’s an example of how you could organize your learning: Week 1 – Camera Basics & Exposure Week 2 – Composition

The Best Places to Photograph: Exploring Locations That Will Inspire Your Photography
Photography is a journey, one that requires more than just a camera—it demands inspiration, creativity, and a keen eye for the world around you. One of the best ways to fuel your photographic passion is by exploring new and diverse locations that offer unique perspectives, lighting conditions, and opportunities for stunning shots. Whether you’re an experienced photographer or just starting, the locations you choose can have a profound impact on your work. In this article, we will explore some of the best places to photograph, offering tips, context, and practical advice to help you capture beautiful, inspiring images. 1. Urban Landscapes: Capturing the Pulse of the City Cities around the world are teeming with life, making them prime locations for photography. From towering skyscrapers to bustling streets, urban landscapes provide endless possibilities for dramatic shots. When it comes to city photography, the key is to find the right balance between architecture, people, and the environment. Iconic Landmarks Start with iconic landmarks such as the Eiffel Tower in Paris, the Brooklyn Bridge in New York, or the Sydney Opera House in Australia. These architectural marvels are visually striking and can evoke powerful emotions in your images. However, don’t just capture the typical tourist perspective—try shooting from different angles, focusing on the details, or using reflections from puddles or windows to add a unique touch. Street Photography Beyond the landmarks, cities are full of life, and street photography allows you to capture the raw energy of urban life. From spontaneous interactions between people to the juxtaposition of old and new architecture, city streets offer incredible opportunities for storytelling. 2. Nature and Wildlife: The Beauty of the Great Outdoors If you’re a nature enthusiast or wildlife photographer, there’s no shortage of breathtaking locations to explore. Nature provides some of the most dramatic landscapes and intimate wildlife moments that any photographer would dream of capturing. From lush forests to arid deserts, the world’s natural wonders are an endless source of inspiration. National Parks National parks are some of the best places to photograph nature, offering a variety of environments and ecosystems in one location. Places like Yellowstone National Park in the U.S., Banff National Park in Canada, or Kruger National Park in South Africa are known for their stunning landscapes, wildlife, and natural beauty. Wildlife Photography For those interested in wildlife photography, the world is full of opportunities to capture stunning moments. Safaris in Africa, birdwatching in the Amazon, or whale watching in Alaska are just a few examples of places where you can photograph animals in their natural habitats. 3. Coastal Regions: The Tranquility and Power of the Sea Coastal photography combines the beauty of nature with the dramatic effects of water. From tranquil beaches to rugged cliffs, coastal regions offer a wide range of photographic opportunities. The ever-changing conditions of the sea—waves, reflections, and light—provide unique challenges and creative possibilities for photographers. Seaside Beaches and Cliffs Beaches and cliffs offer a dramatic backdrop for landscape photography. Locations like the Amalfi Coast in Italy, the Pacific Coast Highway in California, or the white sands of the Maldives are just a few of the stunning coastlines that are perfect for capturing the beauty of the ocean. Coastal Wildlife and Seascapes Many coastal regions also provide opportunities for photographing marine life. From seals and sea birds to underwater creatures, coastal environments are rich with wildlife. A coastal landscape shot can become even more dynamic when you incorporate the wildlife that inhabits the area. 4. Rural and Countryside Photography: Finding Peace in Simplicity If you’re looking for more serene and tranquil environments, rural areas and countryside landscapes provide plenty of opportunities for breathtaking shots. The beauty of the countryside often lies in its simplicity—the rolling hills, rustic barns, and quiet farmland can evoke a sense of peace and nostalgia in your photography. The Charm of Small Towns Small towns and villages provide an excellent opportunity to capture everyday life with a touch of rustic charm. Locations like Tuscany in Italy, the Cotswolds in England, or the countryside of Provence in France are known for their picturesque streets, vineyards, and quaint farmhouses. These settings create perfect backdrops for both landscape and portrait photography. Farmlands and Agricultural Scenes Fields of crops, livestock, and rural landscapes can provide incredible opportunities for capturing the essence of farming life. Whether you’re photographing a golden wheat field at harvest time or an old tractor in a barn, the textures and colors of agricultural scenes make for visually interesting and meaningful images. 5. Mountains and High Altitudes: The Majestic Views from Above Mountain ranges offer some of the most breathtaking views and diverse landscapes for photographers. From snow-capped peaks to lush valleys, the high altitudes provide opportunities for both dramatic wide-angle shots and intimate close-ups of flora and fauna. Mountains are ideal for those looking for both adventure and photography. Hiking and Mountaineering Photography If you enjoy outdoor adventures, photographing while hiking or mountaineering offers the chance to capture stunning scenes from high above. Locations like the Swiss Alps, Patagonia in Argentina, or the Himalayas in Nepal are known for their majestic peaks, alpine lakes, and rugged terrains. Glaciers, Valleys, and Lakes Photographing glaciers and valleys in mountainous regions provides an opportunity to capture dramatic geological features. Locations like Iceland, New Zealand, or the Canadian Rockies are home to awe-inspiring lakes and glaciers that offer unique photographic opportunities. 6. Historical Sites and Architecture: Preserving the Past Through the Lens Historical sites and architectural landmarks provide rich, textured subjects for photographers. Whether it’s ancient ruins, grand castles, or modern architectural feats, photographing these sites allows you to capture the intersection of culture, history, and design. Ancient Ruins and Monuments Places like Machu Picchu in Peru, Petra in Jordan, or the Acropolis in Greece are not only visually stunning but also hold significant historical value. Capturing these sites requires patience and creativity, as you’ll want to incorporate both the structure and its environment into your shots. Modern Architecture Modern cities are home to stunning

How to Start Photography as a Hobby: Tips for Beginners
Photography is one of the most fulfilling and accessible hobbies you can start. It allows you to capture beauty, preserve memories, and see the world through a more curious, intentional lens. Whether you’re walking through your hometown, exploring cultural landmarks on vacation, or simply observing the details of your daily life, photography turns the ordinary into the extraordinary. But for beginners, photography can also feel a bit overwhelming. With so many cameras, settings, and styles to choose from, it’s easy to fall into the trap of thinking you need expensive gear or formal training to get started. The truth is, you don’t need perfection—you need passion. If you feel drawn to photography, that’s enough to begin. In this guide, we’ll walk through practical, beginner-friendly tips to help you start photography as a hobby—with clarity, confidence, and joy. Begin with What You Have One of the most common myths about photography is that you need a professional DSLR or mirrorless camera to take “real” photos. While high-end gear has its place, it’s far more important to start with what you already have—even if that’s just your smartphone. Modern smartphones have surprisingly powerful cameras and editing tools. More importantly, they’re always with you, which makes them perfect for practicing the basics of composition, light, and perspective. The key is learning how to use your device more intentionally: You’ll be amazed at how much you can learn just by using what’s in your pocket. Understand Why You’re Drawn to Photography Before diving into techniques or gear, take a moment to reflect: Why do you want to photograph? What kind of images excite or move you? Do you want to capture travel moments, street life, nature, portraits, or abstract shapes and light? Identifying your motivation will help guide your learning path. If you’re passionate about storytelling, for example, you might gravitate toward documentary or street photography. If you love colors and nature, landscape or macro might be your thing. There’s no right answer here—just your personal interest. Photography becomes more enjoyable and meaningful when you align it with what you already love. Learn the Basics of Composition Great photography isn’t about having the latest camera—it’s about how you see. One of the most foundational skills you can develop is good composition: how you arrange elements within your frame to create visual balance, emotion, or impact. Here are a few beginner-friendly composition tips: Practice these consciously, and over time they’ll become second nature. You’ll start to see compositions everywhere, even when you don’t have your camera with you. Get Comfortable with Light Light is the soul of photography. It affects the mood, contrast, clarity, and color of your images. Learning to see and use light well is one of the most important skills for any photographer—beginner or pro. Here’s how to get started: Good light can turn a simple scene into something breathtaking. It’s worth slowing down and waiting for the right moment. Start a Personal Photography Project One of the best ways to stay motivated and improve your skills is by starting a personal photography project. It doesn’t have to be complex. In fact, the simpler the better. Here are a few ideas: Personal projects give structure and intention to your hobby, which is especially useful when you’re just starting out. They also help you develop a consistent style over time. Learn the Exposure Triangle (But Don’t Stress) If you decide to move from smartphone to a camera with manual settings, you’ll encounter the exposure triangle: ISO, shutter speed, and aperture. These three elements work together to determine how bright or dark your photo is. Here’s a quick breakdown: You don’t need to master all this right away. Use auto or aperture priority mode at first, and gradually experiment with manual settings as you become more confident. What matters most is that you keep shooting. Edit Your Photos with Intention Post-processing is part of modern photography, and it can dramatically enhance your images—if done thoughtfully. You don’t need Photoshop to start. Tools like Lightroom Mobile, Snapseed, or VSCO offer powerful editing features right from your phone. Beginner editing tips: Editing isn’t cheating—it’s part of the creative process. It helps you bring your vision to life. Don’t Compare—Celebrate Progress In the age of social media, it’s easy to fall into the comparison trap. You see stunning travel photos or professional portraits and think, “I’ll never be that good.” But remember: every skilled photographer was once a beginner. The only difference is that they kept going. Celebrate your progress. Look back at old photos and notice how your composition, lighting, or focus has improved. Ask for feedback from fellow enthusiasts, but don’t let criticism shake your confidence. Photography is personal. It’s about how you see the world. There is no one “right” way to do it. What matters most is that you’re having fun and expressing yourself. Explore Different Photography Styles As you grow, you’ll discover the many branches of photography—and it’s okay to explore them all. Try: Each style teaches you something different. Try them all, see what excites you, and over time you’ll naturally develop your own visual voice. Join a Community and Stay Inspired Photography can be deeply personal, but it’s also a community-driven art form. Joining a group—online or in person—can give you inspiration, feedback, and accountability. You can: Community helps you feel less alone in your learning journey—and sometimes, one encouraging comment is all it takes to spark a creative breakthrough. Let Photography Change How You See the World As you dive deeper into photography, something magical happens. You begin to see beauty in ordinary places—the way sunlight hits a window, the expression on a stranger’s face, the quiet elegance of a rainy street. Photography turns you into an observer of life. It teaches you patience, awareness, and appreciation. And even if you never turn it into a career, it will give you something just as valuable: a deeper connection to the world around you. So start today. Grab your

Types of Lighting in Photography: Mastering the Art of Light
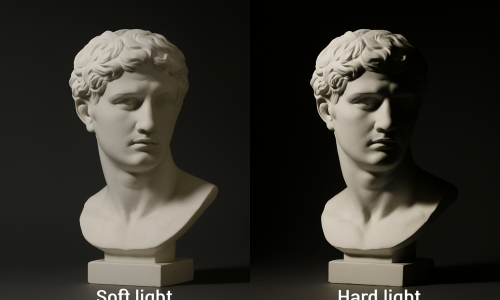
Photography is an art form that hinges on light. The way light falls on a subject can completely transform the mood, texture, and feeling of an image. Whether you are capturing a portrait, a landscape, or an action shot, the lighting you use has the power to make or break the final outcome. But with so many types of lighting techniques to explore, how do you decide which one is best for your shot? In this article, we’ll explore the different types of lighting in photography, providing you with practical tips, real-world examples, and a deeper understanding of how to harness the power of light in your work. Whether you’re a beginner or a seasoned professional, mastering lighting is crucial to creating compelling and visually stunning images. Understanding the Importance of Lighting in Photography Before diving into the specifics, it’s essential to understand why lighting is so vital in photography. Essentially, light determines the exposure, mood, and texture of your photos. The direction, quality, and color of light can influence how shadows fall, how colors appear, and how the subject is highlighted. If you think of light as a tool, it becomes clear that it’s just as important as the camera and lens. Without the right light, even the most high-tech equipment can’t help you achieve the desired results. It’s the lighting that creates the magic, and understanding its role is the first step toward becoming a better photographer. Natural Lighting: The Gift of the Outdoors When most people think of photography lighting, they often think of natural light. This is the light provided by the sun, which is both free and abundant. But as simple as it sounds, natural lighting can be incredibly versatile, offering photographers the ability to capture a wide range of effects, from soft and flattering to dramatic and moody. 1. Soft Natural Light Soft natural light typically occurs during the golden hours of the day—early morning and late afternoon—when the sun is low in the sky. During these times, the light is diffused, often due to the presence of clouds or the time of day, which creates even illumination and soft shadows. This kind of light is perfect for portraiture, as it tends to wrap around the subject’s face, providing a flattering effect. 2. Harsh Natural Light In contrast, midday sunlight is much harsher. The light is often direct and strong, creating stark shadows and high contrast. While this might seem challenging to work with, it can be used creatively to add drama or intensity to an image. Harsh natural light is often ideal for capturing architectural photography, street photography, or dramatic landscapes. Artificial Lighting: Control and Flexibility While natural light is beautiful and free, artificial lighting provides photographers with complete control over their shooting environment. There are various types of artificial lighting that photographers use to achieve specific effects, and understanding how to manipulate them is key to mastering lighting in photography. 1. Continuous Lighting Continuous lighting sources, such as LED panels, tungsten lights, and fluorescent lights, provide a constant stream of light. These types of lights are ideal for beginners or videographers since they allow you to see the effects of the light in real-time. 2. Strobe Lighting Strobe lights, also known as flash lighting, are powerful bursts of light that can be synchronized with your camera’s shutter speed. They are often used in studio photography, particularly for portraits, because they provide a brief, intense light that freezes motion and highlights details with clarity. Key Types of Lighting Setups There are several fundamental lighting setups that are commonly used in photography. Each one can evoke a different mood or style, depending on how the light is positioned in relation to the subject. 1. Rembrandt Lighting Rembrandt lighting is a classic portrait lighting setup that creates a triangle of light on the subject’s cheek. This lighting technique is named after the Dutch painter Rembrandt, who often used it in his paintings to create depth and dimension. To achieve this look, position your light source at about a 45-degree angle from the subject, slightly above their eye level, and off to one side. This will create soft, flattering shadows and highlight the features of the face. 2. Butterfly Lighting Butterfly lighting, also known as Paramount lighting, is often used in beauty and fashion photography. This technique places the light directly above and in front of the subject, creating a soft, flattering shadow under the nose that resembles a butterfly. This setup is particularly popular for its ability to accentuate the cheekbones and jawline, creating a glamorous, smooth look. 3. Loop Lighting Loop lighting is a variation of Rembrandt lighting, where the light is positioned at a slightly more front-facing angle to the subject. It creates a small, loop-shaped shadow under the subject’s nose. This technique is flattering for most face shapes and is one of the most commonly used lighting setups in portrait photography. 4. Split Lighting Split lighting is a dramatic and high-contrast lighting technique where the light is placed directly to the side of the subject. Half of the face is illuminated, while the other half remains in shadow, creating a bold, sculptural look. This lighting style is often used in more artistic, editorial, or cinematic photography. Light Modifiers: Shaping the Light To achieve the perfect lighting for your shots, you often need to shape or modify the light. There are several types of modifiers you can use to soften, diffuse, or direct the light. 1. Softboxes and Umbrellas Softboxes and umbrellas are the most common light modifiers used in studio photography. They help to diffuse the light, making it softer and more even. Softboxes are ideal for portrait photography, as they create flattering, soft shadows that wrap around the subject’s face. 2. Reflectors Reflectors are used to bounce light back onto the subject, filling in shadows and reducing contrast. They come in different colors—white, silver, and gold—each offering a different quality of reflection. Silver reflectors create a harsher, cooler light, while

The Best Budget Lenses for Beginner Photographers
One of the biggest misconceptions about photography is that you need expensive gear to take beautiful photos. Truth is, the lens you choose can make a bigger difference than the camera body itself—especially when you’re just starting out. As a beginner, investing in the right lens can unlock your creativity, sharpen your skills, and help you develop a personal style without breaking the bank. In this guide, we’ll walk through some of the best affordable lenses for beginner photographers. These are real-world recommendations—lenses that I or other enthusiasts have tested, loved, and used to create images that matter. Why Lenses Matter More Than You Think Your camera sensor captures the light, but it’s the lens that decides what kind of light reaches it. Think of lenses as your photography “eyes.” A high-quality lens can: As a beginner, having a versatile lens makes learning more fun and rewarding. You’ll spend less time wrestling with technical limitations and more time actually improving your craft. What to Look for in a Beginner Lens Before jumping into specific models, let’s look at what characteristics make a lens beginner-friendly: 1. Affordability You don’t need to start with a $1,000 lens. Many excellent lenses cost between $100 and $400 and can deliver professional-looking results. 2. Versatility A good beginner lens should handle a wide range of scenarios: portraits, landscapes, street, and even some macro. 3. Ease of Use Look for lenses with fast autofocus, image stabilization (when possible), and a size/weight that feels comfortable on your camera. 4. Compatibility Make sure the lens fits your camera mount—Canon, Nikon, Sony, Fujifilm, or Micro Four Thirds systems. Now, let’s break down the best options based on common categories of photography. Best All-Around Prime Lens: The 50mm f/1.8 (aka the “Nifty Fifty”) Every photographer—beginner or pro—should own a 50mm f/1.8 lens. Why? Available for most brands (Canon, Nikon, Sony, etc.), this lens is a powerhouse for portraits, indoor shots, and creative experimentation. Real-world tip: I shot my first paid portrait session with a 50mm f/1.8. The client loved the results, and the creamy background blur made the images look way more professional than my gear might suggest. It’s also small and lightweight, making it ideal for traveling light or keeping things simple during a day of casual photography. Best Wide-Angle Budget Lens: Canon EF-S 24mm f/2.8 STM or Nikon 35mm f/1.8 DX If you’re using an APS-C (crop sensor) camera, these lenses give you a more natural field of view. These lenses are perfect for beginners looking to explore composition, shoot indoors, or try their hand at storytelling through wide perspectives. They’re also great for group shots and interior photography. Best Zoom Lens on a Budget: 18-55mm Kit Lens (or Upgrade to 18-135mm) Many beginner cameras come with a basic 18-55mm kit lens. Don’t underestimate it! But if you’re ready for a step up, look for an 18-135mm lens. It gives you a much broader zoom range, useful for everything from landscapes to distant subjects without changing lenses. Pro tip: When I started shooting events, I used an 18-135mm for its convenience. I could zoom in on a speaker one moment and grab a wide crowd shot the next without swapping gear. These zoom lenses are perfect for beginners who want to try a bit of everything before committing to more specialized lenses. Best Portrait Lens Under $300: 85mm f/1.8 or 75mm f/1.8 (Mirrorless) For beginners wanting to get into portrait photography, an 85mm (or equivalent) prime lens delivers that dreamy, professional look. Look for: These lenses are fast, sharp, and worth every penny if portraits are your passion. A strong portrait lens will help you understand lighting and composition in a deeper way. Best Lens for Street Photography: 35mm f/1.8 or 23mm f/2 (Mirrorless) Street photographers love these lenses because they’re fast, discreet, and versatile. You can shoot anything from people to architecture with ease. Compact enough to keep your kit lightweight, these lenses are also great for storytelling. They’re also a fantastic choice for environmental portraits, café scenes, and spontaneous moments—key ingredients in a beginner’s visual storytelling journey. Best Macro Lens on a Budget: Tokina 100mm f/2.8 or Canon EF-S 60mm Macro Want to get close and capture the details? Try macro photography with these budget-friendly lenses. Great for beginners who want to experiment with flowers, textures, and small subjects. Example: I once used a budget macro lens to photograph dewdrops on leaves early in the morning—those shots still get the most compliments in my portfolio. Third-Party Brands Worth Exploring Don’t overlook third-party manufacturers like Sigma, Tamron, Samyang, and Viltrox. These companies offer impressive optical quality at a fraction of the price. Always double-check compatibility and autofocus performance with your specific camera body. These brands often push innovation by offering features like constant f/2.8 apertures and unique focal ranges that aren’t always available in first-party lenses. Buying Tips: How to Save Money on Lenses Here are a few quick ways to build your lens collection without going broke: One of the best decisions I ever made as a beginner was buying a used lens that had a few cosmetic scratches but worked flawlessly. I saved nearly 40% and used it for years. Starter Kits: Example Lens Combos by Style To help you build a kit that works, here are a few lens pairings based on photography styles: These combinations give you coverage, quality, and room to grow—without exhausting your budget. How to Choose the Right Lens for You With so many choices, how do you decide? 1. Identify Your Style 2. Think Long-Term Try to invest in lenses that will grow with you. Even if you upgrade your camera later, a good lens will likely remain useful. 3. Try Before You Buy Whenever possible, rent or borrow a lens before committing. This helps you understand what feels right in your hands and fits your shooting style. Ask yourself: does the lens make me want to shoot more? That’s usually a sign it’s the right one. Final

Product Photography for Beginners: Simple Techniques That Work
Good product photography doesn’t just make things look nice — it sells. In a digital world where people can’t touch, hold, or test a product before buying, the photo becomes the product. It’s the first impression, the silent salesperson, and often the deciding factor between a scroll and a click. And the best part? You don’t need a studio or expensive equipment to get started. With basic tools, a creative eye, and a few essential techniques, you can start producing professional-looking product photos — right from your home. Let’s break it down step-by-step, in a way that’s clear, practical, and made for beginners who want results. Understand What Makes a Great Product Photo Before jumping into gear or setup, let’s define what actually makes a product photo effective. It’s not just about being “pretty” — it’s about clarity, purpose, and persuasion. A great product photo should: Different products require different styles. For example: Start by thinking: What feeling should this product create in the viewer? Start With What You Have You don’t need a DSLR to shoot great product photos. If you have a smartphone with a good camera, that’s enough to start. What matters more: That said, here’s a basic equipment checklist (using affordable or DIY options): No fancy studio needed — just good thinking. Lighting: Your Best Friend (or Worst Enemy) Lighting can make or break your photo. The good news? You can do a lot with daylight — if you know how to use it. Natural light setup: Artificial light setup: Quick tip: Always look at your shadows. Soft, controlled shadows make your product look dimensional and elegant. Backgrounds Matter (But Don’t Overdo It) The background should support the product — not distract from it. The cleaner and simpler, the more attention goes to the product itself. Beginner-friendly backgrounds: Use seamless paper rolls, foam boards, or even tile samples from hardware stores. Tape them to the wall or curve them to create a smooth backdrop. Avoid: busy patterns, clutter, strong textures that compete with the product. Composition: Keep It Balanced and Intentional A strong composition guides the viewer’s eye, tells a story, and makes the product stand out. Basic composition tips: Important: Clean the product before shooting! Dust, fingerprints, or smudges will ruin even the best lighting. Angle and Perspective: Show the Product Honestly Different angles tell different stories. The key is to show what matters. Try these: Pro tip: Don’t rely on just one angle. Take 4–6 shots from different perspectives — this increases professional appeal and gives your client or customer options. Add Context (Lifestyle or Use Shots) While white-background images are essential for stores and catalogs, contextual images help customers imagine using the product in real life. Ideas: This is where creativity kicks in. You’re not just showing a product — you’re showing a feeling. Control Reflections and Glare Glossy surfaces like glass, metal, or plastic are tricky. They reflect everything — including you and your camera. Solutions: For bottles or products with clear surfaces, fill them with liquid or colored water to make them photograph better and avoid looking empty. Editing: Clean, Consistent, and Natural Editing is where everything comes together — but it’s easy to go overboard. Editing goals: Recommended tools: Always compare the edited image with the real product. If the color is off or the image looks fake, you’ve gone too far. Show Before-and-After Shots (When Relevant) If you’re working with products that benefit from transformation — like cleaning products, makeup, skincare, or organization tools — consider photographing before-and-after comparisons. This approach works because: Important: Make sure lighting and angle are identical between shots. That way, the viewer focuses only on the difference created by the product — not differences in setup. Create a Visual Style Guide (Even as a Beginner) If you’re photographing products regularly — for your brand, for clients, or for content — it’s worth creating a simple visual guide to keep everything cohesive. This includes: Why does this matter? Because visual consistency builds recognition. Whether you’re shooting five products or fifty, your work should feel like it belongs to the same universe. Even a one-page style board can keep your shoots sharp and your edits focused. Work With Limited Space? No Problem Many beginners think they need a big studio to shoot well. But some of the best product photos are made in tight corners with smart lighting and clean backgrounds. If you’re working in a small room, here’s how to make it work: Remember: control matters more than space. A calm, minimal environment will always outperform a cluttered setup. Don’t Forget to Shoot for Different Platforms One often overlooked detail — especially for beginners — is that product photography isn’t used in just one format. The same product might need to appear on: That means you should plan multiple versions of each shot: Thinking ahead saves time and makes your content more versatile. Even with a small setup, you can deliver a gallery that works across platforms — and that adds huge value to your work. Practice with Household Items If you’re just getting started and don’t have clients yet, you don’t have to wait. Practice with what’s around you. Great starter ideas: The goal isn’t perfection — it’s building your eye. Challenge yourself to make something simple look desirable. That’s the real power of good product photography. Once you get confident, you can start offering your work to local businesses or craft sellers — and begin growing a portfolio. Final Thoughts: It’s About Clarity, Care, and Consistency You don’t need to be a professional photographer to take professional product photos. What matters most is: Take your time. Notice details. Don’t rush. Let light, texture, and context work together. You’re not just clicking a button — you’re building trust with the viewer. And whether you’re shooting your own handmade goods or helping a small business grow, great product photography has the power to make people stop, feel, and take action. So grab your light,