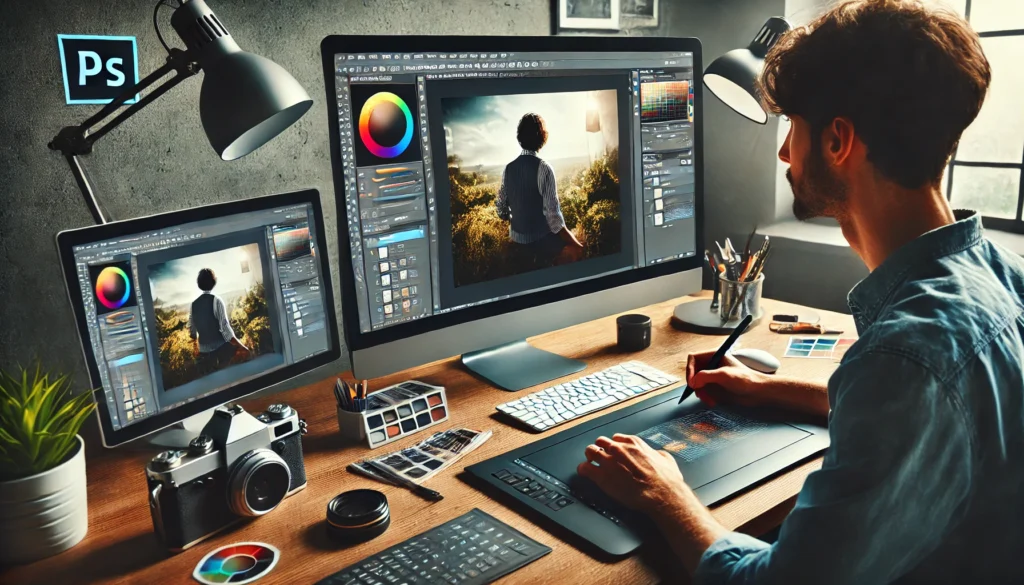
Editing your photos is an essential step in creating stunning images, and Adobe Lightroom is one of the best tools for the job. Whether you’re a beginner or an experienced photographer, Lightroom offers powerful features that allow you to enhance your images and bring your creative vision to life. In this article, we’ll walk you through the basics of editing in Lightroom and some professional tips to help you edit like a pro.
Why Use Lightroom?
Lightroom is a non-destructive editing software, meaning that the original image remains untouched throughout the editing process. All edits are saved as metadata and can be undone at any time. This makes Lightroom a powerful tool for photographers, allowing for extensive adjustments while keeping the integrity of the original file intact.
- User-Friendly Interface: Lightroom’s intuitive interface is easy to navigate, even for beginners. With its clean layout and organized panels, it’s simple to access the tools you need without feeling overwhelmed.
- Comprehensive Editing Tools: Lightroom provides a full range of editing options, including exposure adjustments, color correction, lens correction, and much more. These tools can help you fine-tune every aspect of your image to perfection.
- Batch Editing: Lightroom allows you to edit multiple photos at once, which is especially useful when working with large batches of images. You can apply adjustments to a group of photos and save time while maintaining consistency.
Basic Editing Workflow in Lightroom
Before diving into advanced techniques, let’s first go over the basic steps you should follow when editing photos in Lightroom. Here’s a simple workflow to get you started:
1. Import Your Photos
The first step in editing your photos is importing them into Lightroom. You can import photos from your camera, memory card, or any other storage device. Lightroom supports a variety of file formats, including RAW and JPEG, and provides tools to organize and categorize your images.
- Tip: Import your photos using Lightroom’s “Catalog” feature. This allows you to easily find, sort, and search for your images later.
2. Basic Adjustments: Exposure and White Balance
After importing your photo, the first adjustments you’ll want to make are related to exposure and white balance. These two settings have a huge impact on the overall look of your image.
- Exposure: Adjusting exposure helps you control the brightness of your image. If your photo is too dark, increase the exposure; if it’s too bright, decrease it.
- White Balance: The white balance tool helps you correct color temperature and tint. If your photo has a yellowish or bluish tint, use the white balance slider to correct it and make the colors more natural.
3. Enhance Highlights and Shadows
One of Lightroom’s most powerful tools is the ability to adjust highlights and shadows. This allows you to recover details in both bright and dark areas of your photo.
- Highlights: Lower the highlights slider to bring back detail in overexposed areas, like the sky or bright lights. Raising the highlights can help create a more dramatic effect in photos with high contrast.
- Shadows: Raising the shadows slider helps bring out details in the dark areas of your image, such as the shadows on a person’s face or the dark portions of a landscape.
4. Adjusting Contrast and Clarity
Contrast is essential for adding depth to your photos. By adjusting contrast, you can create a more dynamic image by making the light areas brighter and the dark areas darker.
- Contrast: Increase contrast to make your photos more vibrant and striking. Decrease contrast for a softer, more muted effect.
- Clarity: The clarity slider increases or decreases midtone contrast. Increasing clarity can make your images look sharper and add texture, while decreasing clarity gives a softer, more ethereal look.
5. Fine-Tuning Colors
One of the most fun parts of editing is playing with the colors in your photos. Lightroom offers several ways to enhance and adjust the colors in your images.
- HSL/Color Panel: The HSL (Hue, Saturation, and Luminance) panel allows you to adjust individual colors in your image. You can increase the saturation of certain colors, change their hue, or adjust their luminance to make them lighter or darker.
- Vibrance and Saturation: The vibrance slider increases the intensity of the more muted colors in your image, while the saturation slider affects all the colors in the photo equally. Use vibrance for more subtle adjustments, and use saturation when you want a more dramatic effect.
6. Sharpening and Noise Reduction
After adjusting exposure and color, the next step is to sharpen your image and reduce any noise. Sharpening helps bring out the details in your image, while noise reduction is necessary for photos taken at high ISO settings.
- Sharpening: Use the “Detail” panel to adjust the amount of sharpening. Be careful not to overdo it, as too much sharpening can introduce noise or halos around edges.
- Noise Reduction: If your image has visible grain (often seen in low-light images), use the noise reduction sliders to smooth out the image without losing detail.
7. Lens Corrections
Lightroom offers automatic lens corrections that can help remove distortions such as barrel distortion or vignetting, which are common with wide-angle lenses.
- Enable Profile Corrections: This option automatically applies corrections based on your camera and lens model, removing common lens defects.
- Manual Adjustments: You can also manually adjust distortion, chromatic aberration, and vignetting to further refine your image.
8. Cropping and Straightening
The final step in the editing process is often cropping and straightening the image. If your horizon is crooked or if you want to change the composition, use the crop tool to reframe your image.
- Tip: Use the grid overlay to help align your image correctly. Lightroom provides several crop ratios for common print sizes, so you can easily crop your image to fit your needs.
Advanced Editing Techniques
Once you’re comfortable with the basic adjustments, you can experiment with more advanced techniques to enhance your photos even further.
1. Graduated Filters
Graduated filters are used to adjust specific areas of your image, such as the sky or the foreground. They allow you to apply different edits to different sections of the photo.
- Tip: Use a graduated filter to brighten up a dark sky or bring more detail to a shadowy area.
2. Radial Filters
Radial filters let you create circular or oval-shaped adjustments. They’re great for focusing attention on a subject in the center of the image or for creating vignette effects.
- Tip: Use radial filters to enhance your subject and blur the background for a more focused look.
3. Spot Removal
The Spot Removal tool is perfect for removing small blemishes or distractions from your images, such as dust spots or power lines.
- Tip: Zoom in and use the spot removal tool for precise edits.
Conclusion
Editing your photos with Lightroom doesn’t have to be overwhelming. By following a basic editing workflow and using some of the powerful tools in Lightroom, you can transform your photos into professional-quality images. Whether you’re making subtle adjustments or diving into advanced techniques, Lightroom offers endless possibilities for enhancing your photography. Remember, the key to great editing is practice, so keep experimenting and refining your skills to achieve the best results!

How to Build a Photography Portfolio That Stands Out
A strong photography portfolio is essential for attracting clients, securing freelance gigs, or showcasing your work as a professional photographer. Your portfolio serves as a visual resume, and it needs to highlight your skills, style, and versatility. In this article, we’ll discuss how to build a photography portfolio that stands out, captures attention, and helps you stand out in a competitive industry.
Why Your Portfolio Matters
Your portfolio is often the first impression a potential client or employer will have of your work. A well-curated portfolio can help you:
- Showcase Your Skills: It gives you the opportunity to demonstrate your technical and creative abilities as a photographer. A diverse portfolio shows that you have experience in different types of photography, from portraits to landscapes to product shots.
- Attract Clients: For freelance photographers, your portfolio is your primary marketing tool. It showcases the kind of work you can deliver, and potential clients will want to see it before deciding to hire you.
- Tell a Story: A portfolio isn’t just a collection of random photos. It’s a narrative of who you are as a photographer and what you can bring to the table. By curating your portfolio effectively, you can communicate your unique style and vision.
- Stand Out From the Crowd: With so many photographers in the market, it’s essential to have a portfolio that stands out. A distinctive and high-quality portfolio will help you attract attention and differentiate yourself from others in your field.
Key Elements of a Photography Portfolio
A strong portfolio has several important elements that help create a cohesive and compelling presentation of your work. Let’s take a look at some of these key components.
1. Select Your Best Work
While it may be tempting to include every photo you’ve ever taken, it’s crucial to be selective. Your portfolio should only feature your best and most impactful work. Quality matters more than quantity. A few outstanding images will leave a stronger impression than a large number of mediocre ones.
- Tip: When selecting photos, ask yourself: Does this image represent my skills? Does it reflect the style I want to be known for? Is it something a potential client would want to see?
2. Showcase a Variety of Work
To appeal to a wider audience, include a variety of images that demonstrate your versatility as a photographer. For example, if you specialize in portrait photography, consider including environmental portraits, close-up shots, and studio shots to show the different ways you approach this genre.
- Tip: Diversify your portfolio to show potential clients that you can handle various types of shoots, such as weddings, events, commercial, and product photography.
3. Create a Strong Opening Image
The first image people see will often determine whether they continue viewing your portfolio or not. Make sure to lead with your strongest image. This is the photo that should grab attention immediately and make the viewer want to see more.
- Tip: Choose an image that represents your style and abilities while leaving a lasting impression. If you’re unsure which photo to start with, ask a fellow photographer or friend for their opinion.
4. Highlight a Signature Style
One of the best ways to make your portfolio stand out is by developing a unique and recognizable photographic style. Your style should come through in the composition, lighting, color choices, and overall tone of your images. A signature style will help potential clients instantly recognize your work.
- Tip: Consistency in editing and composition across your portfolio will make it appear more cohesive and polished, helping to reinforce your unique style.
5. Include Client Work (If Applicable)
If you have worked with clients, include those images in your portfolio. Client work demonstrates that you can work professionally and deliver results for real-world projects. Make sure to get permission from clients to use their images in your portfolio, and be mindful of privacy concerns.
- Tip: Showcase a range of client work, including portraits, events, and commercial work, to show that you are adaptable and capable of handling different types of projects.
6. Organize Your Portfolio Effectively
The way you organize your portfolio is crucial to its effectiveness. It should be easy to navigate and display your work in a logical way. Organize your portfolio by categories (e.g., Portraits, Landscapes, Commercial, Events) so that potential clients can easily find the work that interests them.
- Tip: Keep the layout clean and simple. Avoid cluttering the page with unnecessary information, and ensure that your images are the focal point.
7. Add Captions and Context (When Necessary)
While your portfolio should primarily focus on visuals, providing context for your photos can be helpful. Adding short captions, such as the type of shoot, location, and any special techniques used, can give viewers more insight into your process and approach.
- Tip: Don’t overwhelm your portfolio with too much text. Keep it brief and relevant, and let the images speak for themselves.
8. Include Personal Projects
Personal projects are a great way to showcase your passion and creativity. These types of projects often show your true artistic abilities and can give potential clients a better idea of your unique perspective and style.
- Tip: Personal projects can be an opportunity to experiment with new ideas, so don’t be afraid to showcase work that reflects your creative vision.
Building an Online Portfolio
In today’s digital age, having an online portfolio is essential. An online presence allows you to showcase your work to a global audience and gives potential clients easy access to your photos. There are several ways to create an online portfolio:
- Portfolio Websites: Use portfolio platforms like Squarespace, Wix, or Format to create a professional website that showcases your work. These platforms offer customizable templates, making it easy to build a stunning portfolio without any coding experience.
- Social Media: Social media platforms like Instagram, 500px, and Flickr are great for sharing your work and building an audience. Instagram, in particular, is a fantastic platform for photographers to showcase their images and gain exposure.
- Personal Website: Having your own website gives you complete control over your portfolio’s design, layout, and functionality. It also allows you to include more information about yourself, your services, and how potential clients can contact you.
Tips for Promoting Your Portfolio
Once your portfolio is ready, you’ll want to promote it to attract potential clients or employers. Here are some effective ways to promote your portfolio:
- Share on Social Media: Use your social media platforms to share your work and direct followers to your portfolio. Regularly post high-quality images to keep your audience engaged.
- Networking: Attend photography events, workshops, and meetups to network with other photographers and potential clients. Sharing your portfolio with others can lead to collaborations and job opportunities.
- SEO Optimization: Ensure your website is optimized for search engines so that people can easily find your portfolio when searching for photography services online. Use relevant keywords, tags, and descriptions for your images and website content.
- Word of Mouth: Ask satisfied clients for testimonials or referrals. Positive word of mouth is one of the most effective ways to gain new clients.
Conclusion
Building a photography portfolio that stands out takes time and careful curation, but it’s a vital step in establishing yourself as a professional photographer. Focus on quality over quantity, showcase a variety of work, and ensure your portfolio reflects your unique style. With a strong portfolio, you’ll have a powerful tool to attract clients, showcase your talent, and grow your photography career.

How to Create an Attractive Photography Portfolio for Clients
A well-crafted photography portfolio is essential for attracting clients and showcasing your skills. Whether you’re a seasoned professional or just starting in the photography industry, a strong portfolio can make all the difference in gaining new clients. Your portfolio serves as your visual resume, displaying your best work and reflecting your unique style. In this article, we’ll explore how to create an attractive photography portfolio that stands out and impresses potential clients.
1. Curate Your Best Work
The most important element of your portfolio is the work you choose to showcase. Your portfolio should highlight your best and most representative photos that demonstrate your skill, creativity, and versatility. It’s better to have a small selection of high-quality images than to overwhelm viewers with too many mediocre ones.
Choose a Theme or Style
While it’s important to showcase your versatility, it’s equally important to maintain a cohesive theme or style throughout your portfolio. This could be based on the types of photography you specialize in (e.g., portraits, landscapes, events) or a unique creative approach that defines your work. A cohesive portfolio will help potential clients understand your strengths and areas of expertise.
Tip: Group your photos into categories that align with the services you offer, such as portrait photography, wedding photography, product photography, etc. This makes it easier for clients to find the type of work that’s most relevant to them.
2. Showcase a Variety of Work
While your portfolio should have a cohesive style, it’s also important to showcase a variety of work to demonstrate your versatility as a photographer. Potential clients will want to see how you approach different types of photography, lighting, and settings.
Include Different Types of Shots
For a well-rounded portfolio, include a range of images that showcase your ability to handle different situations. This might include:
- Portraits: Close-ups, headshots, lifestyle portraits, or environmental portraits.
- Landscapes: Wide-angle shots, long exposures, and unique perspectives.
- Events: Candid moments, action shots, and posed group photos.
- Product Photography: Clean, detailed shots that highlight your ability to capture products in an appealing way.
- Editorial or Fashion Photography: Stylized images that show your ability to work with models and creative concepts.
Focus on Quality, Not Quantity
A portfolio should be selective. Don’t include every photo you’ve ever taken. Instead, choose the images that best represent your style and expertise. Avoid cluttering your portfolio with too many similar images. Keep it concise and impactful.
Tip: Aim for around 15-20 of your best images to start. Quality always outweighs quantity.
3. Show Your Process and Story
An attractive portfolio doesn’t just showcase the final images—it should also tell a story about your process and your approach to photography. Clients want to know not only what you can do but also how you do it. Sharing your creative process helps clients connect with you and gives them confidence in your ability to deliver.
Behind-the-Scenes Content
Consider adding a behind-the-scenes section or a few images that show you working with clients, setting up shoots, or working on location. This gives potential clients a sense of what it’s like to work with you and helps them visualize how you approach a shoot.
Tip: A “before and after” section can also highlight your editing process. Show raw images alongside the final edits to demonstrate your skill in post-production.
4. Include Testimonials and Reviews
Nothing builds credibility like positive feedback from satisfied clients. Including testimonials in your portfolio can help potential clients feel confident in your abilities. Testimonials act as social proof, providing evidence that you’ve successfully worked with others and that you can deliver high-quality results.
Ask for Client Testimonials
Reach out to past clients and ask for testimonials that you can include in your portfolio. Be sure to choose testimonials that highlight different aspects of your work, such as your professionalism, creativity, attention to detail, or the final results.
Tip: If you don’t have many clients yet, consider offering discounted or free shoots in exchange for testimonials. This can help build your portfolio and establish trust with new clients.
Display Client Names and Projects
Whenever possible, include the names of well-known brands or clients you’ve worked with. This can add credibility and attract attention from potential clients in similar industries.
5. Make Your Portfolio Easy to Navigate
Your portfolio should be easy to navigate and visually appealing. A cluttered or poorly organized portfolio can confuse potential clients and turn them away. Ensure your portfolio is intuitive, easy to browse, and looks professional across all devices (especially mobile).
Simple, Clean Layout
Choose a clean and minimalist layout that allows your images to take center stage. Avoid overly complex designs that distract from the photos. Keep the navigation simple and ensure your contact information is easy to find.
Online Portfolio vs. Physical Portfolio
In today’s digital age, having an online portfolio is essential. Clients are more likely to look at your work online than in person. Consider using portfolio-building platforms like Squarespace, Wix, or Adobe Portfolio to create a professional-looking website.
Tip: If you’re just starting, you can also create a simple Instagram page dedicated to your photography or use a platform like Behance to share your work.
6. Keep Your Portfolio Updated
As you gain more experience and improve your skills, it’s important to keep your portfolio updated. Regularly review your portfolio and replace older or less impressive images with new work that better reflects your abilities. An outdated portfolio can make you seem less professional and reduce your chances of attracting new clients.
Add New Work Regularly
Make a habit of updating your portfolio at least every few months. If you’ve worked on exciting new projects or have refined your skills in a particular area, be sure to showcase that work. Keeping your portfolio fresh helps maintain your credibility and keeps potential clients engaged.
Tip: If you’ve worked with notable clients or received awards, be sure to update your portfolio with that information to further enhance your reputation.
7. Include Your Contact Information and Services
The ultimate goal of your portfolio is to get clients to reach out to you. Make sure your contact information is clearly visible on your website or portfolio. Include a contact form or email address, as well as links to your social media profiles if applicable.
Outline Your Services
In addition to your portfolio, include a brief description of the services you offer. This helps potential clients understand what types of photography you specialize in and what they can expect when working with you. Be specific about the types of projects you take on (e.g., weddings, corporate events, real estate, etc.).
Tip: If you have a booking or inquiry form, make it simple and easy for potential clients to get in touch with you.
Final Thoughts
Creating an attractive photography portfolio is essential for showcasing your skills and attracting new clients. By curating your best work, telling the story of your creative process, including client testimonials, and keeping your portfolio updated, you’ll build a professional online presence that effectively showcases your talent. Remember, your portfolio is your visual resume—make it stand out, and potential clients will take notice.

How to Use Photoshop for Advanced Image Editing
Adobe Photoshop is the industry-standard software for professional image editing. Whether you’re a photographer, graphic designer, or content creator, Photoshop offers powerful tools that allow you to transform, enhance, and manipulate images with precision. In this article, we’ll explore some advanced Photoshop techniques that will help you take your editing skills to the next level.
1. Mastering Layers and Layer Masks
One of the most powerful features in Photoshop is the ability to work with layers. Layers allow you to separate different elements of your image, making it easier to apply changes without affecting the entire composition. Layer masks take this a step further by allowing you to hide or reveal parts of a layer non-destructively.
How to Use Layers
- Create a New Layer: Click the “New Layer” button at the bottom of the Layers panel (or press
Shift + Ctrl + N/Shift + Command + Non Mac). This allows you to add adjustments or elements without altering the original image. - Adjustment Layers: Use adjustment layers to change aspects of your image, such as brightness, contrast, hue, and saturation. Adjustment layers are non-destructive, meaning they won’t permanently alter your original image.
Tip: Name your layers and group them to stay organized, especially when working with complex projects. You can also use blend modes to change how layers interact with each other.
Using Layer Masks
Layer masks allow you to control the visibility of a layer without permanently deleting any content. This is perfect for creating smooth transitions, blending images together, or applying selective adjustments.
- Add a Layer Mask: Click the “Add Layer Mask” button at the bottom of the Layers panel. You can then paint on the mask using a soft brush to hide or reveal parts of the layer.
- Refine the Mask: Use the “Select and Mask” tool to refine the edges of your mask, especially when working with intricate subjects like hair or fur.
Tip: When working with layer masks, use a soft brush with varying opacity to make your edits more subtle and natural.
2. Advanced Selections and Masks
Making precise selections is essential when editing specific parts of an image. Photoshop offers various selection tools that can help you isolate objects and areas for detailed editing.
Using the Pen Tool for Precise Selections
The Pen Tool is one of the most accurate selection tools in Photoshop. It allows you to create paths around objects and convert them into selections. This is particularly useful for complex shapes and objects with sharp edges, like buildings or people.
- Create a Path: Select the Pen Tool (P) and click around the edges of the object to create anchor points. You can adjust the curve of the path by dragging the direction handles.
- Convert to Selection: Once your path is complete, right-click and choose “Make Selection” to convert the path into a selection.
Tip: Practice using the Pen Tool to refine your selection skills. It may take some time to get used to, but it’s incredibly powerful for creating detailed, clean selections.
Using the Quick Selection Tool and Select Subject
For quicker selections, Photoshop’s Quick Selection Tool and Select Subject function can help you automatically detect and select objects based on contrast and edges.
- Quick Selection Tool: Simply brush over the area you want to select, and Photoshop will automatically detect edges and fill in the selection.
- Select Subject: In newer versions of Photoshop, the “Select Subject” option uses AI to automatically identify and select the main subject of the image, saving you time on manual selection.
Tip: After making a selection, refine it by using the “Select and Mask” workspace to smooth edges and remove any unwanted areas.
3. Retouching and Skin Smoothing
For portrait photography and fashion work, retouching is often necessary to perfect the image. Photoshop offers a wide range of tools for smoothing skin, removing blemishes, and enhancing features without making the image look overly edited.
Healing Brush and Spot Healing Brush
The Healing Brush Tool and Spot Healing Brush are essential for removing blemishes, spots, and imperfections. These tools work by sampling pixels from surrounding areas and blending them seamlessly.
- Spot Healing Brush: This tool is great for quickly fixing small imperfections, such as acne or dust spots. Simply click on the blemish, and Photoshop will automatically heal it.
- Healing Brush Tool: This tool gives you more control, allowing you to manually select the area to sample from. It’s perfect for more complex retouching tasks, such as removing wrinkles or other distractions.
Frequency Separation for Skin Smoothing
Frequency separation is an advanced technique used to smooth skin while preserving texture. It separates the image into two layers: one for high-frequency details (skin texture) and another for low-frequency details (color and tone).
- Apply Frequency Separation: Use two duplicate layers and apply a Gaussian Blur to the low-frequency layer to smooth out skin tones. Use the high-frequency layer to paint over any skin texture you want to preserve.
- Blend the Layers: Use layer masks to blend the two layers, allowing you to apply the retouching selectively.
Tip: Use a low opacity brush to gently paint over the skin to keep the retouching natural-looking. Avoid over-smoothing, as this can make the skin look unnatural.
4. Creating Composite Images
Creating composite images involves blending multiple photos together to create a single, seamless composition. This technique is commonly used in advertising, fantasy photography, and creative projects.
How to Combine Multiple Images
- Import the Images: Open all the images you want to combine in Photoshop as separate layers.
- Use Layer Masks: Add layer masks to each layer and use a soft brush to blend the edges of the images together. You can also use the “Align Layers” function to ensure the images fit together seamlessly.
- Adjust Colors and Lighting: After blending the images, use adjustment layers to match the color balance, brightness, and contrast across all layers.
Tip: Pay attention to lighting direction and color temperature when combining images. Mismatched lighting can make the composite look unrealistic.
Adding Textures and Backgrounds
Textures can add depth and interest to your composite images. Overlay textures like fabric, paint, or grunge can be applied using blending modes (such as Overlay or Soft Light) to enhance your composition.
Tip: Experiment with different blending modes to see how textures interact with your images and create unique effects.
5. Advanced Color Grading
Color grading is an essential part of post-processing that allows you to create a specific mood or tone in your images. Photoshop offers powerful tools for color grading, including the Camera Raw filter and Adjustment Layers.
Using the Camera Raw Filter
The Camera Raw filter allows you to adjust the overall tone and color of your image in a non-destructive way. You can use it to fine-tune the exposure, contrast, saturation, and vibrancy.
- Adjust White Balance: Use the Temperature and Tint sliders to correct the color balance and create a more cinematic look.
- Apply Gradients: Use the Graduated Filter or Radial Filter to apply color adjustments to specific areas of the image, such as brightening up the sky or adding warmth to the subject.
Color Lookup Tables (LUTs)
LUTs are pre-set color grading profiles that can instantly change the look of your image. Photoshop includes a variety of LUTs, and you can also create your own.
Tip: Experiment with different LUTs to quickly find a style that fits your image. You can also adjust the opacity of the LUT layer to fine-tune the effect.
Final Thoughts
Photoshop is a powerful tool that offers endless possibilities for advanced image editing. By mastering techniques like layers, advanced selections, retouching, composites, and color grading, you can elevate your photos to a professional level. Whether you’re a photographer, designer, or content creator, learning how to use Photoshop for advanced editing will help you unlock your creative potential and produce stunning, high-quality images.
How to Edit Photos to Highlight Colors and Details
Editing photos to highlight colors and details is an essential skill for photographers who want to bring out the true beauty of their images. Whether you’re enhancing vibrant sunsets, fine-tuning portraits, or making product photos pop, effective photo editing can elevate your work and make your photos stand out. In this article, we’ll explore techniques for editing photos to highlight colors and details, using popular editing software like Adobe Lightroom and Photoshop.
1. Adjusting Exposure and Contrast for Clarity
The first step in enhancing your photos is ensuring that the exposure and contrast are properly adjusted. These basic adjustments can make a huge difference in bringing out the colors and details of your image.
Exposure Adjustment
Exposure controls the overall brightness of an image. If your photo is too dark or too bright, adjusting the exposure can help restore details in both the shadows and highlights.
- Increase Exposure for Dark Photos: If your image appears too dark, you can increase the exposure to brighten it. However, be careful not to overdo it, as this can cause highlights to be blown out.
- Decrease Exposure for Overexposed Photos: If the image is too bright, reduce the exposure to bring back details in the highlights.
Tip: Use the histogram to check exposure levels. The histogram helps you see whether the shadows or highlights are being clipped, giving you a better idea of how to adjust exposure.
Contrast Enhancement
Contrast refers to the difference between light and dark areas in an image. Increasing contrast can make your image more dynamic, helping colors pop and enhancing textures.
- Increase Contrast for More Drama: A slight increase in contrast can make colors appear more vivid and enhance the texture in your photo.
- Reduce Contrast for Softer Images: If you want a more gentle or subtle effect, reducing contrast can make the photo feel softer and more muted.
Tip: If you’re working with portraits, be careful not to increase contrast too much, as it can make skin tones look harsh. In such cases, a subtle contrast boost works best.
2. Enhancing Colors with Saturation and Vibrance
Once the exposure and contrast are adjusted, the next step is to enhance the colors in your image. Both saturation and vibrance are powerful tools for emphasizing colors, but they work differently and should be used in specific ways.
Using Saturation
Saturation increases the intensity of all colors in an image. By increasing saturation, you can make the colors appear more vivid and bold. However, over-saturation can make the image look unnatural, so it’s important to use it sparingly.
- Boost Colors for Impact: Use saturation to enhance vibrant colors, such as in a sunset, flower, or outdoor landscape.
- Be Careful with Skin Tones: Avoid boosting the saturation too much, especially in portraits, as this can make skin tones look unnatural.
Tip: In Lightroom, you can adjust the saturation of individual colors (like red, blue, or green) using the HSL panel for more targeted control.
Using Vibrance
Vibrance, on the other hand, selectively boosts the intensity of the more muted colors without affecting already vibrant ones. This tool is useful for enhancing colors while keeping skin tones and other subtle colors from looking overdone.
- Increase Vibrance for Subtle Boosts: Use vibrance to enhance colors in a balanced way. This tool is particularly useful when you want to boost colors in a landscape or nature shot without affecting skin tones.
Tip: Start by adjusting vibrance first, and then use saturation if you need a stronger effect. Vibrance tends to give a more natural result, especially in portraits.
3. Fine-Tuning Details with Clarity and Sharpness
When highlighting details, it’s important to enhance textures and bring out fine details in your image. Clarity and sharpness are two key tools that can help achieve this.
Using Clarity for Texture
Clarity increases midtone contrast, making textures and details more pronounced. It’s especially useful for adding depth and dimension to landscapes or architectural photos.
- Increase Clarity for Stronger Details: When editing landscape photos, increasing clarity can make the textures of rocks, water, or foliage stand out more.
- Reduce Clarity for a Softer Look: Lowering clarity softens the image and creates a dreamy or ethereal feel, which can be useful in portrait photography to smooth skin or give a more flattering look.
Tip: Use clarity sparingly in portraits, as too much can make skin look harsh. In nature or architectural shots, it can be applied more liberally for dramatic results.
Enhancing Sharpness
Sharpness helps bring out fine details in your image, such as the texture of a subject’s face, the fur on an animal, or the intricate patterns in a landscape. Use sharpening tools to make your photo appear crisper.
- Increase Sharpness for Crisp Details: Use the sharpening slider in Lightroom or the “unsharp mask” in Photoshop to add clarity to the fine details in your image.
- Be Careful with Noise: When applying sharpness, especially in low-light images, be mindful of adding noise (grain) to your photo. To avoid this, apply sharpening selectively or use noise reduction tools.
Tip: In Photoshop, use the “Sharpen” filter or “High Pass” filter to sharpen your image while retaining control over the intensity.
4. Using Local Adjustments for Targeted Edits
In many cases, you may want to highlight specific details or colors in one area of the photo without affecting the rest of the image. Local adjustments allow you to target specific areas for edits.
Graduated Filter
The graduated filter tool allows you to adjust exposure, contrast, or other settings gradually across the image, usually from one side to another. It’s particularly useful for landscapes, where you might want to darken the sky or brighten the foreground.
- Enhance Skies or Landscapes: Use the graduated filter to darken an overexposed sky or add warmth to the foreground in landscape photos.
Tip: Use the graduated filter to balance out lighting, especially in wide shots where one part of the image is much brighter than the rest.
Adjustment Brush
The adjustment brush in Lightroom or Photoshop allows you to paint specific areas of your image with adjustments like exposure, saturation, or sharpness. This is great for selectively highlighting details, such as a subject’s eyes in a portrait or the texture of a leaf in a nature shot.
- Enhance Specific Areas: Use the adjustment brush to bring out the details of a specific area without affecting the entire image. For example, you could brighten the eyes in a portrait or enhance the texture of a flower petal.
Tip: Use a soft brush and adjust the brush size for more precise edits, especially in small or intricate areas.
5. Experiment with Creative Effects
Sometimes, adding creative effects can highlight the mood or story of your photo. These effects can transform a standard image into something unique and artistic.
Adding Vignettes
A vignette darkens the corners and edges of your image, drawing attention to the center or a specific focal point. It’s often used to focus the viewer’s eye on the subject.
- Use Vignettes for Focus: Apply a subtle vignette to highlight the subject in the center of the photo, especially for portraits or product shots.
Tip: Keep the vignette subtle to avoid distracting from the subject. Use the vignette tool in Lightroom or Photoshop to control the intensity and size of the effect.
Playing with Color Grading
Color grading allows you to adjust the overall tone of your image, giving it a specific mood or style. For example, adding a warm, golden tone can evoke a sense of nostalgia or tranquility, while cool tones can create a more dramatic or moody feel.
- Adjust Shadows, Midtones, and Highlights: Use color grading tools to tweak the colors in the shadows, midtones, and highlights to create a cohesive color palette.
- Create a Cinematic Look: Experiment with color grading to give your photos a more cinematic, professional appearance.
Tip: Be mindful of the overall mood you want to convey with your color grading. Try to match the color palette with the emotion or theme of your photo.
Final Thoughts
Editing photos to highlight colors and details is an essential skill that can make a huge difference in the final result. By adjusting exposure, contrast, vibrance, and clarity, you can bring out the best in your images and create visually stunning photographs. Whether you’re enhancing the natural beauty of a landscape or adding a creative touch to a portrait, effective editing can transform your photos and make them stand out. Experiment with the tools and techniques mentioned above to refine your editing process and develop your unique photographic style.

How to Use Portrait Photography to Improve Your Professional Image
In today’s digital age, your online presence can make a significant impact on your professional reputation. Whether you’re building a personal brand, applying for a job, or networking within your industry, having a professional portrait that reflects your personality and expertise is essential. Portrait photography plays a key role in establishing a strong and professional image. In this article, we’ll explore how you can use portrait photography to enhance your professional image, from selecting the right style to posing and editing.
1. Choose the Right Photographer and Style
The first step in using portrait photography to improve your professional image is to choose a photographer whose style aligns with the image you want to portray. A professional photographer will know how to capture your best angles and use lighting and composition to highlight your features effectively.
Find a Photographer Who Understands Your Vision
Look for a photographer who specializes in professional portraits, whether for business, headshots, or personal branding. Review their portfolio to ensure that their style aligns with the image you want to project. For example, some photographers specialize in clean, corporate headshots, while others may offer a more creative, lifestyle-focused style.
- Corporate Style: If you’re using your portrait for LinkedIn, a resume, or professional presentations, a clean, neutral background with soft lighting is ideal.
- Personal Branding: If you want your portrait to showcase your creativity and personality, opt for a more relaxed, artistic style that may include outdoor settings or unique backgrounds.
Tip: Schedule a consultation with the photographer to discuss your goals for the session. Share the purpose of the portrait (e.g., LinkedIn profile, website, business cards) so the photographer can tailor the session accordingly.
Select the Right Clothing and Accessories
The clothing you choose for your portrait should reflect your professionalism and the role or industry you’re in. Keep in mind that solid colors and classic styles tend to work best for professional portraits.
- Keep It Simple: Avoid loud patterns and busy designs that can distract from your face. Solid colors, especially in neutral tones (e.g., navy, gray, black), create a clean, professional look.
- Dress for the Industry: Consider the industry you’re in. Corporate professionals often opt for formal attire like a suit or blouse, while creative professionals may choose a more relaxed or casual style, such as a tailored jacket or shirt.
Tip: Make sure your clothing fits well and is clean and wrinkle-free. It’s also a good idea to avoid overly trendy items that may not age well over time.
2. Posing for Your Professional Portrait
Posing is crucial in portrait photography, as it can influence how you come across in your professional image. A good portrait will highlight your strengths while also conveying confidence, approachability, and professionalism.
Stand or Sit with Confidence
Your posture plays a huge role in conveying confidence. Stand or sit with your back straight and shoulders relaxed. Avoid slouching, as it can make you appear less professional or less confident.
- Shoulders Back: A good posture with your shoulders slightly back helps to project confidence and approachability.
- Angle Your Body Slightly: Instead of facing the camera directly, slightly angle your body to the side. This creates a more flattering and dynamic look.
Tip: Practice good posture before the shoot. If you’re unsure, ask the photographer for guidance on how to stand or sit during the session.
Relax Your Face and Smile Naturally
While a smile is essential in portrait photography, a forced or stiff expression can look unnatural. The goal is to look professional, yet approachable, and to have a genuine expression that reflects your personality.
- Smile with Your Eyes: A genuine smile will engage your eyes, which is key in making a connection with the viewer. A slight smile often works better than a broad grin, as it appears more natural and professional.
- Relax Your Jaw and Face: Tension in your face can make the photo look stiff. Take a deep breath and relax your facial muscles to ensure a more natural look.
Tip: If you’re feeling nervous, take a moment to relax and breathe. Often, the best shots are captured when you’re comfortable and at ease.
3. Lighting and Background Choices
Lighting is one of the most important elements in portrait photography. The right lighting will highlight your best features and help create the mood and tone you want to convey in your professional image. The background also plays a key role in how your portrait is perceived.
Soft, Flattering Lighting
Soft, diffused lighting is ideal for portraits, as it minimizes harsh shadows and highlights, creating an even and flattering look. A common technique for portrait photography is to use natural light from a large window or softbox lighting to ensure that the light wraps around your face smoothly.
- Avoid Harsh Shadows: Hard light can create harsh shadows on your face, which can be unflattering. Diffuse the light to soften it and reduce shadows.
- Use Catchlights: Catchlights are the small reflections of light in your eyes. They help add life to your expression and make your portrait look more engaging.
Tip: If shooting outdoors, try to avoid direct sunlight. Instead, opt for overcast days or shoot in shaded areas for softer, more even light.
Choosing a Simple, Professional Background
The background of your portrait should be simple and neutral to ensure that the focus stays on you. A cluttered or busy background can distract from your professional image.
- Neutral or Solid Colors: A solid, neutral background (such as white, gray, or beige) is ideal for corporate headshots. It provides a clean, distraction-free canvas that highlights your features.
- Outdoor Settings: If you want a more natural or relaxed look, an outdoor background with greenery or an urban setting can add depth and context to your photo without overpowering it.
Tip: Avoid backgrounds with too much contrast or color that might compete with your attire. The goal is for the background to complement your look, not overshadow it.
4. Post-Processing for Professional Finishing
After the photo session, post-processing is key to achieving a polished and professional result. While editing should enhance the photo, it’s important to maintain the authenticity of the image and avoid overdoing it.
Correct Exposure and White Balance
Adjust the exposure and white balance to ensure that the colors are accurate and the image is well-lit. Too much exposure can make the photo look washed out, while too little can result in a dark and unappealing image.
- Adjust Skin Tones: If your portrait has uneven skin tones or lighting issues, use the editing tools to correct them. However, avoid over-smoothing the skin, as this can make the photo look artificial.
Tip: Maintain natural skin textures in your final edit. Your professional portrait should reflect your true self.
Enhance the Details
Sharpen the image slightly to ensure that the details—such as your eyes, hair, and clothing—are crisp and clear. You can also make subtle adjustments to enhance the contrast and color saturation.
- Vibrance and Saturation: Increase the vibrance to enhance the colors without making them look unnatural.
- Remove Blemishes: Use the healing brush or spot removal tool to clean up any minor imperfections, but avoid excessive retouching.
Tip: Keep the editing subtle. The goal is to enhance your natural appearance, not change it entirely.
5. Where to Use Your Professional Portrait
Once your professional portrait is ready, it’s time to showcase it across your personal and professional channels.
- LinkedIn Profile: Your LinkedIn profile picture is one of the first things potential employers or clients will see, so make sure your portrait is polished and reflects your professional brand.
- Website and Portfolio: A professional portrait on your website or portfolio can help establish trust with your audience and make you more relatable.
- Social Media and Business Cards: Consistent, high-quality portraits on your social media profiles and business cards help reinforce your professional image and brand.
Tip: Keep your professional portrait up-to-date. Refresh your image every few years to ensure it still reflects your current style and professional persona.
Final Thoughts
A professional portrait is a powerful tool for enhancing your personal brand and making a positive first impression in your professional life. By selecting the right photographer, understanding the best lighting and posing techniques, and making subtle edits to perfect your image, you can create a portrait that reflects your professionalism, confidence, and personality. Whether you’re using it for LinkedIn, a portfolio, or a business website, your professional image plays a vital role in shaping how others perceive you in your career.

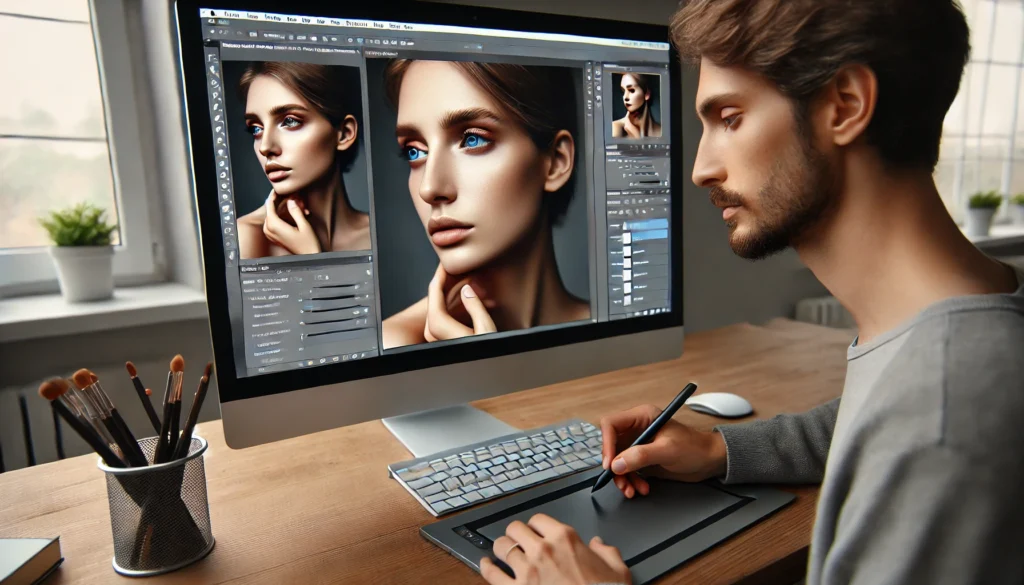
How to Edit Portrait Photos and Make Skin Look Perfect
Portrait photography is all about capturing a person’s personality, expression, and natural beauty. However, even the best portraits can benefit from some post-processing to enhance the subject’s features and make the skin look flawless. Editing portrait photos to create smooth, glowing skin without losing natural texture is an essential skill for photographers. In this article, we’ll explore techniques for editing portrait photos and making skin look perfect while maintaining a realistic and professional appearance.
1. Start with Basic Adjustments
Before diving into skin retouching, it’s important to start with basic adjustments to ensure your photo is well-exposed, balanced, and sharp.
Adjust Exposure and Contrast
- Exposure: The first step in editing a portrait is ensuring that the exposure is correct. If your portrait is too bright or too dark, adjust the exposure to bring out the details in both the highlights and shadows. If the photo is too bright, reduce the exposure slightly, and if it’s too dark, brighten it up.
- Contrast: Adjusting contrast enhances the depth of the photo. Increasing contrast can make the image feel more vibrant and dynamic, while lowering it can create a softer, more subtle look.
Tip: Use the histogram to help guide your adjustments. A well-balanced histogram will ensure you have the right exposure and contrast without losing important details.
Correct White Balance
White balance is crucial in portrait photography, especially when it comes to skin tones. If the white balance is off, it can make skin appear too warm (orange) or too cool (blue).
- Adjust Temperature and Tint: Use the temperature slider to adjust the warmth or coolness of the photo. Increase the temperature for a warmer tone or decrease it for a cooler look. Fine-tune the tint to correct any green or magenta hues in the skin.
Tip: For natural-looking skin tones, aim to keep the white balance close to neutral. Avoid overly warm or cool tones unless you’re going for a creative effect.
2. Retouching Skin to Achieve a Smooth, Natural Look
While skin retouching is an essential part of portrait editing, it’s important to avoid overdoing it. You want the skin to look smooth and flawless but still retain its natural texture and details.
Use Frequency Separation for Skin Smoothing
Frequency separation is a powerful technique that separates the image into two layers: one for texture (the high frequency) and one for color and tone (the low frequency). This allows you to smooth out the skin without affecting the skin’s natural texture.
- Low Frequency Layer: Focus on the low-frequency layer to adjust the color and tone of the skin, correcting any blotches or discoloration. Use the healing brush or clone tool to remove blemishes or uneven patches.
- High Frequency Layer: Use the high-frequency layer to retain skin texture. You can use tools like the clone stamp or healing brush to clean up any imperfections while keeping the skin’s natural texture intact.
Tip: Be subtle with frequency separation. You don’t want to eliminate all texture, as it will make the skin look unnatural. Keep a balance between smoothness and texture.
Remove Blemishes and Imperfections
Even with the best lighting, blemishes, acne, or other imperfections may appear in your portraits. You can easily remove these imperfections using tools like the healing brush, spot removal, or clone stamp.
- Healing Brush: Use the healing brush tool to sample surrounding skin areas and paint over blemishes. This method blends the area seamlessly, maintaining the natural skin texture.
Tip: Use the healing brush sparingly and be careful not to overdo it. Focus on small imperfections and avoid altering the natural structure of the skin.
3. Enhance Skin Tone and Smoothness
Once you’ve addressed blemishes and imperfections, it’s time to enhance the overall skin tone and smoothness.
Use the HSL (Hue, Saturation, and Luminance) Panel
The HSL panel is a powerful tool for adjusting the skin tone in your portrait. By adjusting the hue, saturation, and luminance of individual colors, you can achieve the perfect skin tone.
- Hue: If the skin has a green or magenta tint, use the hue slider to correct it. Adjusting the red or orange hues will help balance the skin tone.
- Saturation: Adjusting the saturation of the reds and oranges can help intensify or mute the skin tone. However, avoid oversaturating the skin, as it can look unnatural.
- Luminance: Use the luminance slider to adjust the brightness of specific colors. Increasing the luminance of reds and oranges can brighten the skin tone without making it look too light.
Tip: Adjust the skin tones carefully, and always aim for a natural look. You don’t want to make the skin appear too flat or too vibrant.
Soften Skin with the Blur Tool
To further smooth the skin, you can use the blur tool to soften areas that need extra attention. This works well for areas with uneven skin texture or shadows.
- Use a Low Opacity: When using the blur tool, keep the opacity low (around 10-20%) and work in small, gradual strokes. This will help you retain some texture while softening the skin.
Tip: Apply the blur tool subtly and avoid using it on the eyes, hair, or any areas where texture is important.
4. Dodge and Burn for Depth and Dimension
Dodge and burn is a technique used to lighten (dodge) or darken (burn) certain areas of the portrait to create depth, add dimension, and emphasize facial features.
Dodge and Burn to Enhance Highlights and Shadows
- Dodge: Use the dodge tool to lighten areas of the face where light naturally falls, such as the forehead, cheekbones, and nose. This will add highlights and give the skin a healthy glow.
- Burn: Use the burn tool to darken areas where shadows fall, such as the jawline, sides of the nose, and under the chin. This adds depth and shape to the face.
Tip: Use a soft brush and low exposure settings for dodge and burn. Gradually build up the effect to avoid harsh lines or overdoing the adjustments.
5. Final Touches: Sharpening and Noise Reduction
Once the skin is looking perfect, it’s time to add the finishing touches to your portrait photo.
Sharpen the Image
After you’ve smoothed the skin and enhanced the details, it’s important to sharpen the image to bring out the fine details in the eyes, lips, and hair. Use a sharpening tool or filter to enhance the image, but avoid sharpening the skin to maintain its smoothness.
- Selective Sharpening: Focus on sharpening the eyes and other key features, leaving the skin soft and smooth.
Reduce Noise
If you’ve used a high ISO or shot in low-light conditions, your portrait may have some grain or noise. Use noise reduction tools to minimize this while preserving the details in the skin and hair.
Tip: Apply noise reduction carefully, as too much can result in a loss of detail. Use selective noise reduction to target the areas with visible grain.
Final Thoughts
Editing portrait photos to create smooth, glowing skin without losing the natural texture is a valuable skill for photographers. By using techniques like frequency separation, dodging and burning, and careful use of the HSL panel, you can achieve professional, flawless results while maintaining the authenticity of the subject. Remember, less is more when it comes to skin retouching—subtle enhancements will make your portrait photos look natural, engaging, and timeless.
How to Organize Your Photo Editing Workflow for Increased Productivity
Editing photos can be a time-consuming process, especially when you’re working with a large batch of images. Whether you’re a professional photographer, a content creator, or simply someone who enjoys editing photos, having a well-organized workflow can significantly boost your productivity and make the editing process more efficient. In this article, we’ll explore tips and strategies for organizing your photo editing workflow, allowing you to work faster, stay focused, and deliver high-quality images.
1. Set Up an Efficient File Management System
The foundation of a productive photo editing workflow is a solid file management system. Organizing your files properly from the moment you import them can save you time later and ensure that you can quickly find and access the images you need.
Create a Folder Structure
Establish a clear and consistent folder structure for organizing your images. This will help you keep everything in order, especially if you’re dealing with multiple projects or clients.
- Main Project Folder: Create a folder for each project or client, and within that folder, create subfolders for different stages of the editing process. For example:
- Raw Files
- Edited Files
- Final Deliverables
- Subfolder Naming: Use clear, descriptive names for your subfolders to make it easy to identify the contents. Include details like the shoot date, location, or type of shoot (e.g., 2023-05-15_Wedding_Day1).
Tip: Consistent naming conventions will help you locate specific files quickly, saving you time when you need to edit or export images.
Use Keywords and Metadata
If you’re working with a large volume of images, using keywords and metadata to categorize and tag your files can make a huge difference. Most photo editing software, like Adobe Lightroom, allows you to add keywords, ratings, and metadata to your images.
- Add Keywords: Tag images with relevant keywords that describe the content, location, or theme of the shoot. For example, you could tag portrait photos with terms like outdoor, sunset, or smiling.
- Ratings and Flags: Use ratings (1 to 5 stars) to mark the best shots, and flag images that need further editing or have issues.
Tip: Utilize Lightroom’s “collections” feature to group similar photos together for easier access and quicker sorting.
2. Streamline Your Editing Process with Presets and Templates
Using presets and templates is a great way to speed up your photo editing process, especially for tasks that require consistent settings across multiple images.
Lightroom Presets for Quick Edits
Lightroom presets are pre-configured editing settings that can be applied to your images with a single click. These presets can help you maintain consistency and speed up the editing process, particularly for basic adjustments like exposure, contrast, and color grading.
- Create Custom Presets: If you frequently apply similar adjustments to your photos, create custom presets to save time. For example, if you always adjust exposure and white balance in the same way, save those settings as a preset.
- Use Third-Party Presets: There are many free and paid presets available online, designed for specific photography styles, such as portrait photography, landscape photography, or vintage effects.
Tip: Apply presets to your images and then fine-tune the settings for each individual photo as needed. This will help you maintain consistency while allowing for adjustments when required.
Photoshop Actions for Repetitive Tasks
In Photoshop, actions are a powerful tool for automating repetitive tasks. Actions allow you to record a series of editing steps and apply them to multiple images with a single click.
- Create Custom Actions: If you often perform similar tasks, such as resizing images, applying a sharpening filter, or correcting skin tones, create custom actions to automate these steps.
- Use Batch Processing: Photoshop’s batch processing feature allows you to apply actions to a large group of images, saving you hours of manual editing.
Tip: Use actions for tasks like resizing or adding watermarks, so you can focus on more creative aspects of editing.
3. Set Time Limits and Use Timers
One of the biggest challenges when editing photos is staying on task and avoiding time-wasting distractions. Setting time limits for each phase of the editing process can help you stay focused and maintain productivity.
Break the Editing Process Into Phases
Instead of editing all your images at once, break the process into manageable phases. This can help you stay organized and avoid burnout during long editing sessions.
- Phase 1: Culling and Sorting: Go through the images and eliminate duplicates or poorly lit shots. Apply flags or ratings to mark the best images for further editing.
- Phase 2: Basic Adjustments: Make global adjustments to exposure, contrast, white balance, and cropping.
- Phase 3: Detailed Editing: Work on more detailed edits, like skin retouching, background adjustments, or special effects.
- Phase 4: Final Touches: Do a final pass for sharpening, noise reduction, and ensuring color consistency across all images.
Tip: Use a timer or productivity app to set time limits for each phase. For example, spend 15 minutes on culling, 30 minutes on basic adjustments, and 45 minutes on detailed editing. This will help you stay on track and avoid spending too much time on one task.
Avoid Perfectionism
While it’s important to produce high-quality work, perfectionism can slow you down. Set realistic expectations for yourself and avoid getting bogged down in minor details that don’t significantly improve the final image.
Tip: Remember, you can always come back to refine your edits later. Focus on getting the basics done first, and leave the finer adjustments for the end.
4. Organize Your Exporting Process
The final step of photo editing is exporting the images for delivery or uploading. Having an efficient exporting process is key to saving time, especially when you need to deliver multiple files quickly.
Use Export Presets
Most photo editing software, like Lightroom and Photoshop, allows you to create export presets with pre-configured settings for file size, resolution, and file type. This is especially helpful when you need to export large batches of photos for different platforms (e.g., social media, print, web).
- Create Export Presets: Set up export presets for various purposes, such as high-resolution images for printing, web-sized images for e-commerce, and social media-ready photos.
- Use Watermarks: If you want to protect your images, add watermarks during the export process to ensure they’re credited properly.
Tip: Set up export presets for common output requirements to save time on each export. Ensure you include metadata, resizing, and color space settings for consistency.
Batch Exporting
Batch exporting allows you to export multiple images at once, using the settings you’ve applied. Whether you’re working in Lightroom or Photoshop, batch exporting ensures that your images are processed efficiently.
Tip: Use batch exporting when you have a large volume of photos to deliver, such as after a wedding shoot or event. It will save you a lot of time compared to exporting each image individually.
5. Back Up Your Files
Backing up your files is essential for protecting your hard work and ensuring that your edited images are safe. Losing your original files or edited work can be devastating, so make backup copies in multiple locations.
Use Cloud Storage and External Hard Drives
- Cloud Storage: Use cloud services like Google Drive, Dropbox, or Adobe Creative Cloud to store backup copies of your edited photos. Cloud storage ensures that your files are safe and accessible from anywhere.
- External Hard Drives: Invest in a reliable external hard drive for additional backups. This provides extra protection and ensures you have physical copies of your images in case of a computer failure.
Tip: Back up your files regularly after editing each batch of photos to avoid losing your work.
Final Thoughts
A well-organized photo editing workflow can help you work faster, more efficiently, and produce higher-quality results. By setting up an efficient file management system, using presets and actions, breaking the process into phases, and organizing your exporting and backup procedures, you can streamline your editing process and boost productivity. With these strategies in place, you’ll be able to spend less time on technical tasks and more time being creative with your photography.

The Importance of Photography in Digital Marketing and How to Make the Most of It
Introduction
In today’s digital world, photography plays a crucial role in the success of online marketing strategies. High-quality images can engage customers, enhance brand identity, and boost conversion rates. In this article, we will explore the importance of photography in digital marketing and how businesses can leverage it to their advantage.
1. Visual Content Drives Engagement
Studies have shown that content accompanied by images or videos receives significantly more engagement than text-only content. In fact, social media posts with high-quality images receive 94% more views than those without. Visuals help capture the attention of potential customers and hold it long enough to convey key messages.
By incorporating photography into your digital marketing campaigns, whether on social media, websites, or email marketing, you increase the likelihood of engaging your audience and creating a strong emotional connection.
2. First Impressions Matter
The first impression is everything in marketing. Whether it’s the first visit to your website, an email campaign, or a product listing, high-quality photos instantly communicate professionalism and build trust with your audience. A poorly taken photo, on the other hand, can make a brand look untrustworthy and unprofessional.
Investing in quality photography is crucial to creating a positive and memorable first impression for your audience. This applies to product photography, lifestyle shots, and even the photos used for blog posts and social media.
3. Photography Enhances Brand Identity
A brand’s visual identity is a powerful tool for establishing recognition and loyalty. Consistent use of high-quality images that align with your brand values, colors, and messaging can create a strong visual identity. This helps differentiate your brand from competitors and gives customers a reason to remember and trust your business.
For example, a fashion brand that uses a consistent style of photography—showcasing products in a lifestyle setting—reinforces its brand image of luxury and sophistication. Similarly, a coffee shop might choose a warm and inviting aesthetic to emphasize its cozy, community-focused atmosphere.
4. Photography Increases Conversion Rates
Photography has a direct impact on conversion rates, especially when it comes to e-commerce. Product images are often the deciding factor for customers when making a purchase decision. High-quality product photography that shows the item from different angles and in context can significantly increase trust and reduce the perceived risk of purchasing online.
To make the most of your photography, ensure that images are clear, well-lit, and show the product in a way that highlights its features. Including lifestyle images that demonstrate the product in use can also help customers imagine how the product will fit into their lives.
5. Photography Improves SEO
Google’s algorithms favor websites that provide a good user experience, and high-quality images are an important part of that. Fast-loading, well-optimized images improve website performance, which can lead to better search engine rankings. Furthermore, by including relevant keywords in your image file names, alt text, and captions, you can improve your SEO and help customers find your website more easily.
To optimize your images for SEO, use descriptive file names (e.g., “red-leather-sofa.jpg”), add alt text that accurately describes the image, and ensure your images are compressed to load quickly.
6. Storytelling Through Photography
Photography is a powerful storytelling tool. Through images, you can tell your brand’s story, showcase your products in real-world contexts, and connect with your audience on an emotional level. For example, a travel agency can use stunning destination photos to evoke wanderlust, while a charity might use impactful images of their work to inspire action.
Storytelling photography helps create a deeper connection with customers, fostering brand loyalty and increasing the likelihood of repeat business.
Conclusion
Photography is an indispensable element of digital marketing. It drives engagement, builds brand identity, improves conversions, enhances SEO, and helps tell your brand’s story. By using high-quality, relevant images in your digital marketing campaigns, you can create a lasting impression on your audience and see tangible results for your business.

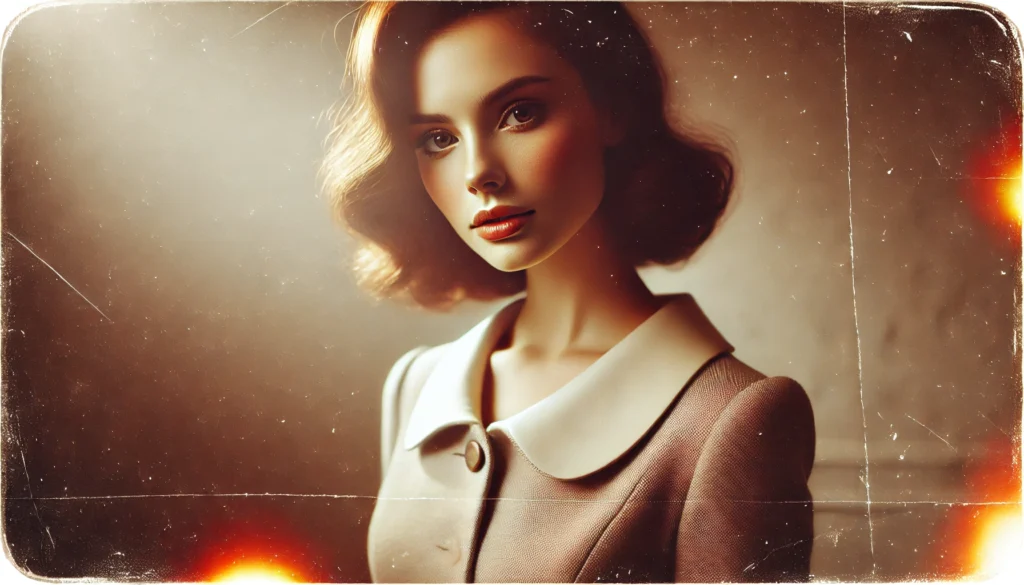
How to Create a Vintage Photo Edit for Your Images
Introduction
Vintage photo editing is a popular trend that adds a nostalgic, timeless feel to your images. Whether you’re aiming for a retro look reminiscent of old film photography or simply want to evoke a sense of history, creating a vintage effect can transform your photos into works of art. In this article, we’ll explore how to create a vintage photo edit and how to apply various techniques to achieve that old-fashioned, classic look.
1. Choosing the Right Photo
The foundation of a successful vintage photo edit begins with selecting the right image. Vintage-style editing works best with photos that have a natural, timeless feel to them. Here are a few tips for selecting your image:
- Subject Matter: Portraits, landscapes, and street photography are ideal for vintage effects. Subjects like old buildings, vintage clothing, or even black-and-white street scenes work well.
- Lighting: Soft, natural lighting (such as golden hour light) complements the vintage effect by adding warmth and depth to your image.
- Composition: Vintage edits often benefit from strong composition. Images with balanced elements and clear focal points are easier to transform into classic, nostalgic visuals.
2. Start with a Black-and-White or Sepia Tone
One of the most classic vintage effects is turning your image into black-and-white or sepia tones. Both of these approaches give your image an old-fashioned feel:
- Black-and-White: Converting your photo to black-and-white can help remove distractions and emphasize the textures, lines, and emotions in the scene. It’s a timeless effect that’s often used in vintage photography.
- Sepia Tone: Sepia adds a warm, brownish tint to your image, creating the look of photos taken with old film cameras. You can easily achieve this effect by adjusting the color balance or applying a sepia filter in photo editing software.
3. Apply Film Grain and Texture
Adding grain and texture to your photo helps to replicate the look of film photography. Vintage film often had a grainy texture that added to its charm and authenticity. Here’s how to add grain to your photos:
- Add Noise: In programs like Photoshop, you can add noise or grain to an image by adjusting the “Noise” slider in the filter settings. A little goes a long way—aim for a subtle texture.
- Textures: You can also apply textures such as scratches, dust, or paper creases. These imperfections make the photo feel more aged and authentic. Look for texture overlays online or create your own by photographing textures like fabric or old paper.
4. Adjust the Colors
Vintage photos often have specific color schemes that are characteristic of their time. To emulate this, adjust the color settings of your image:
- Muted Colors: Reduce the saturation slightly and apply subtle color grading to achieve muted tones. This can make the image feel more vintage and less vibrant.
- Warmth: Adding a slight warm tone to the image can create the nostalgic feeling of photographs from the 1960s or 1970s. Adjust the temperature settings to bring in more reds and yellows.
- Faded Colors: If you’re going for a washed-out, retro look, slightly desaturate the colors to make them appear more faded, as though they’ve been exposed to light over time.
5. Use Vignetting for Focus
Vignetting is a technique used to darken the edges of a photo while keeping the center bright. It’s often used in vintage photography to create a sense of focus and to draw attention to the subject. To apply vignetting:
- Darken the Edges: Use a radial gradient or vignette effect in your photo editing software to darken the edges of the image.
- Subtle Effect: Make sure the vignette is subtle—too much darkening can make the image look unnatural. A soft vignette effect works best to enhance the vintage feel.
6. Add Light Leaks and Flares
Light leaks were a common occurrence in vintage film photography, especially when the film was exposed to light unintentionally. Adding light leaks or flares to your image can help give it that authentic, old-school look. Here’s how to do it:
- Light Leak Overlays: You can find free or paid light leak overlays online that you can simply place on top of your image. These will simulate the light leaks seen in film photography.
- Create Your Own: If you have access to photo editing software, you can simulate light leaks by using gradients of bright, warm colors at the edges of your image.
7. Create a Polaroid Effect
A popular vintage photo style is the Polaroid-style instant photo. If you want to add a retro touch, consider editing your image into a Polaroid format:
- Square Crop: Crop the image into a square format, and add a white border around the edges to mimic the look of a Polaroid picture.
- Add Text: If you like, you can add text to the bottom of the Polaroid frame to make it feel more personalized and nostalgic.
Conclusion
Creating a vintage photo edit is a great way to transform your modern images into timeless works of art. By using techniques like black-and-white or sepia tones, adding film grain and textures, adjusting colors, applying vignetting, and including light leaks, you can give your images a retro, classic appeal. Experiment with these techniques to find the style that best suits your photos, and enjoy the creative process of creating images that evoke nostalgia and charm.