Taking photos with your phone has become an essential part of digital culture. Whether for social media lifestyle content, everyday moments, or even work, the phone camera is no longer a secondary tool — it’s a key element in how we create visual experiences. And while today’s smartphones are incredibly powerful, many people still don’t unlock their full camera potential due to a lack of understanding about the settings that truly enhance image quality.
This guide goes beyond the basics. Its purpose is to clearly and accessibly reveal the best settings to get truly impressive photos from your phone camera, turning ordinary shots into standout visuals.
Know Your Camera’s Full Potential
Before changing any settings, the first step is to understand what your phone camera can actually do. The evolution of smartphone lenses and sensors is impressive, with some models offering multiple cameras (wide, ultra-wide, macro, telephoto), sensors up to 200MP, and AI-powered post-processing.
Look into:
The megapixel count of the main lens;
Whether it has optical image stabilization (OIS);
The lens aperture (e.g., f/1.8, f/2.2);
RAW shooting capability;
Real night mode functionality;
Optical and digital zoom capabilities.
These specifications help define your technical range and inform which settings you should prioritize.
Activate RAW Format for Advanced Editing
Many smartphones now allow you to shoot in RAW — an uncompressed image file that keeps all the data captured by the sensor. Unlike JPEG, RAW doesn’t lose quality during editing, making it perfect for enhancing light, shadows, and color without sacrificing detail.
How to enable it:
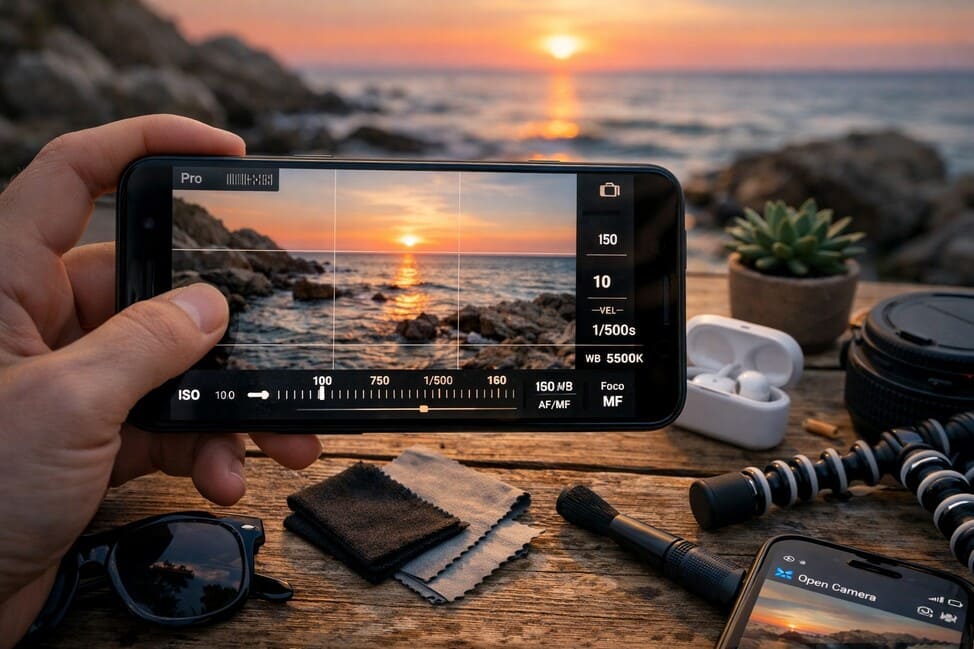
Switch to the “Pro” or “Manual” mode;
Find the image format settings;
Choose RAW (sometimes labeled DNG).
How to enable it:
-
Switch to the “Pro” or “Manual” mode;
-
Find the image format settings;
-
Choose RAW (sometimes labeled DNG).
Keep in mind: RAW files take up more storage, so use them when you plan to edit.
Lighting Is Everything
Light is the foundation of good photography. Even with the right phone camera settings, poor lighting can ruin a shot. Ideally, use natural light — it’s free and flattering — or position yourself near a soft, even artificial light source.
Quick tips:
-
Stand near windows with sheer curtains;
-
Shoot during the “golden hour” for warm, soft tones;
-
At night, use reflected or diffused light for smoother results.
If artificial lighting is your only option, opt for LED lights with a neutral temperature (5,000K–5,500K) for natural skin tones.
Use a Tripod or Stable Surface
Shaky hands are a major enemy of photo clarity. Especially in low light or when using manual mode, even small movements can blur your shots. A simple tripod for smartphones can make a significant difference.
Also:
-
Use a 2–5 second timer to avoid touching the shutter button;
-
Use stabilizers (gimbals) for video;
-
Improvise with shelves or tables when you don’t have a tripod.
Activate Portrait Mode Carefully
Portrait mode is great for highlighting your subject by blurring the background (bokeh effect). But some models may struggle to accurately separate the subject from the background, especially with hair or uneven edges.
For better results:
-
Use in well-lit environments;
-
Choose contrasting backgrounds;
-
Maintain a medium distance from the subject.
If your phone camera has a telephoto lens, it usually activates automatically in portrait mode, improving depth detection.
Disable Beauty Filters (If You Prefer Realism)
Many phones apply automatic filters, like beauty mode or skin smoothing. While some users enjoy this, these filters can make your photos look overly edited and unnatural.
Recommendation:
Turn off auto-enhancement and beauty filters in your camera settings for a more authentic, professional look.
Master White Balance Control
White balance adjusts your photo’s color temperature. This is key for keeping tones realistic, especially in artificial lighting.
Typical values:
- 2,500K–3,200K: warm indoor lighting;
- 4,500K–5,500K: natural daylight;
- 6,000K+: cool tones, cloudy or shaded scenes.
Manual white balance allows you to correct unwanted yellow or blue color casts and maintain color accuracy.
Manually Adjust Focus and Exposure
Even in automatic mode, tapping your screen lets you manually set focus and exposure. This is a quick way to avoid overexposed areas or soft focus.
Try this:
- Tap on faces for sharp portraits;
- Slide the exposure bar up/down to control brightness;
- For dark environments, increase exposure slightly — just avoid blown-out highlights.
Avoid Digital Zoom Whenever Possible
Digital zoom only enlarges the image digitally, which reduces quality. Whenever possible, physically move closer to the subject or use your phone’s telephoto lens if available.
Another solution: shoot at maximum resolution and crop later during editing — this preserves better detail than zooming in live.
Turn On Gridlines (Rule of Thirds)
Composition is key in photography. By enabling gridlines, you can apply the rule of thirds — aligning your subject with intersecting lines to create more balanced, visually appealing images.
To activate:
- Open camera settings;
- Turn on “Grid” or “Composition Lines.”
This simple visual guide helps you avoid centering everything and improves framing naturally.
Use Burst Mode for Action Shots
Burst mode captures several images in quick succession when you hold the shutter button. It’s perfect for sports, candid shots, or any scene with movement.
After capturing, choose the best image and delete the rest to save space.
Don’t Rely on the Front Camera Alone
While convenient for selfies, the front camera is typically lower in quality. It usually has fewer megapixels, weaker sensors, and fewer focus options.
For higher-quality selfies:
- Use the rear camera with a mirror;
- Set up your phone on a tripod and use the timer or a Bluetooth shutter.
Adjust Aspect Ratio Based on Purpose
Aspect ratio determines your image’s frame shape and size. Choose the one that matches your final destination.
- 4:3 – ideal for shooting and editing;
- 16:9 – great for horizontal shots and videos;
- 1:1 – best for Instagram feeds;
- Full screen – visually immersive but may crop important parts.
Always preview your frame to avoid unexpected cuts.
Use Third-Party Camera Apps for More Control
If your default camera app lacks manual settings, try alternatives like:
- Halide (iOS);
- ProCamera (iOS);
- Open Camera (Android);
- Manual Camera DSLR (Android).
These apps offer RAW support, full manual control, histograms, and more.
Edit with Purpose, Not Excess
Editing enhances your photo — it shouldn’t replace good photography. Avoid over-processing your images.
Best practices:
- Use apps like Lightroom Mobile, Snapseed, or VSCO;
- Adjust brightness, contrast, sharpness, and color temperature;
- Avoid heavy filters and extreme saturation;
- Keep skin tones and textures natural in portraits.
Creating your own preset or editing style can help you build a consistent visual identity.
Tell Visual Stories with Style
Great photography isn’t just about individual shots. It’s also about curating a collection that communicates your story. Organize your photos by themes, colors, moods, or places.
Try creative photo challenges:
- Urban textures;
- Minimalism;
- Daily objects;
- Nature close-ups;
- Color-based series.
With intention, your phone camera becomes a storytelling tool — not just a quick snapshot device.
The True Difference Is in Your Perspective
Knowing the ideal phone camera settings is just the first step. What truly transforms your photos is the way you see the world. Practice, experiment, and refine your eye. Understand light. Observe shapes. Compose with emotion.
Technical skills matter, but your unique perspective is what brings meaning to the image.
The camera in your hand holds immense power. Now it’s time to use it intentionally — and artistically.


