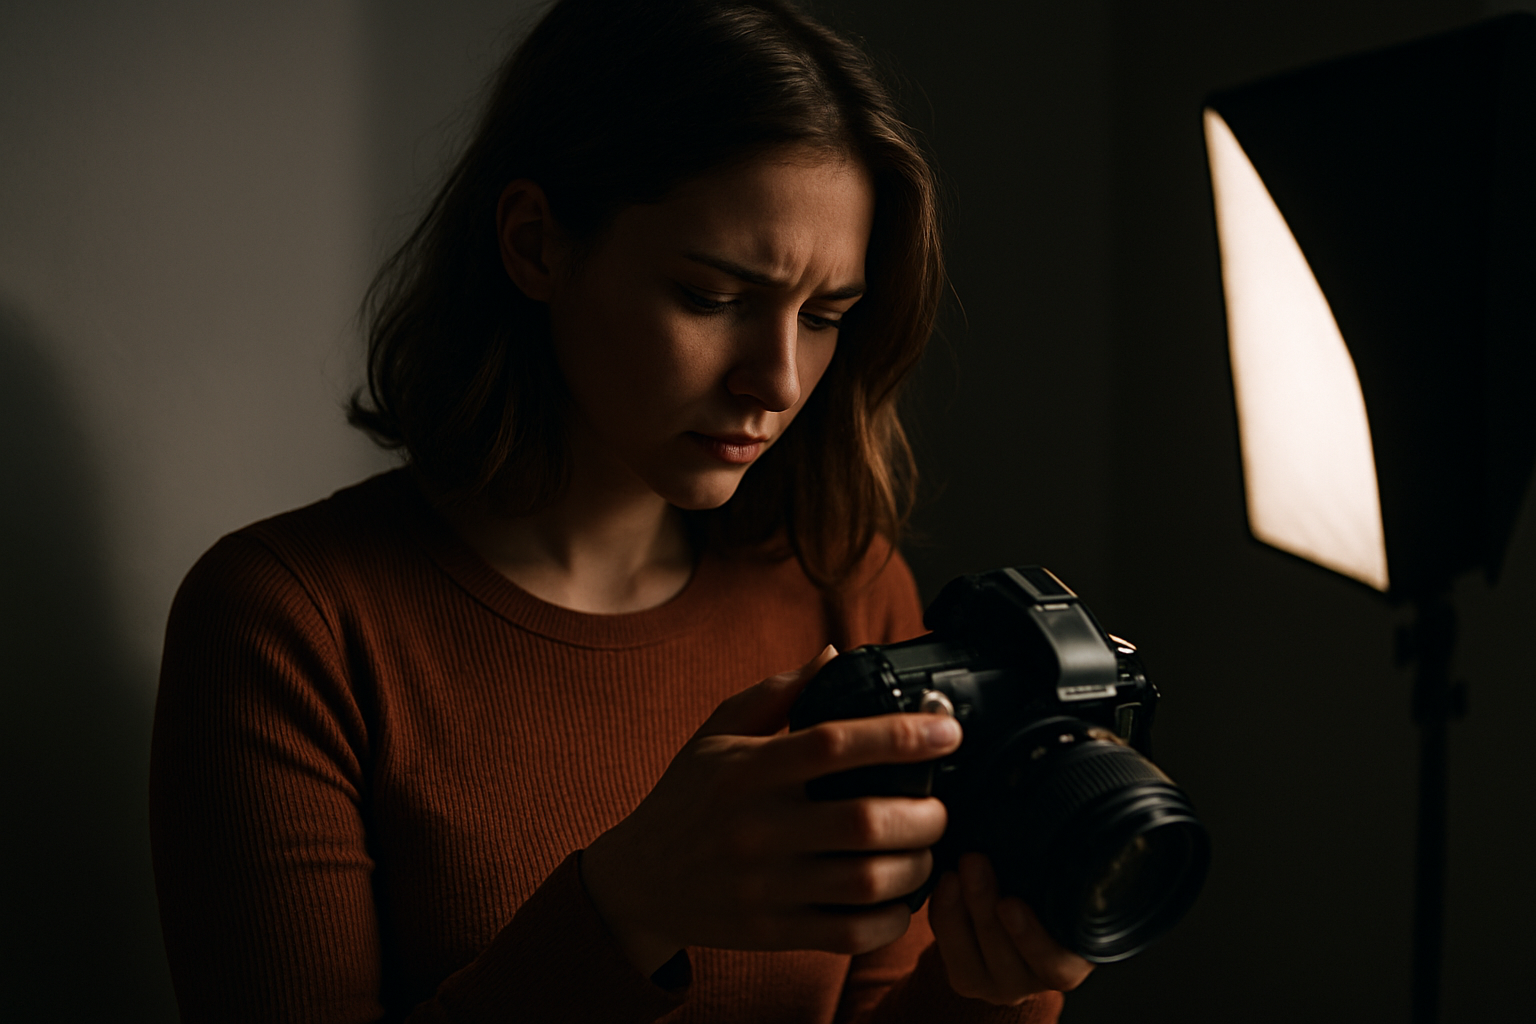
Introduction Lighting is one of the foundational pillars of photography. Without light, there is no image. However, many photographers — both beginners and even experienced ones — make mistakes that compromise the technical and aesthetic quality of their photos. In this guide, we will address the main lighting mistakes in photography, and more importantly, show you how to avoid them through practical techniques, planning, and creative sensitivity. Mastering light is the first step to turning ordinary clicks into memorable images. The Importance of Light Control in Photography Light as a Narrative and Technical Element Light not only reveals but also communicates. It defines shapes, creates moods, guides the viewer’s eye, and expresses emotions. Thus, mastering light goes beyond technique—it involves sensitivity and intention. How Lighting Mistakes Can Compromise an Image Issues such as blown highlights, harsh shadows, incorrect color balance, or underexposure can distract the viewer, weaken the focal point, or even render the image unusable in a professional context. Recognizing these errors is essential for any photographer aiming for consistency and visual impact. Moreover, understanding the fundamentals of light and applying creative solutions helps develop an authentic and recognizable photographic style. The right light can transform a simple composition into a powerful, meaningful image. 1. Harsh Direct Light Without Control How It Affects Portraits and Products Direct light, such as midday sun or a frontal flash without diffusion, creates harsh shadows, excessive highlights, and loss of detail — especially in portraits or reflective product photography. This light can emphasize skin imperfections, cause squinting, and hinder texture reading on products. Solutions: Diffusers, Softboxes, and Bouncing Techniques Controlling direct light is the first step toward more natural portraits and clearer product visuals. It’s also beneficial to use larger light sources closer to the subject, as the larger the source relative to the subject, the softer the light it produces. 2. Insufficient Light or Underexposure Dark Environments and Loss of Detail Shooting in low-light settings without proper adjustments results in dark images, with lost shadow information and high noise—especially on cameras with smaller sensors. This affects sharpness and may render the image unusable for print or professional use. Solutions: ISO, Fast Lenses, and Auxiliary Light Correct exposure is a balance of sensitivity, speed, and quality. Also, consider the color temperature of your auxiliary light to maintain chromatic consistency in your image. 3. Blown Highlights and Overexposed Areas Causes: Direct Flash, Strong Sunlight, or Poor Metering Blown highlights occur when parts of the image receive more light than the sensor can handle, resulting in totally white, detail-less areas — especially on light skin, white clothing, or reflective surfaces. Built-in flash and harsh sunlight are major culprits. Solutions: Metering, Exposure Compensation, and ND Filters Avoiding blown highlights preserves detail and provides more control in post-production. A good practice is exposure bracketing — capturing the same scene at different exposures and selecting the best one later or combining them. 4. Poorly Positioned or Unintentional Shadows How Shadows Can Ruin Aesthetics Unwanted shadows on faces, backgrounds, or products can cause visual distractions, alter form perception, and compromise image legibility. A common example: nose shadows caused by direct frontal lighting. How to Use Shadows Consciously and Artistically Controlled shadows add drama, depth, and narrative to photos. Incorporating shadows intentionally can even serve as a compositional tool, guiding the eye or suggesting abstract and symbolic shapes. 5. Incorrect White Balance Mixed Lighting, Incorrect Tones Shooting in environments with various light sources (fluorescent, incandescent, LED) can produce images with unrealistic tones — bluish, yellowish, or greenish. This compromises color fidelity and requires complex correction during editing. Solutions: Manual Settings and Gray Card Balanced colors convey more professionalism and realism. Another option is to use your camera’s custom white balance mode, capturing the actual ambient light and applying that profile to all session images. 6. Lack of Planning in Light Direction Flat Lighting vs. Expressive Lighting Lighting the subject or object from the front, without contrast, creates a “lifeless” image, flat and unengaging. This is common in shots with built-in flash or no modifiers. Techniques to Guide the Eye with Light The direction of light defines depth and emotion in a photo. Experimenting with different lighting angles also reveals how light affects the perception of texture, volume, and even the mood of the image. 7. Ignoring Existing Ambient Light Mixing Lights Without Harmony Adding flash without considering ambient light can cause color inconsistencies and light direction conflicts, along with mismatched shadows. This often happens indoors where natural window light mixes with artificial flash on the subject. How to Integrate Flash and Natural Light Balancing different light sources results in more harmonious and natural-looking images. Consciously managing the mix between continuous and strobe light is essential to avoid visual clashes and maintain cohesion. Practical Tips to Avoid Lighting Mistakes Test and Use the Histogram Before your session, test various setups. The histogram is a valuable tool to adjust exposure and prevent clipping in shadows or highlights. Observe Light Before Shooting Good lighting starts with conscious observation. Note the light source, how it casts shadows, and how it interacts with the subject or scene. Learn About Modifiers Softboxes, reflectors, filters, panels, and gobos are essential for precise light control. Learning to use them enhances your creative and technical potential. Also, watching videos and tutorials from experienced photographers can uncover simple and effective techniques that make a big difference in practice. Master Light and Transform Your Photography Making lighting mistakes in photography is part of the learning process. What matters is recognizing them, understanding their causes, and applying technical and creative solutions to avoid them. Mastering light is a continuous journey that requires practice, study, and sensitivity. Every intentional adjustment brings you closer to impactful, professional, and expressive photography. When you understand light, you start using it as a tool for storytelling, emotion, and aesthetics — and your images will no longer just document moments, but tell stories with visual identity and purpose. Lighting, when fully understood, not only prevents technical errors
How to Use Creative Lighting for Artistic and Conceptual Photos
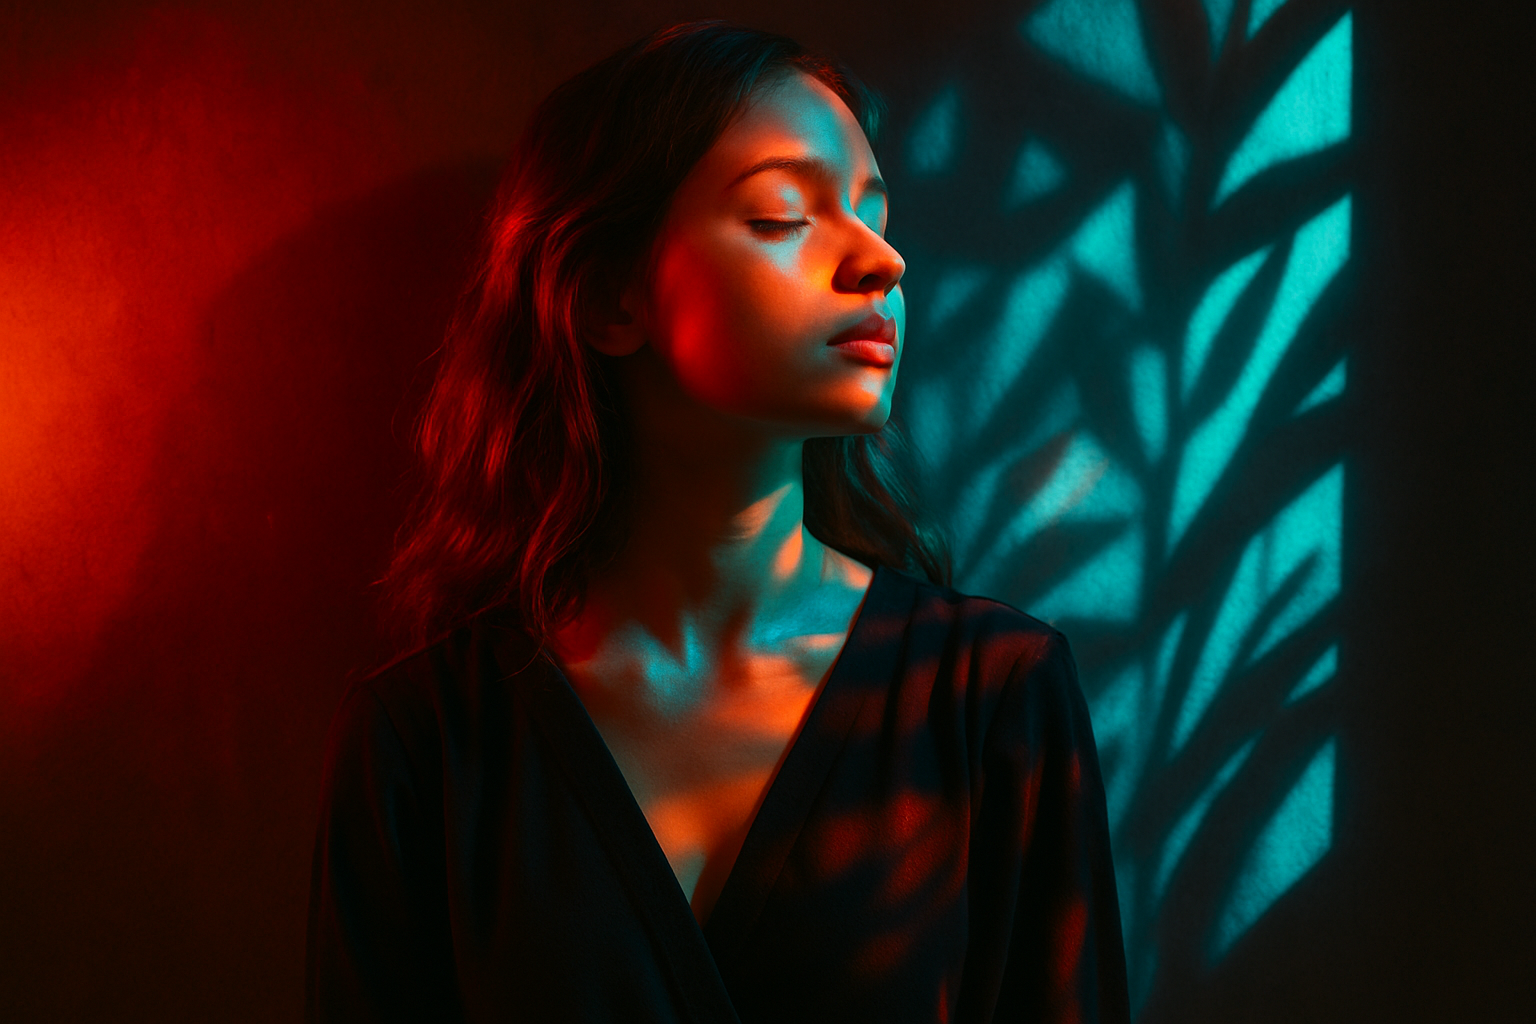
Introduction Creative lighting is one of the most powerful tools to transform an ordinary image into a visually striking work of art. More than just illuminating a subject, light can communicate emotions, symbolism, and abstract ideas. In this article, you’ll learn how to use various techniques and light sources to create artistic and conceptual photos, exploring light as a visual language and a tool for photographic expression. Whether you’re a beginner or an experienced photographer, mastering creative lighting is essential for building a strong and authentic visual identity. What Is Creative Lighting in Photography? Definition and Artistic Purpose Creative lighting goes beyond technical use. It is employed to evoke feelings, build atmospheres, and provoke interpretation. The goal isn’t merely correct exposure, but how light affects composition, emotion, and the conceptual meaning of the image. Difference Between Technical and Expressive Light Creative lighting bends the rules to achieve artistic goals. Elements That Influence Creative Light Color, Intensity, and Direction These three factors form the foundation of light experimentation. Textures, Shadows, and Shapes Projecting light on surfaces like glass, fabric, or metal changes reflections. Shadows can also be used graphically, adding visual layers to the image. Movement and Projection Moving light (such as flashlights in long exposure) can paint in the air. Projecting patterns or cutouts onto backgrounds or models creates surreal and symbolic atmospheres. Emotional and Psychological Contrast Colors and contrast create different emotional readings. Blue light may evoke sadness or coldness. Red light may suggest passion or tension. Mixing opposing lights creates visual ambiguity and encourages subjective interpretation. Light Sources for Creative Effects Natural Light with Interventions Using sunlight with diffusers, fabrics, or blinds creates unique effects. Changing the time of day (golden hour, blue hour) adds temperature and drama to the scene. Experimenting with sun reflections on metallic or aquatic surfaces also adds spontaneous artistic flair. Colored Continuous Light (LED, RGB) LED panels and RGB bulbs allow full control over color and intensity. They simulate cinematic environments or abstract compositions with crossing lights. Portable colored light sticks can create unique patterns and trails in long exposure photography. Flash with Customized Modifiers Using flash with color gels, snoots, gobos, or small mirrors allows you to direct and tint light creatively. Bouncing flash off colored or textured surfaces also yields unique results. Try using two differently colored flashes on opposite sides of a model—each light can represent an emotion, idea, or duality. Lighting Techniques to Create Atmosphere and Meaning Backlight and Silhouettes Using backlighting with little or no front light produces graphic, mysterious, or symbolic silhouettes. This works well in portraits, objects, or abstract shapes. Silhouettes can metaphorically represent anonymity, introspection, or mystery. Dramatic Side Lighting Lighting just one side of the face or scene with hard light creates a dramatic mood. Harsh shadows add strength, introspection, or tension to the portrait. This technique suits psychological portraits, noir themes, or emotionally intense photo essays. Fragmented Light (Gobos, Blinds, Cutouts) Gobos block parts of light to create patterns. A leaf with holes, a fence, or blinds can project shapes onto the model or background, adding visual interest. Fragmented light creates visual rhythm and narrative depth, symbolizing imprisonment, freedom, control, or fragmented identity. Creative Tools Applied to Lighting Color Gels and Custom Filters Color gels in front of light sources alter the light’s tone. Combining them (e.g., blue on one side, red on the other) produces strong contrasts and psychological messaging. You can also craft custom filters with cellophane, colored glass, or translucent fabrics to add texture and tone to your light. Reflections, Prisms, and Glass Reflecting light on mirrors or broken glass fragments the image, producing artistic distortions. Prisms and glasses can create flares, rainbows, and distortion in creative portraits. Placing the prism or glass in front of the lens yields effects like duplication, selective blur, and overlays—ideal for dreamlike compositions. Artificial Lights from Everyday Objects Lamps, Christmas lights, candles, flashlights, and even phone screens can be used creatively. The trick is to view everyday items not as tools but as expressive light sources. Programmable LED strips offer sequenced colors, pulses, and patterns that bring visual movement to static images. Practical Use Cases and Artistic Applications Conceptual Portraits with Storytelling Use light for narrative intent: blue light might convey loneliness; dramatic side lighting could symbolize inner conflict. Light becomes a character in the image’s story. Create scenes with projected shadows that support the concept: bars to represent oppression, plants for nature and freedom, and so on. Fashion Photography with Creative Ambience Blend colored light with translucent fabrics, smoke, or reflections to build a bold, unique editorial aesthetic. Lighting defines the campaign’s style and visual positioning. Use backlighting to highlight fabric transparency or gobos to project patterns onto the body for powerful visuals in branded campaigns. Artistic and Symbolic Still Life Inanimate objects come alive when lit with dramatic shadows or colored lights. The way light shapes the object adds conceptual meaning. Compose with symbolic objects like fruits, flowers, or tools and light them expressively to create metaphorical visual narratives. Tips for Experimenting and Finding Your Lighting Style Create Scenes with Simple Resources You don’t need an expensive studio. With cellophane, cardboard, mirrors, or fabric, you can build creative setups at home. Intention matters more than tools. Use a flashlight behind a bottle of water for aquatic distortions or a cracked mirror to fragment the light—small tricks can yield striking results. Study Visual and Cinematic References Movies, music videos, and editorials are great sources for understanding how lighting affects emotion. Study cinematographers and artistic photographers. Watch how lighting is used in films like “Blade Runner” or “Her”—each scene uses light as a storytelling tool. Apply similar techniques in your photography. Break Technical Rules and Trust Your Visual Instinct Allow yourself to make mistakes. Artistic photography thrives on trial and error. Shoot against the light, use high ISO, overexpose or underexpose on purpose—observe what emerges. Try motion blur, camera shake, or lens defocus with improvised filters. These are legitimate ways to explore new
Flash Photography: How to Avoid Harsh Shadows and Light Blowouts
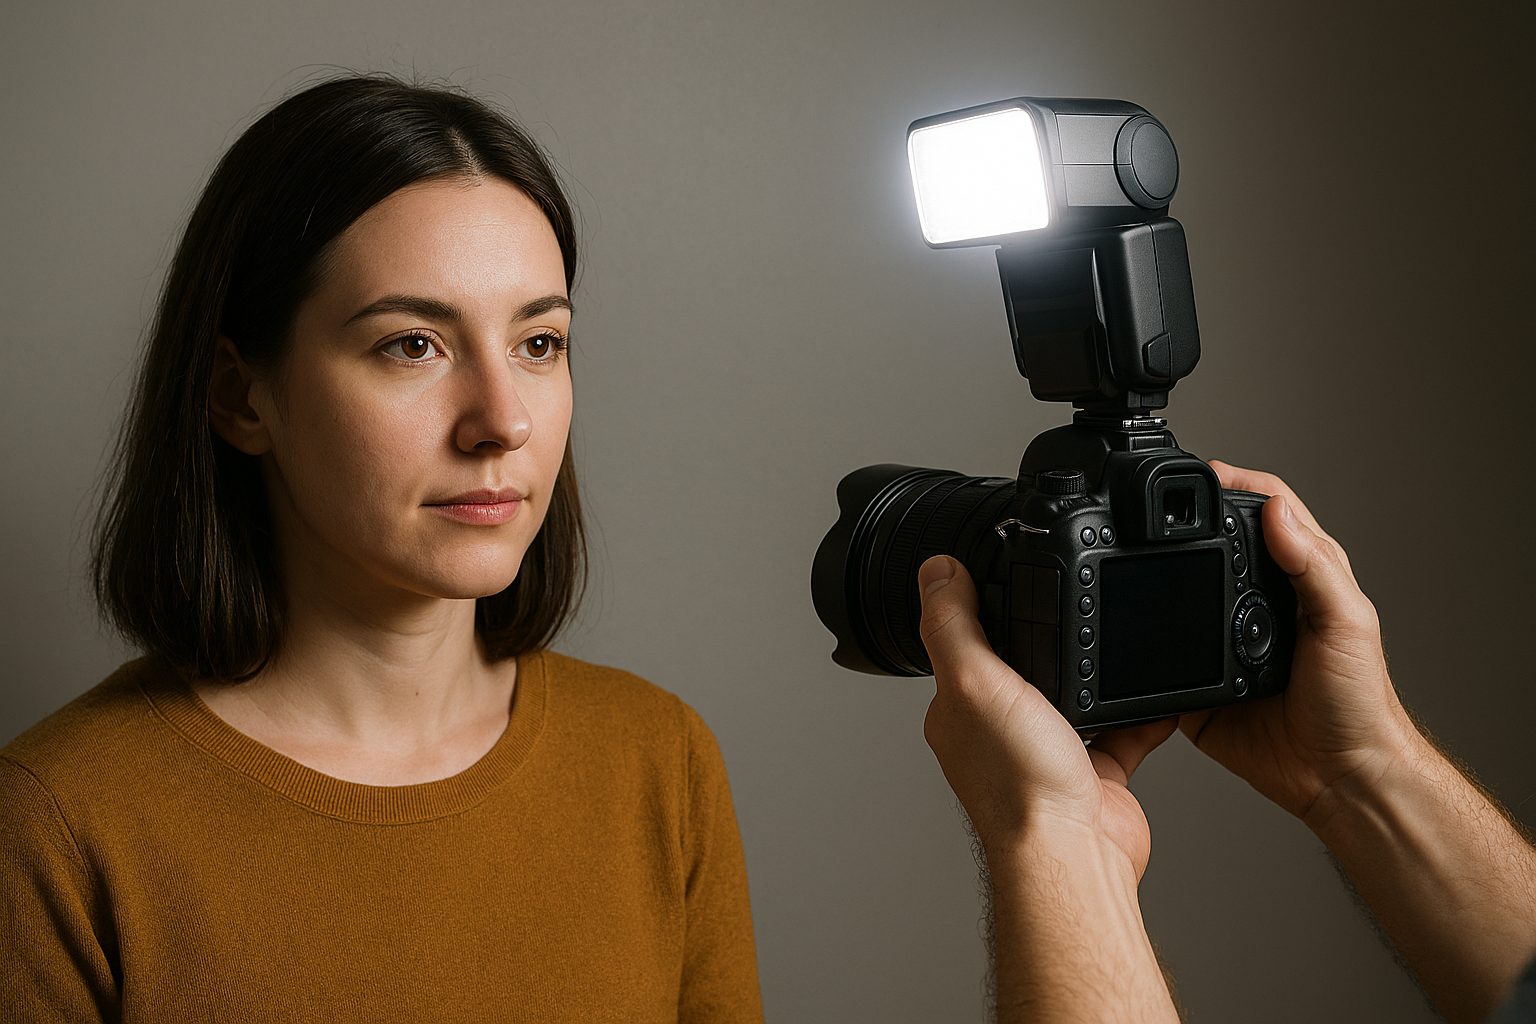
Introduction Flash photography is a powerful and versatile tool that can elevate the quality of an image—or completely compromise it if not properly controlled. One of the biggest challenges when using flash is avoiding harsh shadows and light blowouts, issues that directly affect the aesthetics and readability of the photo. This guide is designed to help both beginners and experienced photographers understand how to master flash use technically and creatively, extracting the full potential of this resource without sacrificing natural lighting. Why Is Flash Still Essential in Photography? Advantages of Flash in Different Contexts Flash allows safe shooting in low-light environments, maintaining low ISO, freezing motion, and highlighting elements with precision. It’s a practical solution for situations where ambient light is insufficient or uncontrollable. Moreover, flash contributes to more even lighting and fills in unwanted shadows—provided it’s properly positioned and adjusted. When Flash Is Indispensable Even with the advancement of low-light camera sensors, flash remains indispensable when precise lighting control is essential. What Are Harsh Shadows and Light Blowouts? How Flash Light Interacts with the Subject Flash emits intense, direct light that, when it hits the subject head-on, creates very marked shadows and abrupt transitions between light and dark. This is known as a harsh shadow. Light blowouts (overexposed highlights) occur when parts of the image receive more light than the sensor can handle, resulting in completely white areas with no detail. Main Causes of These Problems Techniques to Soften Shadows Created by Flash Using Diffusers and Softboxes Diffusers help spread light, making it softer and less concentrated. Softboxes, umbrella diffusers, or translucent panels increase the size of the light source and reduce direct intensity, creating more enveloping lighting. Bouncing Light off Surfaces By pointing the flash at the ceiling or a light-colored wall, the reflected light becomes softer and more natural. This technique, known as bounce flash, avoids direct frontal lighting and creates soft, directional shadows. Using Reflectors and Light Walls Placing reflectors on the side opposite the flash helps fill shadows. White walls or light-colored surfaces act as natural diffusers, returning light to the scene with gentleness. Strategies to Avoid Light Blowouts (Overexposed Highlights) Controlling Exposure and Flash Power Reduce flash power whenever possible. Many external flashes allow intensity adjustment in fractions (1/1 to 1/128). Adjusting aperture and shutter speed also helps prevent light overlap. Using Histogram and Light Meter Checking the histogram after a shot is crucial. Spikes on the right side indicate overexposed areas. Using a light meter (external or in-camera) helps accurately measure reflected light on the subject. Manual vs. TTL Flash Mode TTL (Through The Lens) mode automatically adjusts flash power based on camera metering, which can cause unwanted variations. Manual mode gives full control over power and consistent lighting. Flash Positioning for More Natural Results Direct Flash vs. Side Flash Direct flash (pointed at the subject) often causes harsh shadows and unwanted reflections. Positioning the flash at a 45° angle creates more dimensional lighting, with volume and depth. Off-Camera Flash Using flash detached from the camera, controlled via radio or cable, offers full positioning freedom. Light can be directed based on creative intent, producing more refined, professional effects. Ideal Angles and Distance The closer the flash is to the subject, the harsher the light. Moving it back and expanding the dispersion area makes the light softer. Changing the angle (above, side, back) also affects how shadows behave. Light Modifiers That Help Prevent Errors Softboxes, Umbrellas, and Snoots Grids and Diffusion Filters Grids narrow the light beam, reducing spread and keeping focus. Diffusion filters reduce direct intensity and soften transitions between light and shadow. Color Correction Gels Gels help balance flash color temperature with ambient light, avoiding cool or warm color casts in the image. This also improves exposure consistency in mixed-light settings. Practical Examples of Application Indoor Portrait with Flash and Reflector Event Photography with Bounce Flash Product Photography with Flash Extra Tips and Common Mistakes to Avoid Avoid Using On-Camera Flash Directly The built-in flash points directly at the subject, producing hard, flat light. Opt for external flash or bounce techniques whenever possible. Don’t Rely Only on Auto Mode Although convenient, auto mode doesn’t always grasp scene complexity. Manual adjustments provide better control and precision. Don’t Ignore Scene Lighting Balancing flash with ambient light yields more natural photos. Turn off the flash and observe the scene before shooting to assess where it’s actually needed. Master Flash as a Creative and Expressive Tool Mastering flash photography goes beyond technical skill—it’s about understanding light as a language. Learning to avoid harsh shadows and light blowouts is just the first step in transforming flash into a powerful aesthetic tool. With practice, attention to detail, and creativity, flash can be used to set moods, express emotion, and build impactful images. Invest in modifiers, practice with angles, study light behavior—and turn flash into your most versatile ally in photography.
How to Use Reflectors to Improve the Lighting in Your Photos
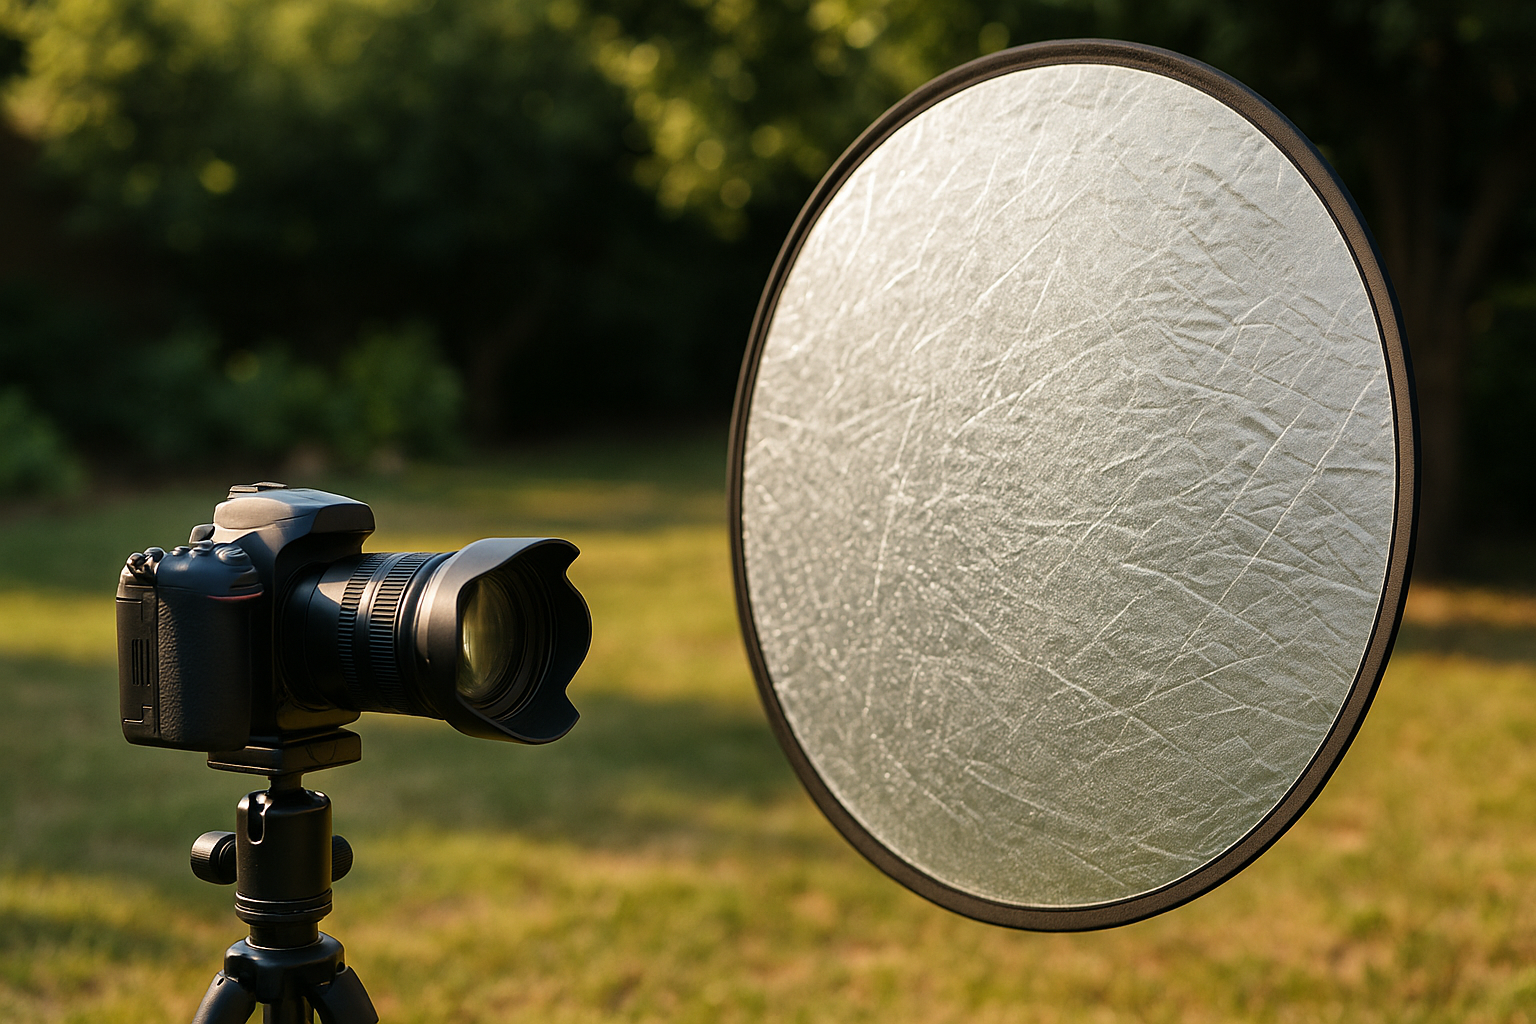
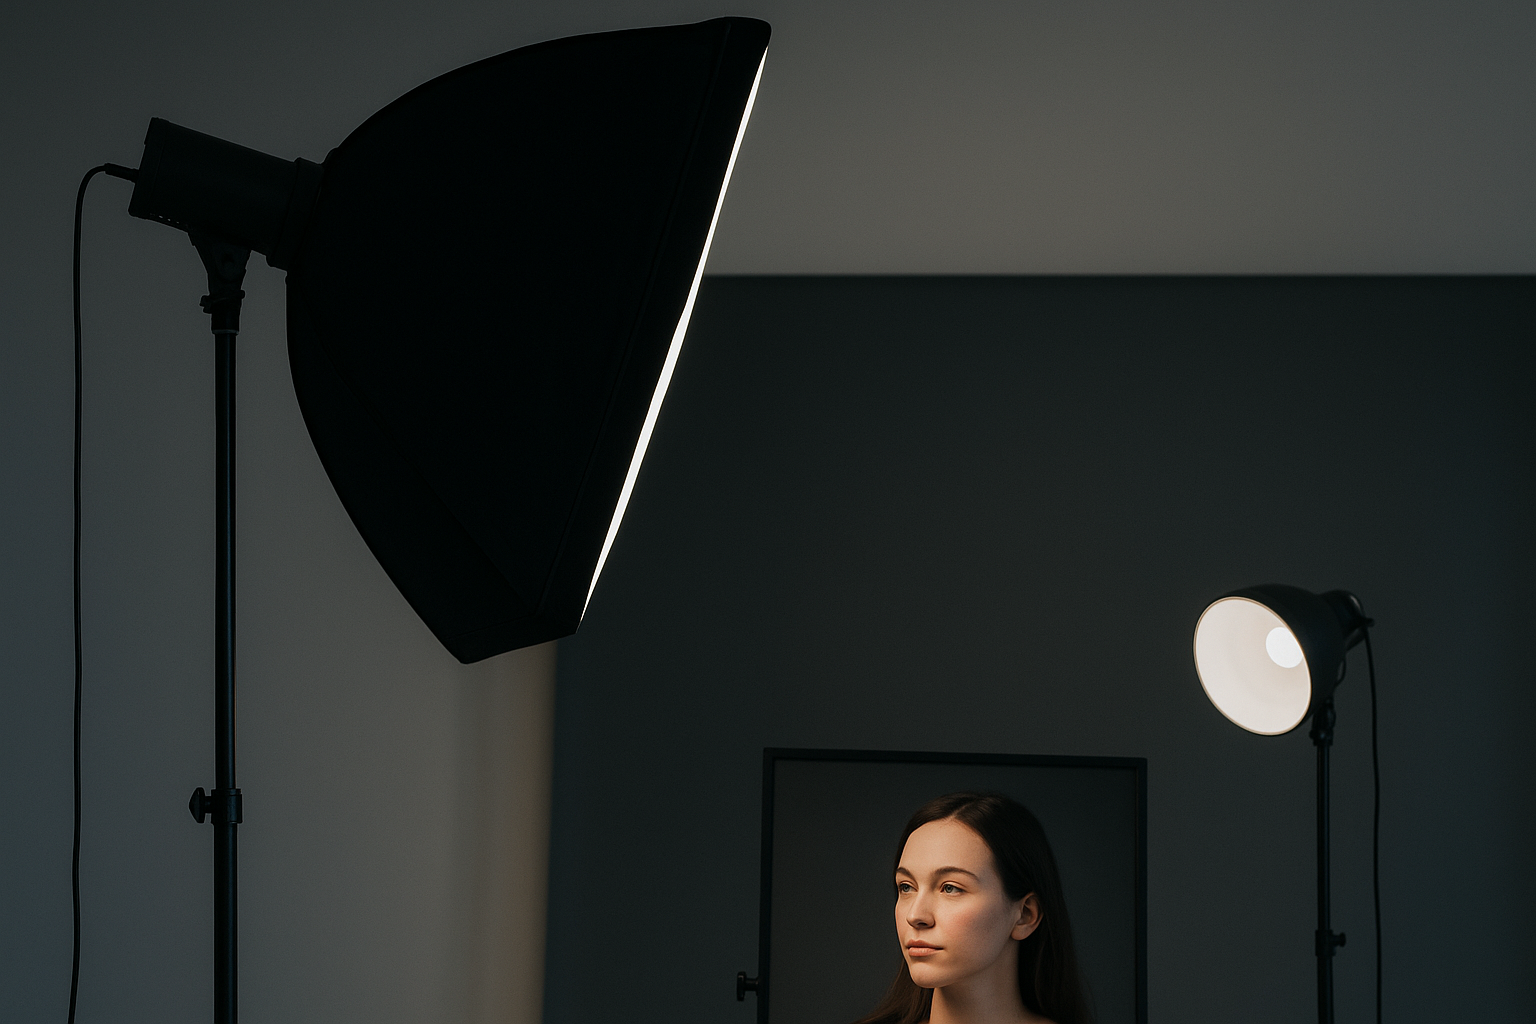
Introduction Learning how to use reflectors in lighting is a fundamental step for anyone looking to master light in photography. Reflectors are simple, accessible, and incredibly versatile tools that can completely transform the quality of an image. Whether in professional studios or outdoor photo shoots, reflectors help control shadows, direct light, and balance contrast—all without adding artificial light sources. In this article, you’ll learn how to choose, position, and use reflectors effectively, taking your photos to a new level of visual quality. What Are Reflectors in Photography? Purpose and Function Reflectors are surfaces that redirect existing light (natural or artificial) to specific areas of a scene. They do not produce light but rather reflect it to fill in shadows or highlight details. They are especially useful when there is only one light source and the photographer needs to soften contrast or illuminate secondary areas of the subject. Additionally, reflectors simulate secondary light sources, adding depth and richness to the image. Why Are They So Important? Reflectors allow precise control of light without relying on expensive or complex equipment. With just a simple white board or a portable reflector, you can: Furthermore, reflectors are sustainable tools, as they utilize existing light strategically, reducing energy consumption in photography productions. Types of Reflectors and Their Characteristics Foldable Reflectors (5-in-1) These are the most common on the market. They consist of a flexible frame with interchangeable surfaces: These reflectors are compact, foldable, and easy to carry—ideal for photographers who work in various locations. Rigid Panels and DIY Surfaces You can improvise reflectors using: Creativity is a powerful ally when working on a tight budget. Many professional photographers use homemade solutions with excellent results. Colors and Materials: White, Silver, Gold, Black, and Translucent Each color has a unique impact: Always align your reflector choice with the image’s visual intent and the scene’s color palette. How to Choose the Ideal Reflector for Each Situation Outdoor Photography vs. Studio Work Color Temperature Control Reflector color affects the tone of reflected light: This subtle variation can enhance your creative storytelling. Portability and Cost-Effectiveness 5-in-1 reflectors are compact, affordable, and versatile. Styrofoam and poster board are inexpensive and effective for home use. Ideally, have multiple options for different contexts and shooting styles. If you work solo, consider reflectors with adjustable arms or articulating stands. These offer flexibility and independence during shoots. Techniques for Using Reflectors Effectively Filling Shadows Use reflectors on the opposite side of the light source to soften shadows on the face or subject. Perfect for outdoor portraits with harsh side lighting or to balance sunlight and shadow. Directing Natural Light In indoor environments with windows, position reflectors strategically to redirect light and balance scene exposure. You can simulate side lighting using only daylight and a well-placed reflector. Creating Contrast and Depth In addition to softening shadows, reflectors help define volume. Bouncing light on specific body parts creates contrast and emphasizes form, adding dimension and visual interest. Bouncing Light from Flash or Continuous Sources Use reflectors to redirect flash light, simulating multiple sources. They also work well with LED or spotlights to create side light or fill. Position reflectors close to the main light to subtly reinforce light direction. Strategic Reflector Positioning Angle, Height, and Distance Experiment with small adjustments and observe how the light changes with each variation. Light control starts with a trained eye. Reflector with Assistant vs. Floor Stand Some stands have articulating arms for precise placement, useful in complex lighting setups. Tips to Avoid Unwanted Shadows Avoid placing the reflector directly below or above the subject’s face, which can create vertical shadows or harsh highlights. Always test the effect before shooting. Also, ensure the reflector doesn’t alter the direction of the original light source—unless that’s your creative goal. Practical Use Examples Outdoor Sessions with Natural Light Studio Setup with Flash and Reflector Product Photography with DIY Reflectors Common Mistakes and How to Avoid Them Overexposure in Reflected Areas Reflectors too close or angled directly at the subject can blow out highlights. Adjust angle and distance to soften the effect. Wrong Color That Alters Skin Tone Too much gold can turn skin orange. Silver can create a metallic look when overused. Test each color per scene and fine-tune with white balance adjustments. Unwanted Reflections and Glare Avoid pointing reflectors at reflective surfaces like glasses or chrome. This can cause lens flare or exaggerated light spots. Use diagonal angles to minimize risk. Master Light Creatively with Reflectors Mastering the use of reflectors in lighting is one of the simplest and most effective ways to control light without relying on expensive gear. With creativity and observation, you can transform any light source into an expressive tool. Explore different colors, distances, and angles. Practice in various lighting conditions and times of day. Observe how the reflector affects mood, detail, and imperfections. Reflectors are not just technical accessories—they are creative allies that expand the possibilities of any photographer committed to lighting quality and strong visual storytelling. With technical mastery and aesthetic sensibility, the reflector becomes more than a tool—it becomes an extension of the photographic eye.
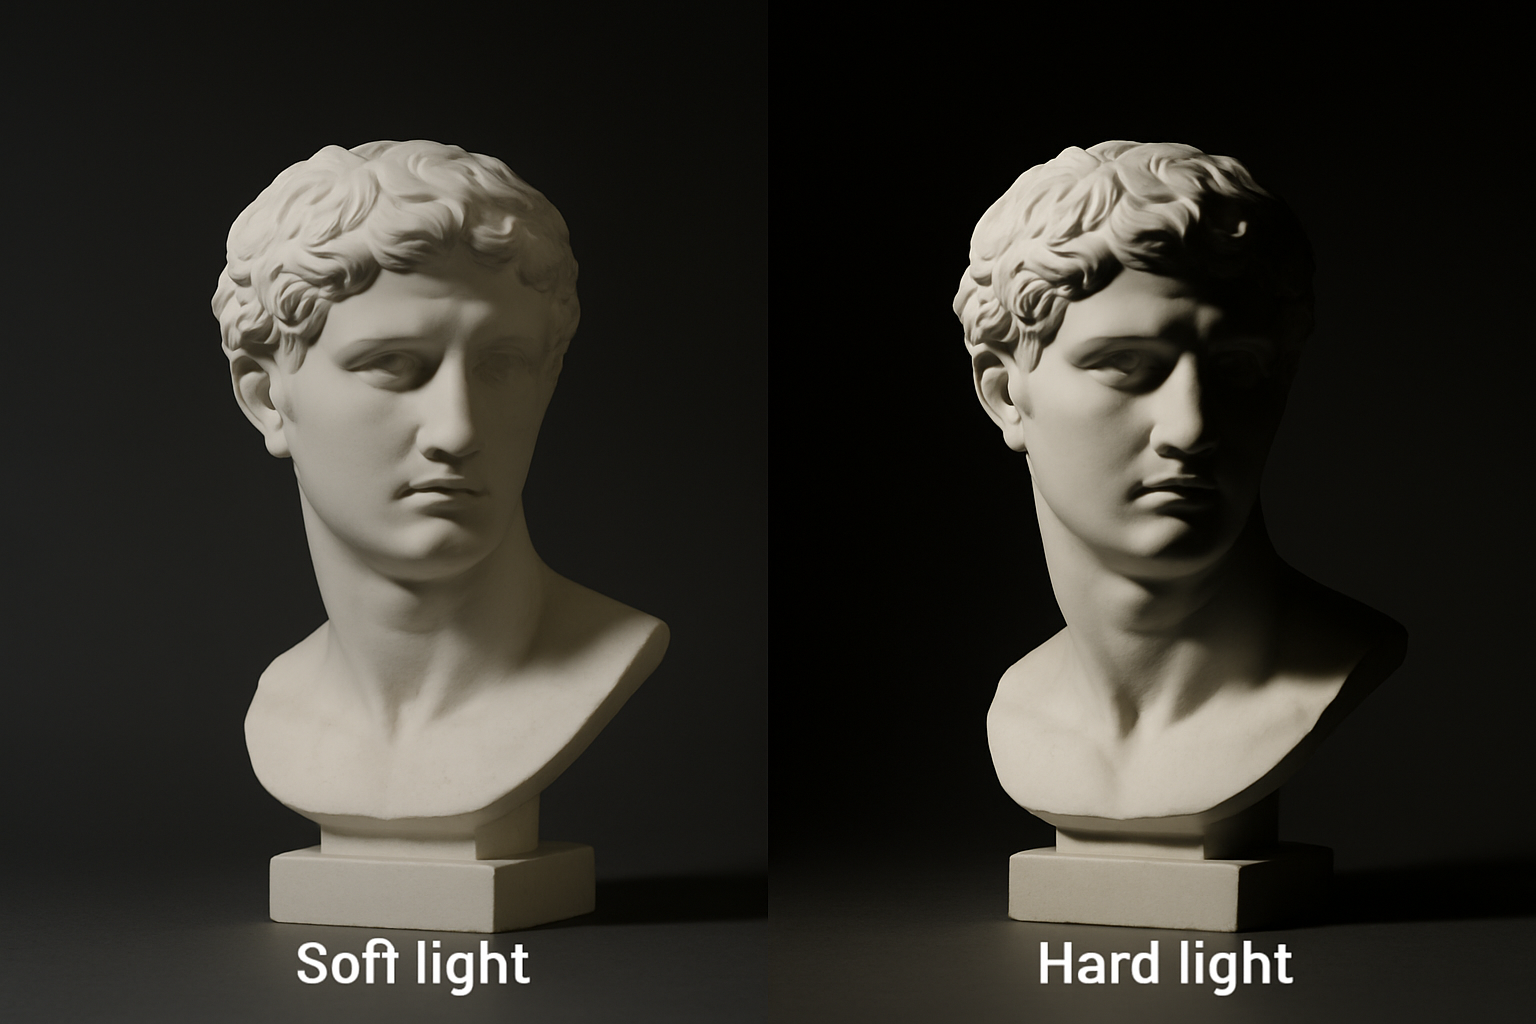
Soft Light vs. Hard Light: Understand the Differences and When to Use Each
Introduction Soft light vs. hard light is an essential discussion in the world of photography. Understanding how each type of light affects the image is fundamental to creating visually coherent, expressive, and high-quality compositions. Whether in portrait, product, fashion, or documentary photography, the choice between hard or soft light directly influences the atmosphere, texture, and emotional impact of the image. In this guide, you’ll learn what differentiates these two types of light, how to identify them, and, most importantly, when and why to use each one in a technical and creative way. What is soft light and what is hard light? Definition and visual characteristics Soft light is characterized by diffused shadows, smooth transitions, and even illumination. It reduces contrast and provides a more delicate, uniform look—ideal for creating calm atmospheres or conveying comfort and warmth. Hard light, on the other hand, creates well-defined shadows with abrupt transitions between light and dark. It increases contrast and highlights details, textures, and volumes more intensely. This quality is useful when you want to emphasize lines, shapes, or create visual impact. How light interacts with the subject Soft light tends to “wrap” the subject, filling in shadows and softening imperfections. It’s commonly used for portraits and emotional scenes because it flatters facial features without harshness. Hard light emphasizes shapes, contours, and surfaces. It can convey drama, tension, or raw realism. It’s ideal for creating visual impact and enhancing texture, especially in more journalistic or artistic photography. Factors that determine the softness or hardness of light Size of the light source in relation to the subject A larger light source relative to the subject tends to be softer. Large softboxes, broad windows, or wide LED panels create diffused, enveloping light, allowing for more gradual transitions between light and shadow. Small sources like direct flashes, small reflectors, or midday sunlight create hard light because they can’t “wrap around” the subject, resulting in marked shadows and high contrast. Distance of the light source The farther the light source is, the harder the light becomes. That’s because the illuminated surface receives light from a narrower angle, increasing shadow definition. Bringing the light source closer increases its angular size, softening shadows and reducing contrast. This is especially useful in portraits or food photography. Presence of diffusers, reflectors, or modifiers Diffusers (like translucent fabrics or softboxes) spread the light, making it softer and less directional. Reflectors help fill in shadows created by hard light, softening the overall result. Modifiers such as beauty dishes, umbrellas, or snoots help control softness or directionality depending on the photographer’s creative intent. Advantages and applications of soft light Portraits Soft light flatters the skin, conceals expression lines, and creates a welcoming atmosphere. Ideal for feminine portraits, baby photos, and elderly subjects. It also reduces the need for extensive post-processing. Fashion and newborn photography In fashion, soft light enhances fabrics without casting harsh shadows. In baby photography, it’s essential to convey delicacy, purity, and comfort. It ensures that eyes are well-lit without harsh reflections. Ambient lighting and video Spaces lit with soft light feel more natural and pleasant to viewers. It’s perfect for interviews, educational videos, vlogs, and home recordings. In cinema, it’s also used to create realistic or intimate scenes. Advantages and applications of hard light Product photography With textured objects, hard light is excellent for highlighting relief, edges, and details. It creates a tactile sensation, especially useful for materials like wood, leather, or metal. Dramatic effects and strong contrast Theater scenes, masculine portraits, or bold editorials benefit from hard light to convey strength and intensity. It directs the viewer’s eye to specific areas of the image, increasing visual impact. Creative and artistic lighting Hard light allows for playing with defined shadows, geometric shapes, and minimalist compositions with strong visual appeal. It’s also used to create patterns, natural framing, or striking silhouettes. When to choose soft or hard light? Evaluating aesthetic intent If the goal is to convey emotion, softness, and comfort, soft light is more appropriate. To convey energy, tension, or dynamism, hard light is more effective. The desired aesthetic should always guide lighting choices. Considering photographic style Fashion, advertising, and portrait photographers often alternate between the two styles depending on the shoot’s concept. In photojournalism, hard light can reinforce realism and urgency. In artistic photography, hard light enables a more graphic visual narrative. Controlling light in studio or outdoor environments In the studio, you have full control: softboxes, reflectors, flags, and diffusers are at your disposal. Outdoors, using natural shade, reflectors, or fabric can help soften harsh sunlight. In both cases, the photographer’s position relative to the light source significantly affects the outcome. Techniques for turning hard light into soft light (and vice versa) Diffusers, softboxes, and reflectors Light direction and distance Creating shadows and shaping contrast Common mistakes when using hard and soft light Lack of exposure balance With hard light, it’s common to overexpose highlights and underexpose shadows. Use the histogram and light meter to control the scene’s dynamic range. Improper use for the subject Using hard light for delicate portraits may be too aggressive. Using soft light for highly textured products might result in “dull” images. Always align lighting with the visual message and target audience. Light as visual language: exploring its expressiveness The choice between soft light vs. hard light goes far beyond technique. It’s a visual language that communicates feelings, ideas, and aesthetic stimuli. Each light source has character and contributes to the final image’s identity. Learning to manipulate these two extremes with intentionality and mastery is essential for any photographer who seeks not just to capture images but to build impactful visual narratives. Light doesn’t just reveal—it interprets. Study, experiment, and practice with different sources, distances, and modifiers. Over time, you’ll master the art of controlling light with precision and creativity, making it your ally in crafting memorable imagery.
The Direction of Light in Photographic Composition
Introduction The direction of light in photographic composition is one of the fundamental pillars for creating images with depth, emotion, and visual impact. Although often overlooked by beginners, the way light strikes the subject is crucial to the final result of the photograph. This article aims to inform and inspire both beginners and professionals to understand, master, and apply the direction of light as a creative and technical element in composition. Why the direction of light is essential in photography The role of light in defining visual narrative Light has narrative power. Depending on how it hits the subject, it reveals or hides details, highlights shapes, evokes sensations, and creates atmospheres. Side lighting can suggest drama or mystery. Frontal light tends to flatten volumes, conveying neutrality. Backlighting, on the other hand, can create symbolic silhouettes. Relationship between light direction and depth perception The direction of light is crucial for building three-dimensionality. Shadows and highlights created by lighting from different angles help the human eye interpret depth and form. Photos without directional contrast tend to look flat or lifeless. Types of light direction and their visual effects Frontal light: definition, advantages, and limitations Frontal light hits the subject directly from the camera’s viewpoint. It minimizes shadows, softens wrinkles and imperfections, making it popular in beauty portraits. However, it can also flatten volumes and reduce depth. Side light: adding texture and drama Side lighting is highly valued for highlighting textures and creating contrast between light and shadow. It adds depth and drama to the image. Commonly used in artistic portraits and food photography where texture is key. Backlight: silhouettes and atmospheres Backlighting points toward the camera and can create silhouettes, halos, or outline highlights. When used well, this direction adds a cinematic feel and mood. It requires balancing exposure between the background and the subject. Top and bottom lighting: special effects and symbolism Light from above simulates sunlight or ceiling lights. It’s natural but can cast shadows over the eyes. Bottom lighting is unusual and used to create eerie or surreal effects, often seen in horror films. How to identify and use light in different environments Natural light: how to make the most of it Sunlight varies throughout the day. In the morning and late afternoon, it offers soft, golden side lighting—ideal for portraits. At noon, light is harsh and overhead. Windows can serve as natural side light sources depending on the time of day. Artificial light: control and repeatability Artificial light offers full control over intensity, color, and direction. It can be shaped using softboxes, reflectors, or snoots. In studio setups, it’s common to use three lights: key light (main), fill light (softens shadows), and back light (creates separation), each from a different direction. Mixing light sources: when and how to balance them Environments with both natural and artificial light require attention to color temperature. The direction of each light source must match the creative intent. Use gels, diffusers, and reflectors to balance mixed lighting effectively. Techniques to control light direction Positioning the subject and light source Moving the subject relative to the light source is the simplest way to change light direction. Small adjustments can make big differences in shadow, volume, and texture. Using reflectors, diffusers, and flags Reflectors fill shadows without changing the light’s direction. Diffusers soften harsh light. Flags block or redirect light, creating contrast. These tools give photographers greater technical control. Tips to create specific effects with light direction Practical cases and applied examples Portrait with soft side light A 45° side light with a diffuser produces gentle shadows that enhance facial features. Ideal for emotional or editorial portraits. Product shot with dimensional lighting To highlight products, use side key light and a soft backlight to separate the subject from the background. This emphasizes volume and detail perception. Rim light in the studio Rim light (or kicker light) is placed behind and slightly to the side of the subject. It outlines the shoulders and hair, separating the subject from the background without lighting the face directly. Common mistakes and how to avoid them Poorly positioned light that flattens the subject Avoid direct frontal light without diffusion—it removes natural shadows that convey depth. Excessive contrast or unresolved shadows When the light is too harsh, shadows can become distracting. Use reflectors or adjust the light angle to fix this. Mastering light direction to create memorable images Understanding and applying the direction of light in photographic composition is a skill that sets amateurs apart from professionals. The right direction transforms an ordinary scene into a powerful visual statement. Study the work of photography masters, experiment with different light sources and angles, observe how light interacts with real-world scenes. When well-directed, light becomes a visual language. And mastering this language is essential for anyone aiming to tell unforgettable visual stories.
Simple and Affordable Lighting Setup
Introduction Setting up a simple and affordable lighting setup at home is easier than it seems. With creativity and basic knowledge, it’s possible to achieve professional results using accessible resources. In this article, we’ll show you how to create a well-lit environment for photography or videos using low-cost materials. The goal is to democratize access to quality lighting, even on a limited budget. Both beginners and professionals will find practical tips to assemble a functional and efficient setup without leaving home. The importance of lighting in photography How light transforms the image Light is the main element in any photograph. It defines shapes, textures, volumes, and even the mood of the image. Good lighting enhances the photographed subject and makes post-editing easier. In controlled lighting environments, it’s easier to maintain visual consistency between different sessions. Natural light vs. artificial light Natural light is abundant and free, but also unstable. Artificial light, on the other hand, offers complete control: intensity, direction, and temperature. A simple and affordable lighting setup can combine both sources for greater versatility. At times like early morning or late afternoon, natural light reaches its ideal point, offering soft and diffused lighting. Accessible materials to get started Essential equipment To build your basic setup, you’ll need: Efficient homemade solutions Everyday objects can replace expensive gear. For example: Step-by-step setup guide Choosing the location Choose a room with light-colored walls, good ventilation, and access to natural light. This reduces the need for artificial lighting and improves light diffusion. Avoid rooms with many colored walls, as they may affect the image’s color temperature. Light positioning Controlling shadows and reflections Use diffusers to avoid harsh shadows. If the photographed surface is reflective, adjust the light angle or apply filters to reduce excessive glare. Position elements at different distances from the background to add depth and eliminate unwanted shadows. Tips to enhance lighting on a budget Economical LED lighting White LED lamps (5500K) are ideal for photography. They don’t overheat, have good durability, and consume little power. Rechargeable versions are great for mobile setups and save money in the long run. DIY reflectors and modifiers Use white poster board as a reflector or foam board to fill shadows. A regular white umbrella can act as a diffuser when placed between the light and the subject. You can also use an opened milk carton as a homemade light directional tool. Support apps Free apps like Lux Light Meter or LightMeter help evaluate light intensity. This way, you can fine-tune exposure even without professional gear. Many of these apps simulate light meters and suggest aperture and ISO settings based on ambient readings. Practical setup examples For portraits Soft side lighting, reflector on the opposite side, neutral background. Use a desk lamp with parchment paper to diffuse light. Position the model one meter away from the wall to avoid harsh background shadows. For videos and live streams Frontal lighting at eye level, diffuser to reduce skin shine, and softly lit background for depth. A secondary light in the background can help separate the speaker from the environment. For product photography Use top and side lighting with a white background and side reflectors. This highlights the object and eliminates harsh shadows. Try shooting inside a homemade lightbox made from cardboard and parchment paper. Common mistakes to avoid Master lighting with simplicity With planning and creativity, it’s possible to build a simple and affordable lighting setup and still produce professional-quality images. The key lies in controlling light—not in how much you spend. Try different configurations, observe the results, and adjust as needed. Good lighting is within your reach. You just need to know where to position it, how to diffuse it, and when to test it. Now it’s your turn!


